Dokumentacja aplikacji App documentation
Instrukcja aplikacji RENTSPORTS dla klientów, od założenia konta numerem telefonu do wejścia na obiekt kodem z telefonu. Każdy rozdział opisuje jeden ekran aplikacji. A guide to the RENTSPORTS app for customers, from creating an account with a phone number to opening the door with a code. Each chapter covers one screen of the app.
Obejrzyj, zanim przeczytasz
Cała rezerwacja w niecałe dwie minuty, od numeru telefonu do otwartych drzwi. Film pokazuje dokładnie te ekrany, które opisują rozdziały poniżej.
Rozdziały można klikać, a film zatrzymać w dowolnym momencie.
1. Zakładanie konta
Konto zakładasz numerem telefonu, bez hasła. System wysyła SMS-em kod weryfikacyjny, a po jego wpisaniu prosi o imię, nazwisko i adres e-mail. Ten adres jest istotny, ponieważ na niego trafiają potwierdzenia rezerwacji oraz kody do drzwi.
Krok 1: numer telefonu
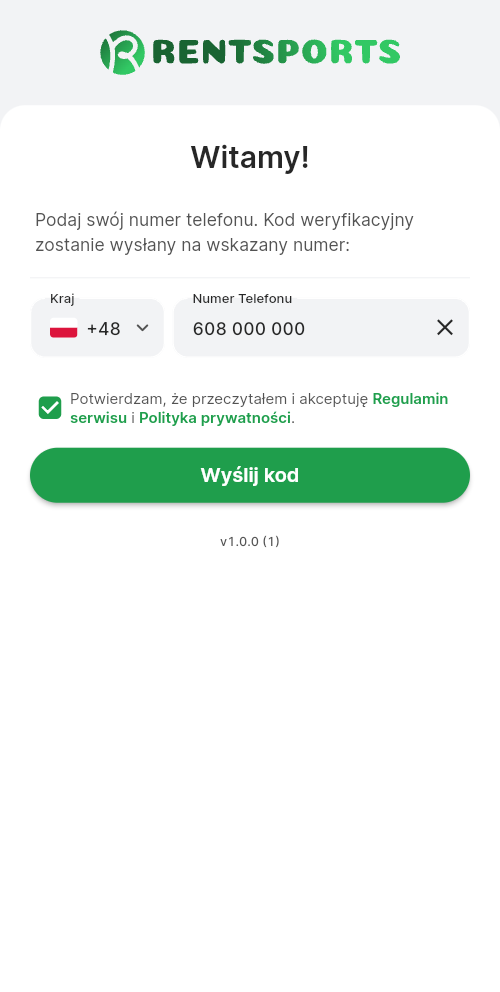
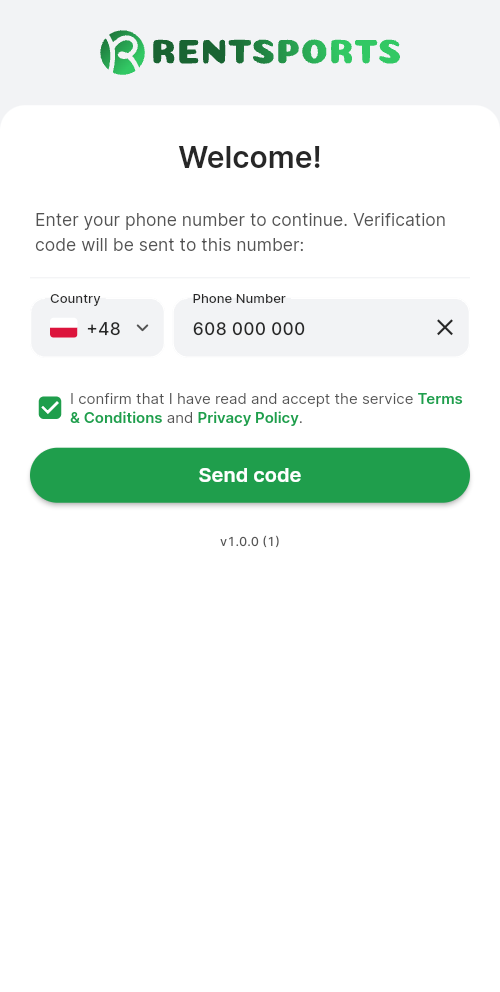
Na ekranie powitalnym wybierasz kierunkowy kraju i wpisujesz numer. Poniżej zaznaczasz zgodę na Regulamin serwisu i Politykę prywatności. Bez tej zgody przycisk Wyślij kod otwiera okno z prośbą o jej zaznaczenie. Oba dokumenty otwierają się z tego samego ekranu.
Krok 2: kod z wiadomości SMS
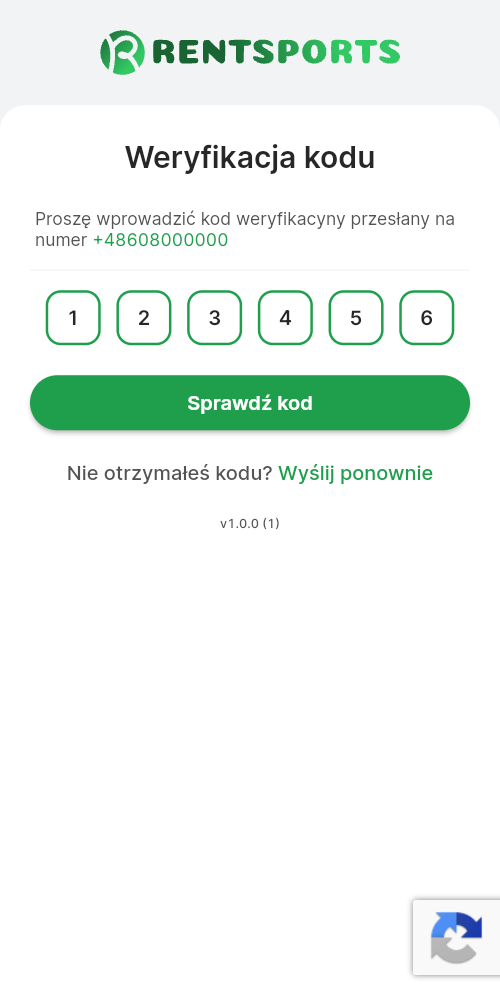
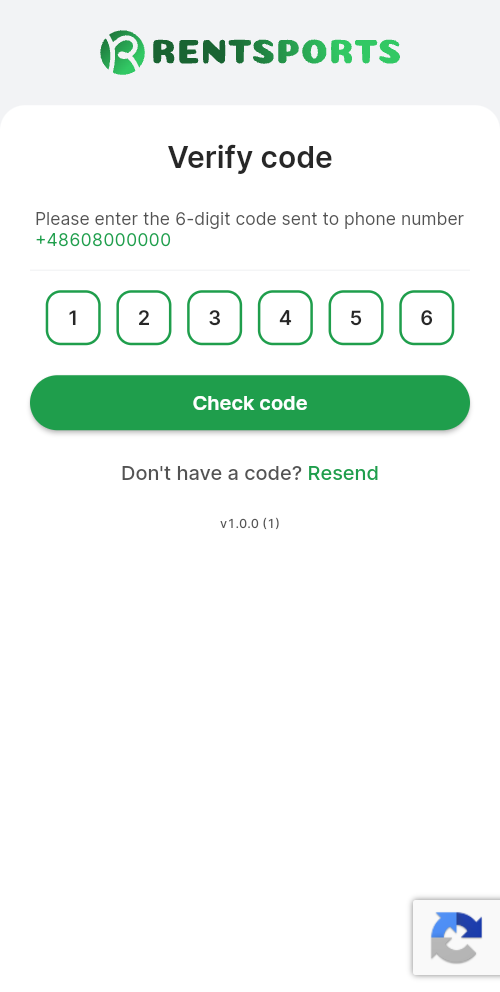
Ekran Weryfikacja kodu przyjmuje sześciocyfrowy kod przesłany na wskazany numer, a zatwierdza go przycisk Sprawdź kod. Jeśli wiadomość nie dotarła, skorzystaj z odnośnika Nie otrzymałeś kodu? Wyślij ponownie. Kod jest jednorazowy i wygasa, więc przy kolejnej próbie użyj najnowszego.
Krok 3: dane konta
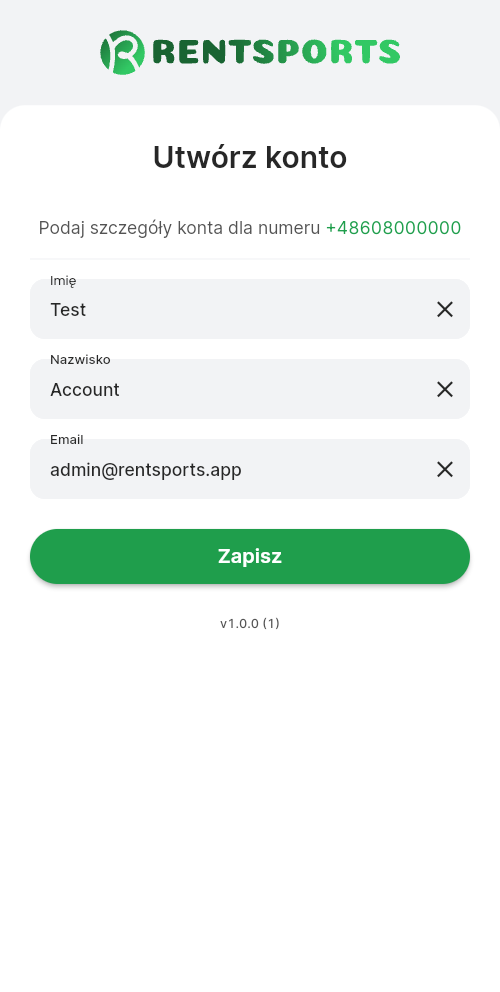
Ekran Utwórz konto pojawia się wyłącznie przy pierwszym logowaniu z danego numeru i prosi o trzy pola: imię, nazwisko oraz adres e-mail. Wszystkie są wymagane, a adres jest sprawdzany pod kątem poprawności zapisu.
Na adres e-mail przychodzą potwierdzenia rezerwacji i kody do drzwi. Literówka nie zablokuje założenia konta, ale sprawi, że wiadomości nigdy nie dojdą. Adres poprawisz później w profilu, a kod do drzwi znajdziesz także przy samej rezerwacji w aplikacji.
Kolejne logowania
Przy każdym następnym logowaniu podajesz sam numer telefonu i kod z wiadomości. Nie ma hasła do zapamiętania ani do zresetowania. Jeżeli w profilu brakuje imienia, nazwiska albo adresu e-mail, aplikacja poprosi o ich uzupełnienie przy otwieraniu obiektu z listy.
2. Szukanie obiektu
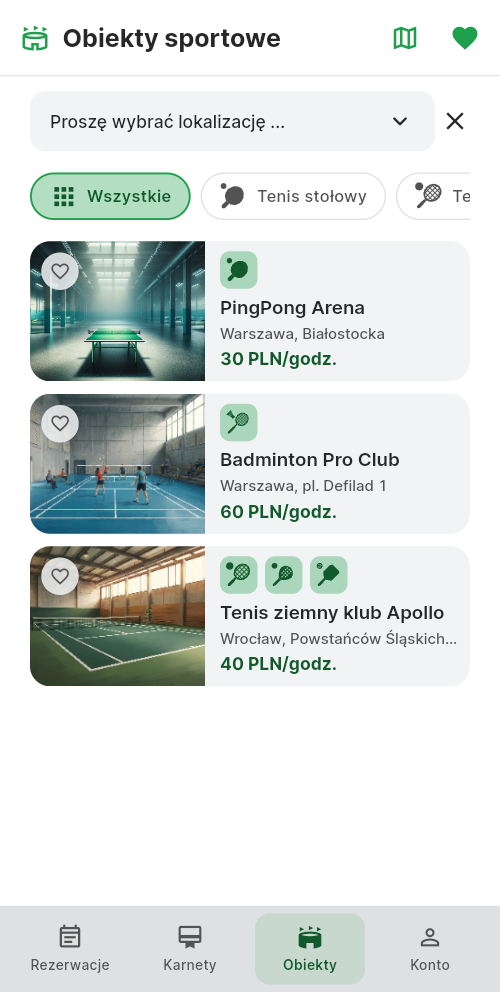
Od Obiektów sportowych zaczyna się każda rezerwacja. Widzisz tu obiekty uporządkowane według miejscowości i zawężasz listę na dwa sposoby: miejscowością albo dyscypliną. Obok masz ulubione oraz przełącznik między listą a mapą.
Lokalizacja
Pole wyboru u góry ekranu ogranicza listę do jednej miejscowości. Dopóki nie wybierzesz żadnej, widzisz wszystkie obiekty. Do wyboru są tylko miejscowości, w których jakiś obiekt jest dostępny.
Dyscypliny
Pasek ikon pod lokalizacją filtruje po dyscyplinach: tenis stołowy, tenis ziemny, badminton, squash, padel i pickleball. Wybór jest wielokrotny: zaznaczenie squasha i padla pokazuje obiekty oferujące którąkolwiek z tych dyscyplin, nie tylko te z obiema. Kafelek Wszystkie zdejmuje filtr. Pasek wymienia dyscypliny, które oferuje któryś z dostępnych obiektów.
Ulubione
Ikona serca otwiera osobny ekran Ulubione obiekty. Obiekt dodajesz i usuwasz sercem przy jego kafelku albo z jego własnego ekranu. Ulubione zapisują się przy koncie, więc masz te same na każdym urządzeniu.
Lista i mapa
Przełącznik Mapa oraz Lista zmienia sposób prezentacji tego samego, już przefiltrowanego zbioru. Na mapie każdy obiekt jest pinezką z ikoną swojej pierwszej dyscypliny, a dotknięcie pinezki otwiera szczegóły. Na mapie widać wyłącznie obiekty z ustalonymi współrzędnymi.
Gdy komplet filtrów nie zwraca nic, ekran mówi o tym wprost komunikatem „Żaden obiekt nie pasuje do wybranych filtrów”.
3. Szczegóły obiektu
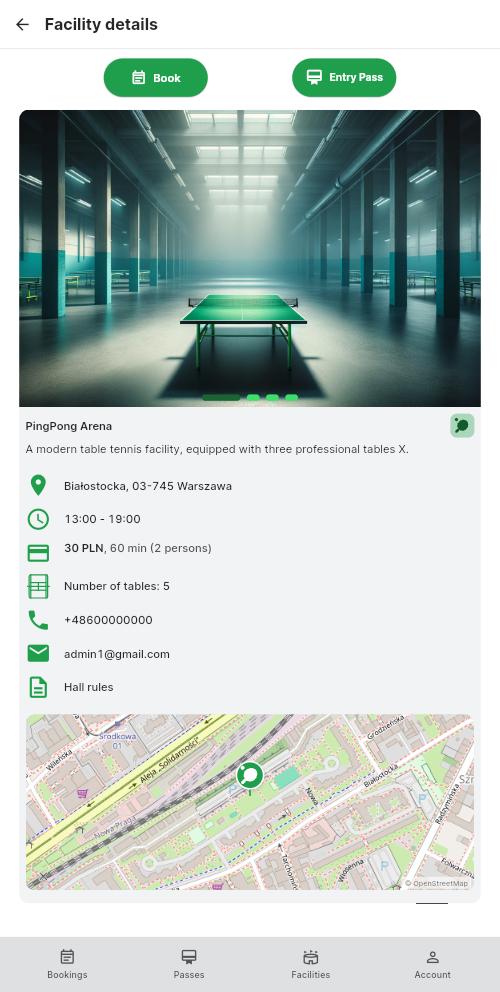
Zanim zarezerwujesz, w Szczegółach obiektu sprawdzasz wszystko, co ma znaczenie: zdjęcia, adres, dyscypliny, godziny otwarcia, cenę oraz liczbę stołów lub kortów. Stąd prowadzą dwie drogi dalej: przycisk Rezerwuj otwiera kalendarz, a Karnety listę karnetów obiektu. Przycisk karnetów pojawia się tylko wtedy, gdy obiekt ma karnety w sprzedaży.
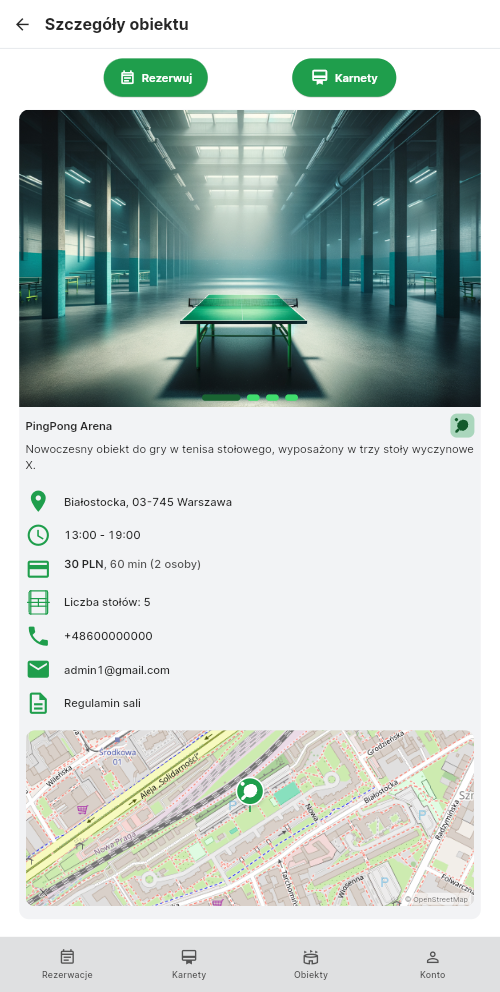
Cena i liczba osób
Cenę podaje się za jednostkę czasu ustaloną przez obiekt, na przykład „60 min (2 osoby)”. Jest to stawka orientacyjna dla dwóch osób. Przy rezerwacji kwota przelicza się na wskazaną liczbę osób i na wybraną godzinę, bo obiekt może ustawić dla niektórych godzin wyższą lub niższą stawkę. Dopuszczalną liczbę osób ustala obiekt.
Informacje od obiektu
Jeśli obiekt dodał własne uwagi, na przykład o wejściu, parkingu czy obuwiu, zobaczysz je po otwarciu potwierdzonej rezerwacji. Ta sama treść trafia do wiadomości z potwierdzeniem, jako akapit zatytułowany „Uwaga”.
Regulamin obiektu
Jeśli obiekt udostępnił link do własnego regulaminu, znajdziesz go w szczegółach obiektu, a przy płatności obok Regulaminu serwisu i Polityki prywatności. Regulamin obiektu opisuje zasady i parametry działania konkretnego obiektu, odrębnie od Regulaminu serwisu RENTSPORTS.
Mapa i dojazd
Obiekt z ustalonymi współrzędnymi pokazuje mapę z własną pinezką, w miejscu wskazanym przez obiekt.
4. Rezerwacja
Ekran Kalendarz pokazuje jeden dzień naraz, a dzień wybierasz z paska tygodnia u góry, przesuwanego na boki. Niżej widnieją godziny otwarcia i cena, a pod nimi siatka dostępnych godzin. Zaznaczasz w niej tyle godzin, ile chcesz grać, a obok wybierasz stół lub kort.
Wybór godzin
Dostępne są wyłącznie terminy, które obiekt wystawił w swoim grafiku i których nikt jeszcze nie zajął. Godzina pozostaje do wzięcia do samego swojego końca, więc slot trwający jeszcze kwadrans nadal da się zarezerwować. Można zaznaczyć kilka godzin naraz, a cena sumuje się w polu Cena całkowita.
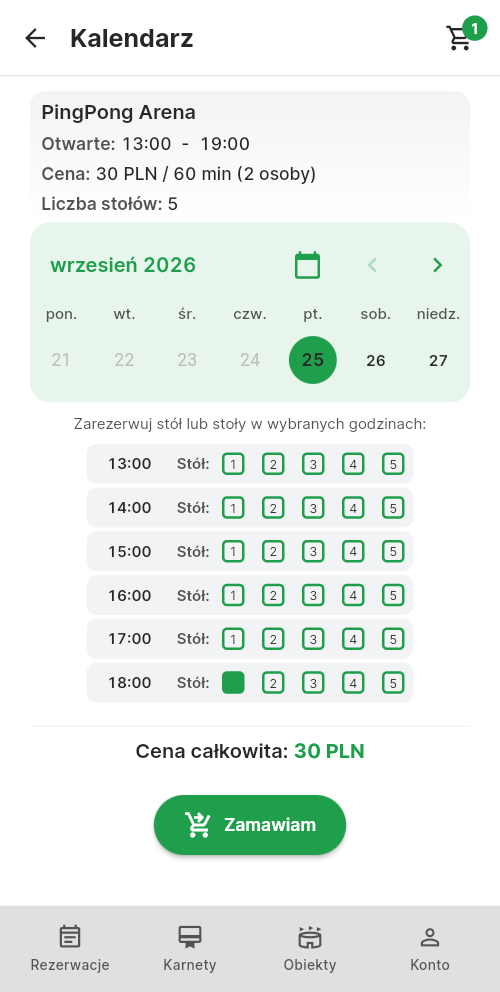
Stół lub kort
Gdy obiekt ma więcej niż jedno stanowisko, wybierasz konkretne. Stanowiska zajęte w danej godzinie nie są pokazywane.
Liczba osób
Zakres liczby osób ustala obiekt, a aplikacja pozwala wybrać tylko wartość z tego zakresu.
Ograniczenia, które mogą Cię dotyczyć
- Okno rezerwacji. Obiekt decyduje, jak daleko w przyszłość przyjmuje rezerwacje. Poza tym oknem kalendarz nie pokaże żadnych terminów.
- Limit rezerwacji na dzień. Obiekt może ograniczyć liczbę rezerwacji jednego klienta w obrębie jednego dnia. Wartość zero oznacza brak limitu.
- Czas na opłacenie. Nieopłacona rezerwacja blokuje termin tylko przez czas ustalony przez obiekt, po czym termin wraca do puli.
Przycisk Zamawiam przenosi do podsumowania zamówienia.
5. Płatność
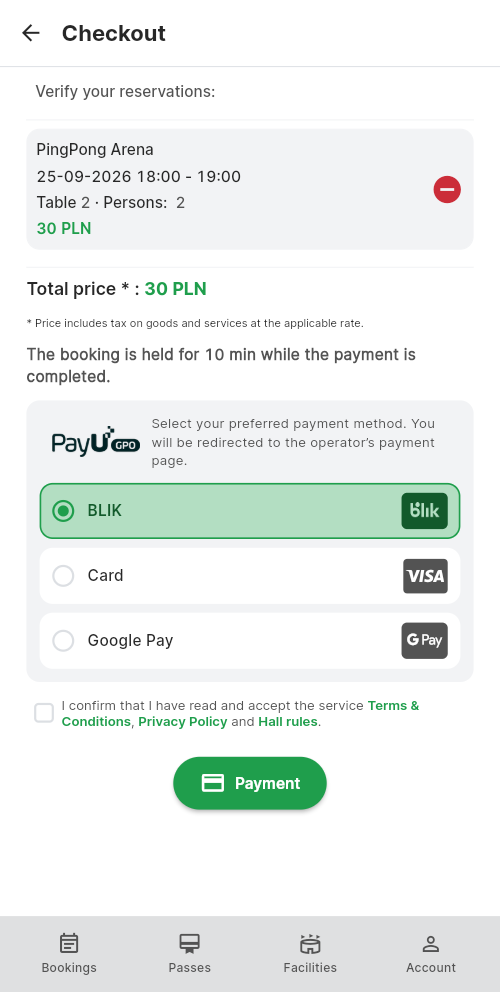
W Zamówieniu sprawdzasz, za co płacisz: każdą rezerwację z datą, godziną, stołem i liczbą osób, a pod spodem cenę całkowitą. Cena zawiera podatek od towarów i usług zgodnie z obowiązującą stawką. Przed zapłatą potwierdzasz zapoznanie się z Regulaminem serwisu i Polityką prywatności, a jeśli obiekt udostępnił własny regulamin sali, także z nim.
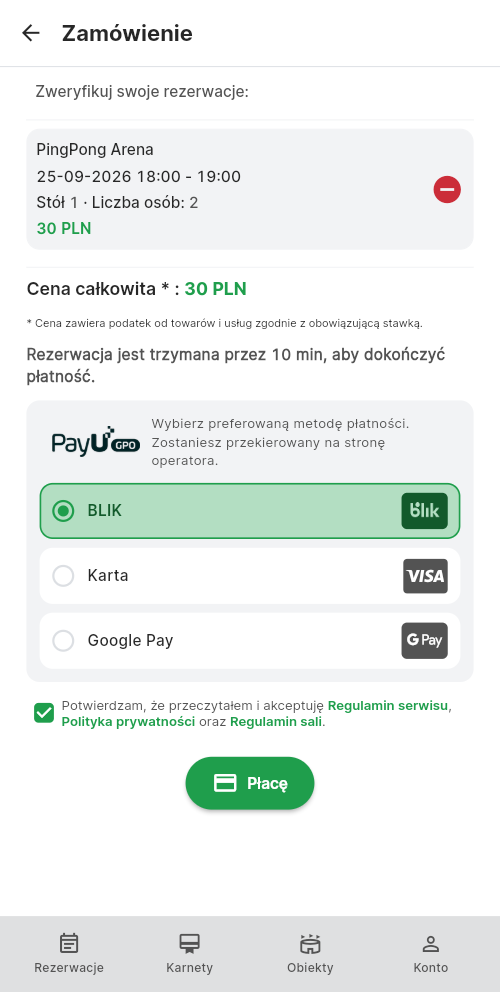
Przebieg płatności
Przycisk Płacę przekazuje zamówienie operatorowi płatności PayU. Po zakończeniu płatności wracasz do aplikacji, która potwierdza zakończenie transakcji i przenosi Cię do listy rezerwacji. Czy płatność doszła do skutku, sprawdzisz przy samej rezerwacji albo w historii transakcji.
Termin jest Twój dopiero po zaksięgowaniu płatności. Wcześniej rezerwacja ma status oczekującej i blokuje slot jedynie przez czas na opłacenie, ustalony przez obiekt. Po jego upływie termin wraca do puli i może go zająć ktoś inny.
Płatność przerwana
Jeśli płatność się nie dokończyła, transakcja zostaje w historii ze statusem oczekującym, a jej szczegóły udostępniają przycisk Wznów płatność. Prowadzi on do tego samego zamówienia, bez wybierania godzin od nowa. Ma to sens dopóki rezerwacja nie wygasła.
Obiekty rozliczające się na miejscu
Nie każdy obiekt przyjmuje płatność online. Tam, gdzie tak ustalono, przycisk zamówienia nosi nazwę Zarezerwuj, rezerwacja powstaje bez płatności w aplikacji, a należność regulujesz u obiektu. Potwierdzenie takiej rezerwacji zawiera adnotację „Do uregulowania na miejscu”.
6. Karnety
Karnet to opłacona z góry pula wejść albo prawo do korzystania z obiektu przez określony czas. Karnety definiuje każdy obiekt osobno, więc karnet kupiony w jednym obiekcie nie działa w innym.
Co określa karnet
- Liczba wejść. Ile rezerwacji karnet pokryje.
- Ważność w dniach. Jak długo karnet działa, licząc od daty startu.
Oba ograniczenia obowiązują równocześnie, więc karnet na dziesięć wejść ważny 90 dni kończy się wtedy, gdy wyczerpiesz pulę albo gdy minie termin, zależnie od tego, co nastąpi wcześniej.
Zakup
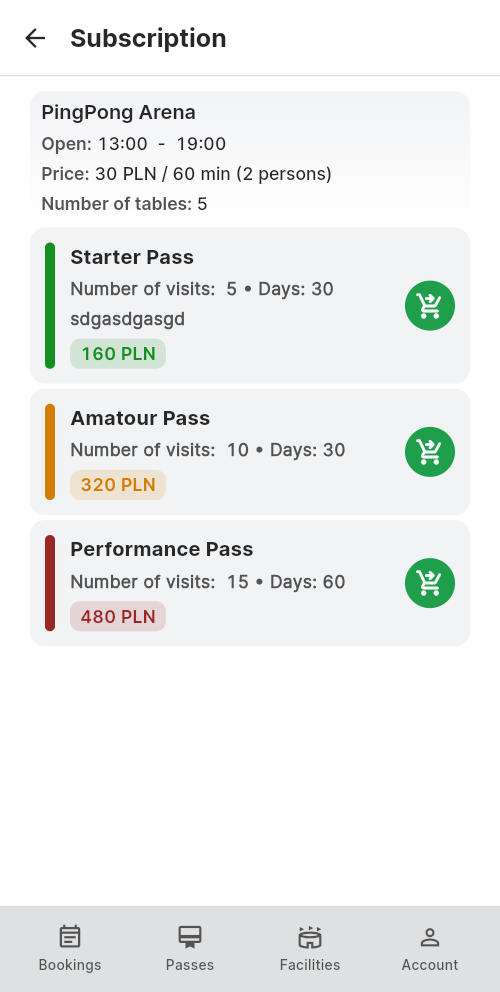
Karnety obiektu otwierasz przyciskiem Karnety na ekranie szczegółów. Zakup przechodzi tę samą ścieżkę płatności co rezerwacja, z ekranem zamówienia i potwierdzeniem regulaminu. Podsumowanie pokazuje liczbę dni, liczbę wejść oraz datę startu.
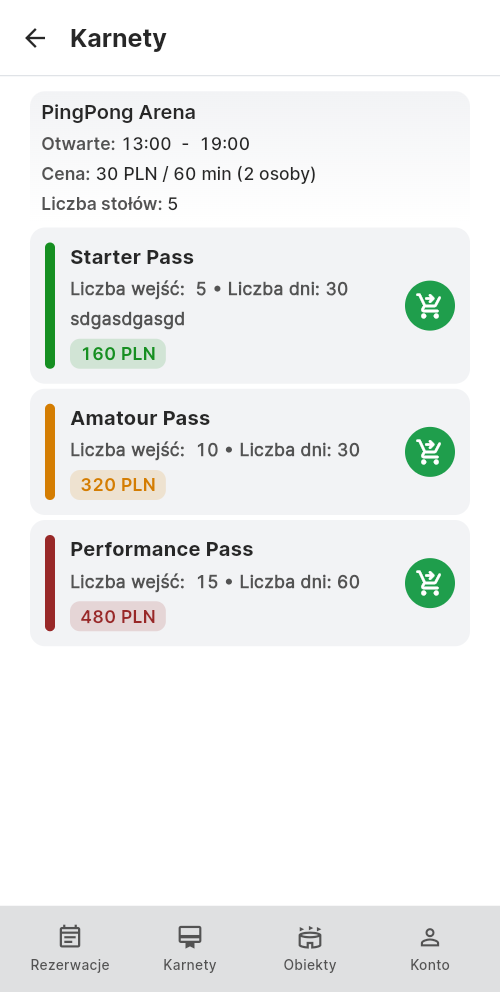
Płacenie karnetem
Gdy masz aktywny karnet obiektu, ekran zamówienia zamiast kwoty wyświetla informację, że płatność zostanie zrealizowana przy jego użyciu, wraz z terminem ważności i liczbą pozostałych wejść. Rezerwacja odlicza się z puli, a w historii transakcji widnieje przy transakcji, którą kupiono karnet, oznaczona jako opłacona karnetem.
Moje karnety
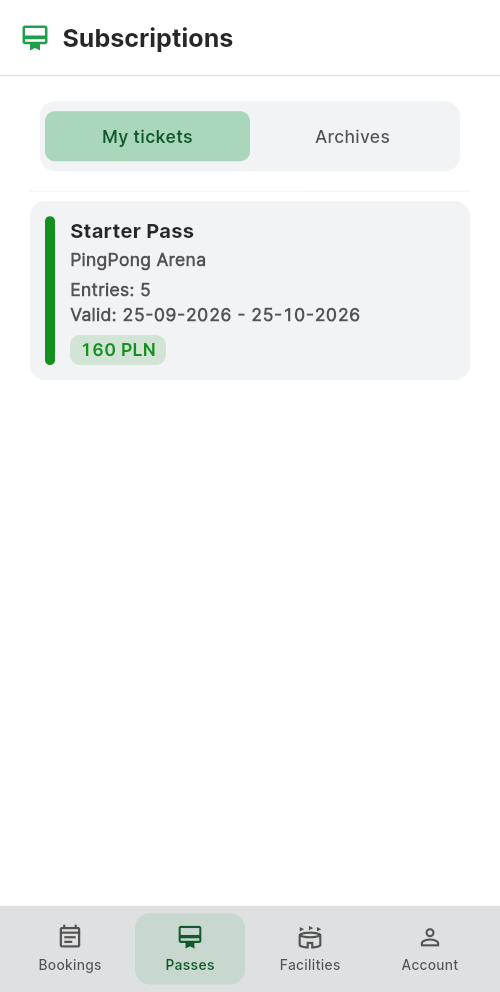
Zakładka Karnety w dolnym pasku zbiera Twoje karnety ze wszystkich obiektów i dzieli je na Moje karnety oraz Archiwum. Przy każdym widnieje termin ważności i liczba pozostałych wejść. Karnet trafia do archiwum po upływie terminu ważności; karnet z wykorzystanymi wejściami zostaje na liście do końca tego terminu.
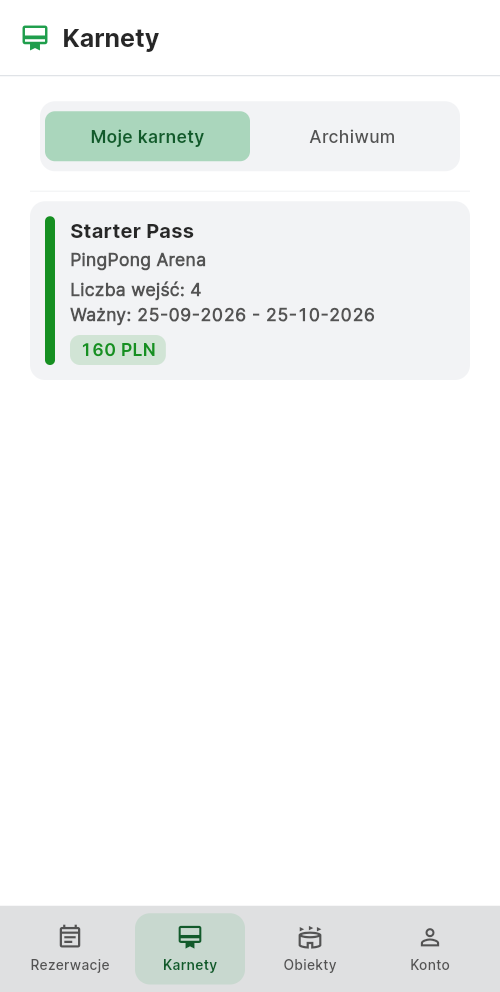
Karnety sprzedaje obiekt z włączonymi płatnościami online. W obiekcie rozliczającym się na miejscu przycisk karnetów w szczegółach obiektu się nie pojawia.
7. Moje rezerwacje
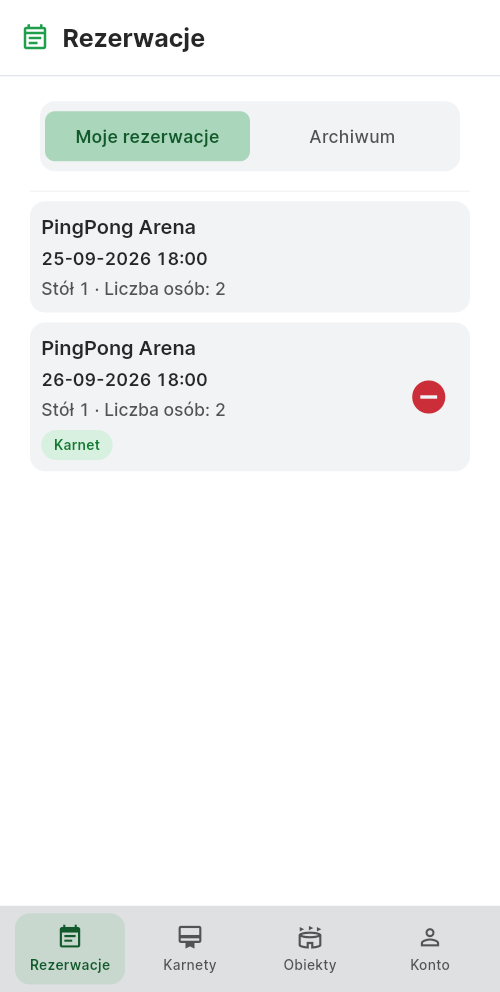
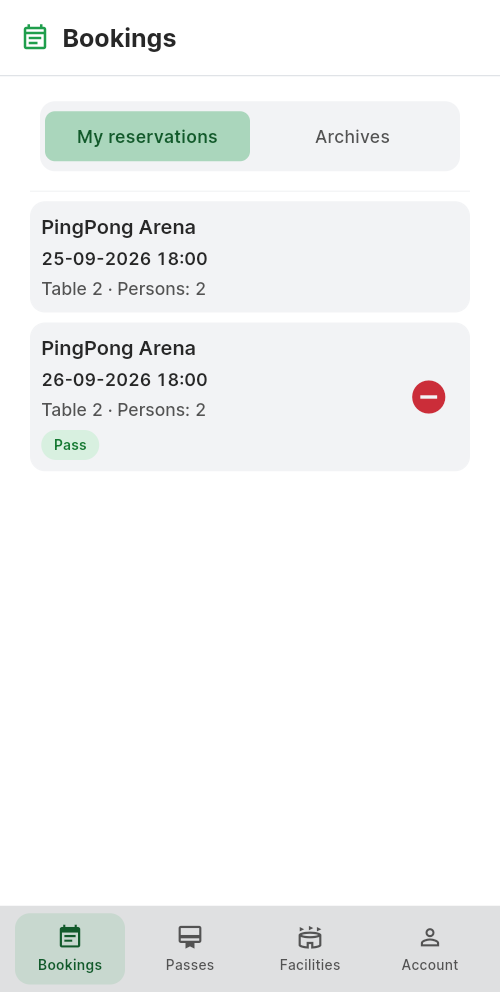
Zakładka Rezerwacje dzieli się na Moje rezerwacje oraz Archiwum. Pierwsza zawiera terminy, które jeszcze się nie skończyły, druga te, które minęły. Rezerwacja odwołana znika z obu list, ale zostaje w szczegółach swojej transakcji.
Co pokazuje pozycja listy
Każda pozycja wymienia obiekt, datę i godzinę rozpoczęcia, stół lub kort oraz liczbę osób. Jeżeli obiekt wydaje kody do drzwi, a kod nie powstał, przy pozycji widnieje oznaczenie Brak klucza, opisane w rozdziale ósmym. Sam kod zobaczysz po otwarciu rezerwacji.
Długie listy
Listy pokazują dwadzieścia pozycji naraz, a przycisk Pokaż więcej dobiera kolejne.
8. Kod do drzwi
Część obiektów działa bezobsługowo i wpuszcza gości kodem wybieranym na klawiaturze zamka. Nie dotyczy to wszystkich: obiekt z recepcją albo z własnym systemem dostępu kodów nie wydaje i wtedy ten rozdział Cię nie dotyczy.
Kiedy przychodzi kod
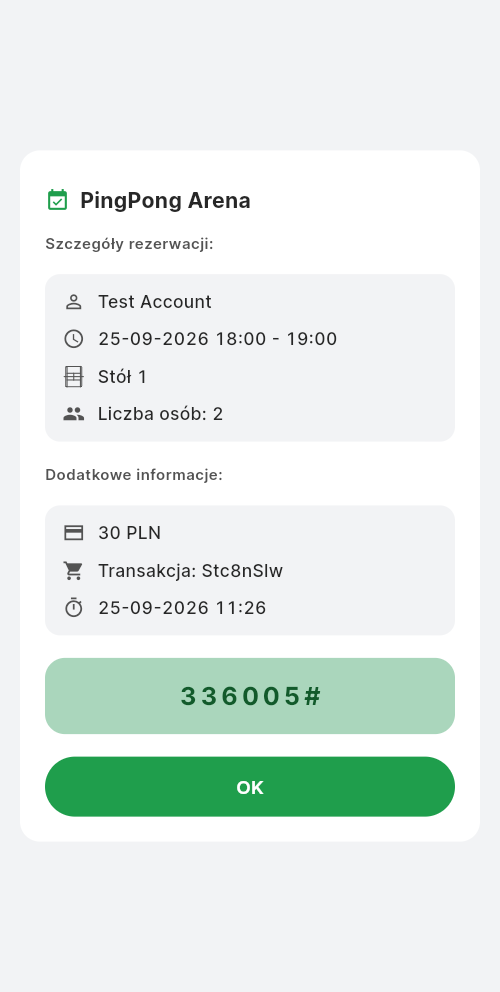
Kod powstaje po zaksięgowaniu płatności, nie w chwili złożenia rezerwacji. Trafia do wiadomości z potwierdzeniem i jest widoczny przy rezerwacji w aplikacji. Działa w godzinach Twojej rezerwacji, a obiekt może dodać kilkuminutowe wyprzedzenie na wejście i wyjście.
Otwieranie z aplikacji
Po otwarciu rezerwacji w obiekcie z zamkiem widnieje przycisk otwarcia drzwi. Pojawia się w oknie ważności rezerwacji, czyli w jej godzinach powiększonych o wyprzedzenie ustawione przez obiekt, i wymaga, żeby zamek był osiągalny zdalnie. Udane otwarcie potwierdza zmiana koloru przycisku.
Oznaczenie Brak klucza przy opłaconej rezerwacji w obiekcie wydającym kody znaczy, że kod nie powstał. Jeśli termin jest bliski, skontaktuj się z obiektem.
9. Anulowanie i zwroty
Rezerwację odwołujesz z jej własnej pozycji na liście. Termin wraca wtedy do puli obiektu i może go zająć ktoś inny.
Do kiedy można odwołać
Termin graniczny ustala obiekt i liczy się go w godzinach przed rozpoczęciem rezerwacji. Obowiązuje ten, który był aktualny w chwili składania rezerwacji, więc późniejsza zmiana zasad przez obiekt nie zmienia warunków tego, co już masz zarezerwowane.
Zwrot pieniędzy
Zwrot dotyczy rezerwacji opłaconej online i przechodzi tą samą drogą co płatność, czyli przez PayU na to samo źródło. Rezerwacja nieopłacona, która wygasła, nie generuje zwrotu, bo nic nie zostało pobrane; tak samo rezerwacja rozliczana na miejscu. Rezerwacja opłacona karnetem oddaje wejście do puli.
Po terminie granicznym przycisk odwołania znika. Nie zobaczysz go również przy rezerwacji, która nie została jeszcze opłacona.
10. Powiadomienia
W Powiadomieniach, w zakładce Konto, włączasz przypomnienia o zbliżających się rezerwacjach i ustalasz, z jakim wyprzedzeniem mają przychodzić.
Przypomnienia o rezerwacjach
Przełącznik Przypomnienia o rezerwacjach włącza powiadomienie przed początkiem rezerwacji. Przy pierwszym włączeniu system poprosi o zgodę na powiadomienia; odmowa pozostawia przełącznik wyłączony. Ustawienie należy do konta, więc obejmuje wszystkie urządzenia, na których jesteś zalogowany.
Wyprzedzenie
Po włączeniu przypomnień pojawia się wybór wyprzedzenia, od 1 do 24 godzin, ustawiany w pełnych godzinach. Ustawienie należy do konta, a nie do pojedynczej rezerwacji, więc obowiązuje wszystkie.
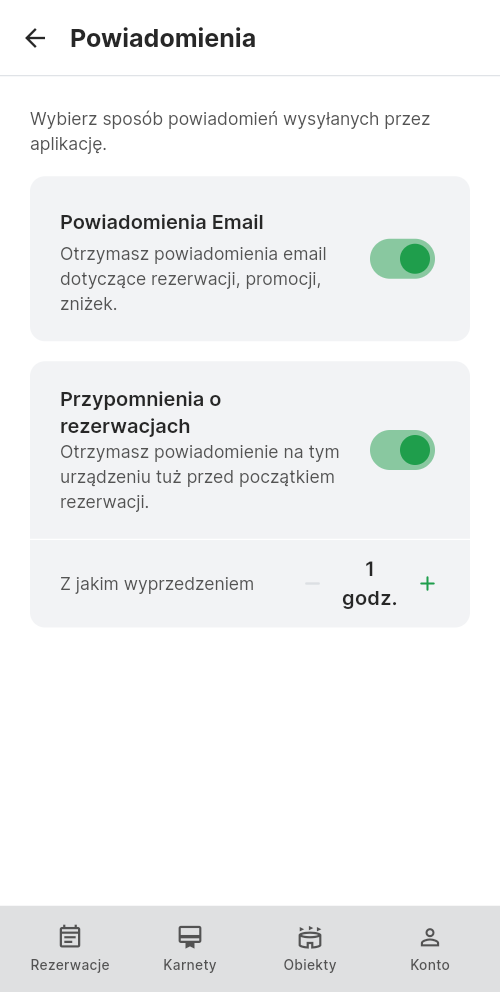
Na tym samym ekranie znajdziesz przełącznik Powiadomienia e-mail. Dopóki jest włączony, na adres z profilu przychodzą potwierdzenia rezerwacji, kody do drzwi, potwierdzenia zakupu karnetu oraz informacje o odwołaniu. Wyłączenie go zatrzymuje te wiadomości.
11. Profil i wygląd
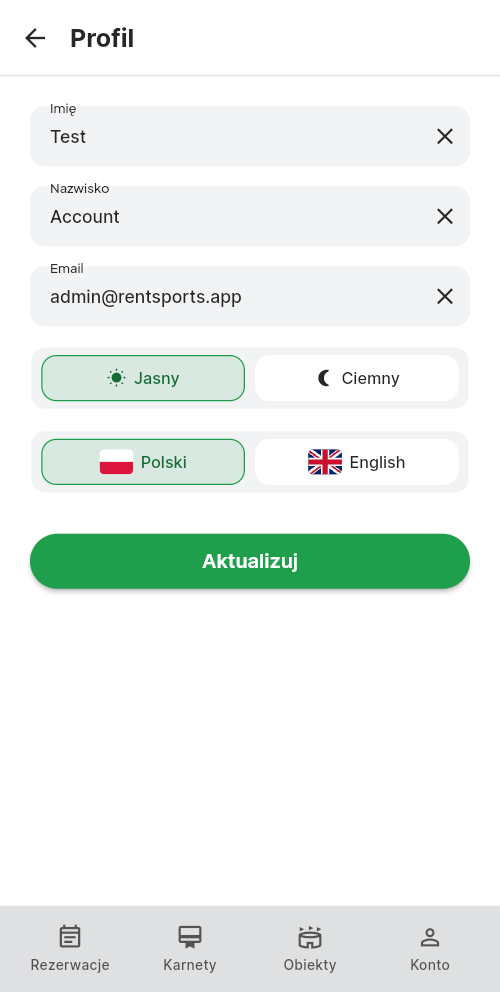
W Profilu użytkownika poprawiasz imię, nazwisko i adres e-mail, a obok przełączasz motyw i język aplikacji. Numeru telefonu nie da się zmienić, ponieważ służy do logowania.
Dane
Wszystkie trzy pola są wymagane, a adres jest sprawdzany pod kątem poprawności zapisu. Przycisk Aktualizuj zapisuje zmiany. Adres e-mail zmieniasz właśnie tutaj, jeśli przy zakładaniu konta wkradła się literówka.
Motyw
Przełącznik Jasny i Ciemny zmienia wygląd aplikacji. Wybór zostaje zapamiętany na urządzeniu, więc aplikacja uruchamia się w nim przy kolejnych wejściach.
Język
Do wyboru są polski i angielski. Zmiana działa od razu, bez zapisywania przyciskiem, i obejmuje nie tylko ekrany aplikacji, ale też język wiadomości, które wysyła system.
12. Transakcje
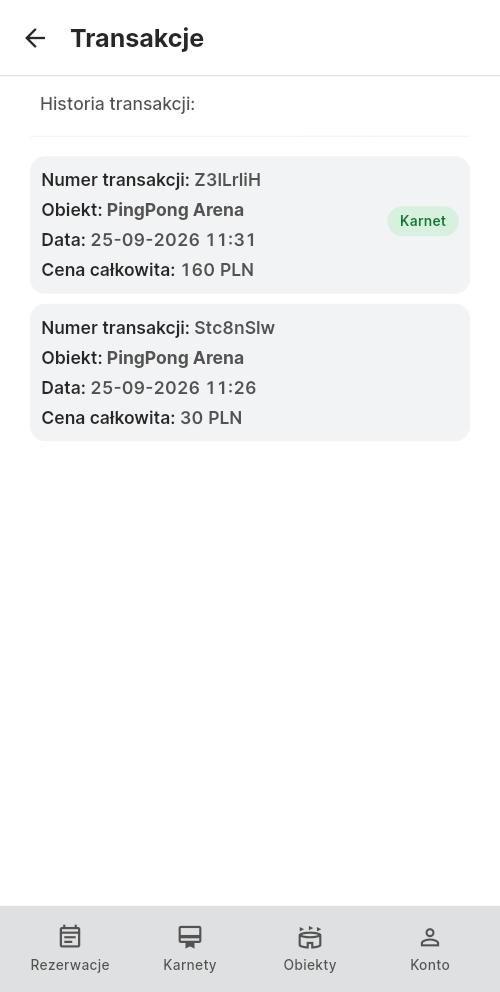
W Transakcjach, w zakładce Konto, znajdziesz historię swoich wpłat, od najnowszej. Przy każdej stoi numer transakcji, obiekt, data i zapłacona kwota.
Szczegóły transakcji
Po otwarciu pozycji widzisz dodatkowo status płatności oraz wykaz rezerwacji objętych tą transakcją, każda z datą, stołem, liczbą osób i ceną. Rezerwacja odwołana jest w tym wykazie wyraźnie oznaczona, więc widać, za co faktycznie zapłaciłeś i co zostało zwrócone.
Transakcja nieopłacona
Transakcja ze statusem oczekującym udostępnia przycisk Wznów płatność, opisany w rozdziale piątym.
13. Zarządzanie kontem
W zakładce Konto znajdziesz to, co dotyczy Ciebie, a nie pojedynczej rezerwacji: profil, powiadomienia, transakcje, dokumenty oraz dwie operacje na samym koncie.
Regulaminy i polityki
Pozycja Regulaminy i polityki otwiera Regulamin serwisu i Politykę prywatności, czyli dokumenty wspólne dla całego RENTSPORTS. Regulamin konkretnego obiektu, jeśli został udostępniony, znajdziesz w jego szczegółach albo przy płatności za rezerwację w tym obiekcie, nie w tym miejscu.
Wylogowanie
Wylogowanie kończy sesję na tym urządzeniu. Konto, rezerwacje i karnety pozostają nietknięte; wracasz do nich, logując się ponownie tym samym numerem.
Usunięcie konta
Pozycja Usuń konto prosi o potwierdzenie i usuwa Twoje konto wraz z danymi profilu oraz możliwością logowania. Jest to operacja nieodwracalna, więc rozważ ją dopiero po wykorzystaniu lub odwołaniu aktywnych rezerwacji i karnetów. Rozliczone rezerwacje i transakcje pozostają w dokumentacji obiektów, w których je złożyłeś. Jeśli ostatnie logowanie było dawno, aplikacja poprosi o ponowne zalogowanie przed usunięciem.
Usunięcie konta nie jest tym samym co wylogowanie. Wylogowanie odkładasz na później bez żadnych skutków, usunięcia nie da się cofnąć.
14. Typowe problemy
Nie przyszedł kod SMS
Odczekaj chwilę i użyj przycisku Wyślij ponownie. Sprawdź też, czy numer i kierunkowy są wpisane poprawnie. Jeżeli wpiszesz kod ze starszej wiadomości, zostanie odrzucony; zawsze używaj najnowszego.
Nie przyszło potwierdzenie ani kod do drzwi
Najczęstszą przyczyną jest literówka w adresie e-mail. Sprawdź adres w profilu i popraw go, a potem zajrzyj do folderu z niechcianą pocztą. Pamiętaj też, że kod powstaje po zaksięgowaniu płatności, a nie w chwili rezerwacji.
Rezerwacja zniknęła przed opłaceniem
Nieopłacona rezerwacja blokuje termin wyłącznie przez czas ustalony przez obiekt. Po jego upływie termin wraca do puli. Jeśli płatność się przerwała, sprawdź w transakcjach, czy da się ją wznowić.
Kalendarz nie pokazuje żadnych terminów
Możliwe trzy przyczyny: obiekt nie wystawił grafiku na ten dzień, wszystkie godziny są już zajęte albo wybrałeś dzisiejszy dzień, a pozostałe godziny już minęły. Dni wykraczające poza okno rezerwacji nie są w kalendarzu dostępne do wyboru.
Przy rezerwacji widnieje „Brak klucza”
Jeśli obiekt w ogóle nie wydaje kodów, jest to stan normalny i wejście odbywa się inaczej. Jeśli wydaje, znaczy to, że kod nie powstał, i przy bliskim terminie warto skontaktować się z obiektem.
Nie widzę przycisku odwołania
Minął termin graniczny ustalony przez obiekt. Liczy się go w godzinach przed rozpoczęciem rezerwacji, a obowiązuje ten, który był aktualny w chwili jej składania.
Obiekt nie pojawia się na liście
Sprawdź, czy nie zawężają jej filtry: wybrana miejscowość albo zaznaczone dyscypliny. Obiekt może też być chwilowo wyłączony przez właściciela. Na mapie widać ponadto tylko obiekty z ustalonymi współrzędnymi.
15. Najczęstsze pytania
Czy muszę zakładać hasło?
Nie. Logowanie działa numerem telefonu i jednorazowym kodem z wiadomości SMS. Nie ma hasła do zapamiętania ani do zresetowania.
Czy mogę zarezerwować kilka godzin naraz?
Tak. W kalendarzu zaznaczasz dowolną liczbę dostępnych godzin, a cena sumuje się w podsumowaniu. Obiekt może natomiast ograniczyć liczbę rezerwacji jednego klienta w obrębie jednego dnia.
Kiedy termin jest pewny?
Po zaksięgowaniu płatności. Wcześniej rezerwacja jedynie blokuje slot, i to tylko przez czas na opłacenie ustalony przez obiekt.
Czy karnet działa we wszystkich obiektach?
Nie. Karnet należy do obiektu, w którym go kupiłeś, ponieważ to obiekt ustala jego cenę, liczbę wejść i okres ważności.
Co się stanie z wejściem z karnetu po odwołaniu rezerwacji?
Wraca do puli karnetu, o ile odwołanie nastąpi przed terminem granicznym obiektu.
Czy kod do drzwi zadziała po zakończeniu rezerwacji?
Nie. Kod działa w godzinach rezerwacji i wygasa sam. Obiekt może dodać kilkuminutowe wyprzedzenie na wejście i wyjście.
Czy zmiana języka zmienia też język wiadomości?
Tak. Zmiana języka w profilu obejmuje zarówno ekrany aplikacji, jak i treść wysyłanych wiadomości.
Czy muszę płacić online?
Zależy od obiektu. Część rozlicza się na miejscu; wtedy rezerwacja powstaje bez płatności w aplikacji, a potwierdzenie zawiera odpowiednią adnotację.
Czym różni się regulamin obiektu od Regulaminu serwisu?
Regulamin serwisu RENTSPORTS obowiązuje w całej aplikacji i dotyczy korzystania z niej. Regulamin obiektu, jeśli dany obiekt go udostępnił, opisuje zasady obowiązujące na terenie tego konkretnego obiektu i jest od Regulaminu serwisu odrębny.
Watch before you read
The whole booking in under two minutes, from a phone number to an open door. The film walks the same screens the chapters below describe.
The chapters are clickable and the film pauses wherever you like.
1. Creating the account
You create the account with a phone number, without a password. The system sends a verification code by text message, and once you enter it, asks for your first name, surname and email address. That address matters, because booking confirmations and door codes go to it.
Step 1: the phone number
On the welcome screen you pick a country code and type the number. Below it you accept the Terms of Service and the Privacy Policy. Without that tick, the Send code button opens a dialog asking you to accept them. Both documents open from the same screen.
Step 2: the code from the text message
The Code verification screen takes the six-digit code sent to that number, and the Check code button submits it. If the message did not arrive, use the No code? Send again link. The code is single-use and expires, so use the newest one on a second attempt.
Step 3: account details
The Create account screen appears only on the first sign-in from a given number, and asks for three fields: first name, surname and email address. All three are required, and the address is checked for a valid shape.
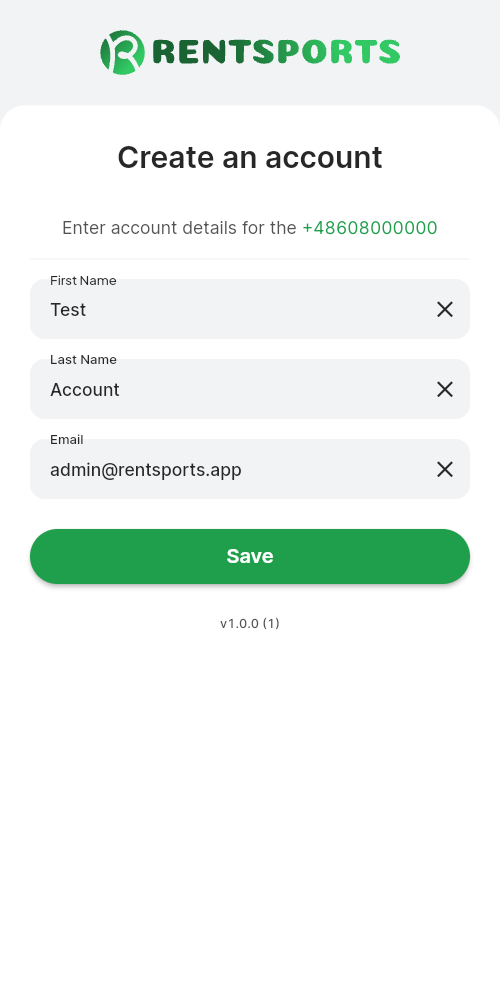
Booking confirmations and door codes arrive at your email address. A typo will not stop the account being created, but it will mean the messages never arrive. You can correct the address later in the profile, and the door code is also shown on the booking itself in the app.
Signing in later
Every later sign-in takes the phone number and a code from the message. There is no password to remember and none to reset. If the profile is missing a first name, a surname or an email address, the app asks you to fill it in when you open a venue from the list.
2. Finding a venue
The Sports facilities screen is the starting point. It lists the venues open for booking, ordered by town, and offers two ways to narrow the list: the town and the sport. Favourites and the list/map toggle sit separately.
Location
The picker at the top limits the list to one town. Until you choose one, you see every venue. Only towns with a venue available appear in it.
Sports
The row of icons below the location filters by sport: table tennis, tennis, badminton, squash, padel and pickleball. The choice is multiple: ticking squash and padel shows venues offering either of them, not only those with both. The All chip clears the filter. The row lists the sports the available venues offer.
Favourites
The heart icon opens a separate Favourite venues screen. You add and remove a venue with the heart on its tile or from its own screen. Favourites are kept with the account, so they are the same on every device.
List and map
The Map and List toggle changes how the same, already filtered set is presented. On the map each venue is a pin carrying the icon of its first sport, and tapping a pin opens its details. Only venues with coordinates set appear on the map.
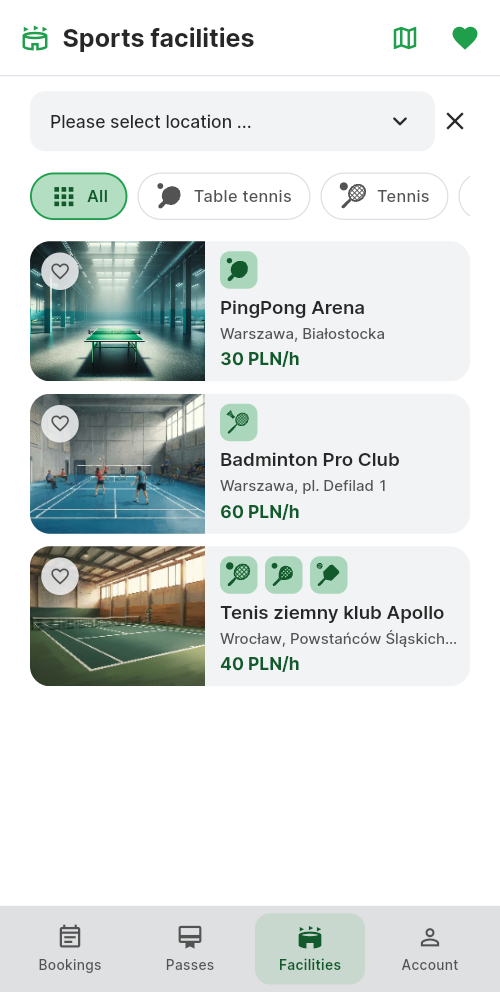
When the filters together return nothing, the screen says so plainly with "No facility matches the selected filters".
3. Venue details
The Facility details screen gathers everything worth knowing before booking: photos, address, sports, opening hours, price and the number of tables or courts. Two routes lead on from here: Book opens the calendar, and Entry Pass the venue's passes. The passes button appears only when the venue has passes on sale.
Price and party size
The price is given per the unit of time the venue set, for example "60 min (2 people)". That is an indicative rate for two people. At booking the amount is recalculated for the party size you choose and for the hour you pick, since a venue may set a higher or lower rate for particular hours. The party size allowed is set by the venue.
Notes from the venue
If the venue added notes of its own, about the entrance, parking or footwear, you see them when you open a confirmed booking. The same text goes into the confirmation message as a paragraph headed "Note".
Venue rules
If the venue published a link to its own rules, you will find it in the venue details, and at checkout alongside the Terms & Conditions and Privacy Policy. The venue's own rules describe that specific venue's operating rules and parameters, separately from RENTSPORTS' own Terms & Conditions.
Map and getting there
A venue with coordinates set shows a map with its own pin, at the point the venue picked.
4. Booking
The Calendar screen shows one day at a time, and you pick the day from the week strip at the top, swiped sideways. Below it sit the opening hours and the price, and under them the grid of available hours. You mark as many hours as you want to play, and pick a table or court beside it.
Choosing the hours
Only the slots the venue published in its schedule, and that nobody has taken, are available. An hour stays available right up to its own end, so a slot with a quarter of an hour left can still be booked. Several hours can be marked at once, and the price adds up in the Total price field.
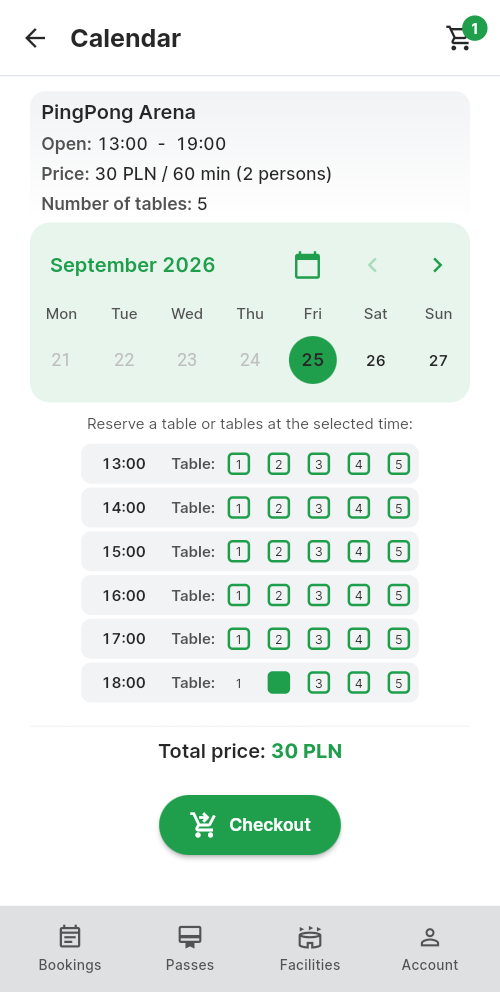
Table or court
Where the venue has more than one, you pick a specific one. Those taken in that hour are not shown.
Party size
The party size range is set by the venue, and the app only lets you pick a value inside it.
Limits that may apply to you
- Booking window. The venue decides how far ahead it takes bookings. Beyond that window the calendar offers no slots at all.
- Bookings per day. A venue may cap how many bookings one customer holds within a single day. Zero means no cap.
- Time to pay. An unpaid booking holds its slot only for the time the venue set, after which the slot returns to the pool.
The Order button leads to the order summary.
5. Payment
The Order screen is where you check what you are paying for: every booking with its date, hour, table and party size, and the total underneath. The price includes VAT at the applicable rate. Before paying you confirm that you have read the Terms & Conditions and the Privacy Policy, and, where the venue has published its own rules, those too.
How payment runs
The Payment button hands the order to the PayU payment provider. Once the payment is finished you return to the app, which confirms that the transaction has ended and takes you to your bookings. Whether the payment went through is shown on the booking itself and in the transaction history.
The slot is yours only once the payment has cleared. Until then the booking is pending and holds the slot only for the time to pay set by the venue. After that it returns to the pool and somebody else may take it.
An interrupted payment
If a payment did not finish, the transaction stays in the history as pending, and its details offer a Resume payment button. It leads back to the same order, with no need to choose the hours again. This works for as long as the booking has not expired.
Venues that settle on site
Not every venue takes payment online. Where it is set up that way, the order button reads Reserve, the booking is made without paying in the app, and you settle with the venue. The confirmation for such a booking carries the note "Payable on site".
6. Passes
A pass is a prepaid pool of entries, or the right to use a venue for a set period. Each venue defines its own passes, so a pass bought at one venue does not work at another.
What a pass sets
- Entries. How many bookings the pass covers.
- Validity in days. How long the pass works, counted from its start date.
Both limits apply at once, so a ten-entry pass valid for 90 days ends when you use the pool up or when the date passes, whichever comes first.
Buying one
The venue's passes open from the Passes button on its details screen. Buying follows the same payment route as a booking, with an order screen and the terms to confirm. The summary shows the number of days, the number of entries and the start date.
Paying with a pass
When you hold an active pass for the venue, the order screen shows, instead of an amount, that the payment will be made with it, along with its validity and the entries left. The booking comes off the pool, and in the transaction history it sits under the transaction that bought the pass, marked as paid by pass.
My passes
The Passes tab in the bottom bar collects your passes from every venue and splits them into My passes and Archive. Each one shows its validity and the entries left. A pass moves to the archive once its validity ends; a pass whose entries are used up stays on the list until then.
A venue with online payments switched on sells passes. At a venue settling on site the passes button does not appear on the venue details.
7. My bookings
The Bookings tab splits into My bookings and Archive. The first holds slots that have not ended yet, the second those that have passed. A cancelled booking leaves both lists, but stays in the details of its transaction.
What a row shows
Every row names the venue, the date and start time, the table or court and the party size. If the venue issues door codes and no code was created, the row carries a No key marker, covered in chapter eight. The code itself is shown when you open the booking.
Long lists
Lists show twenty rows at a time, and the Show more button fetches the next ones.
8. The door code
Some venues run unattended and let people in with a code typed on the lock's keypad. This does not apply everywhere: a venue with a reception or its own access system issues no codes, and then this chapter does not concern you.
When the code arrives
The code is created once the payment has cleared, not when the booking is made. It goes into the confirmation message and shows against the booking in the app. It works during your booked hours, and the venue may add a few minutes' leeway at each end.
Opening from the app
When you open a booking at a venue with a lock, it carries a button that opens the door. It appears within the booking's window, that is its hours plus the leeway the venue set, and it needs the lock to be reachable remotely. A successful opening is confirmed by the button changing colour.
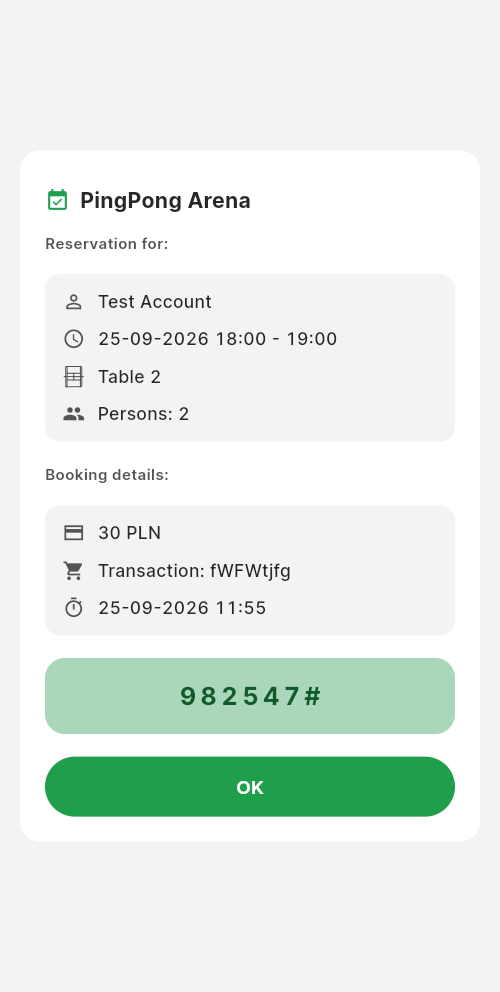
The marker No key on a paid booking at a venue that does issue codes means the code was not created. If the slot is close, contact the venue.
9. Cancelling and refunds
You cancel a booking from its own row in the list. The slot then returns to the venue's pool and somebody else may take it.
How late you can cancel
The deadline is set by the venue and counted in hours before the booking starts. The one that applies is the one in force when you made the booking, so a later change of rules by the venue does not change the terms of what you have already booked.
Getting the money back
A refund applies to a booking paid online, and travels the same route as the payment, through PayU back to the same source. An unpaid booking that expired produces no refund, because nothing was ever taken, and neither does one settled on site. A booking paid with a pass returns its entry to the pool.
After the deadline the cancel button disappears. You will not see it on a booking that has not been paid for either.
10. Notifications
Under Notifications, in the Account tab, you turn on reminders about upcoming bookings and set how far ahead they should arrive.
Booking reminders
The Booking reminders switch turns on a notification before a booking starts. The first time it is switched on, the system asks for permission; refusing leaves the switch off. The setting belongs to the account, so it covers every device you are signed in on.
How far ahead
With reminders on, a lead-time control appears, from 1 to 24 hours, set in whole hours. The setting belongs to the account rather than to a single booking, so it governs all of them.
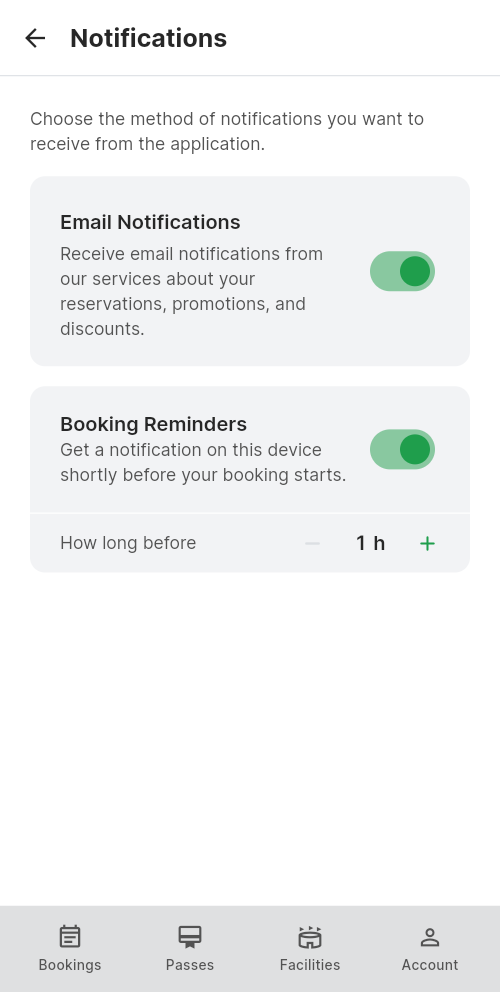
The same screen carries an Email notifications switch. While it is on, booking confirmations, door codes, pass purchase confirmations and cancellation notices arrive at the address in your profile. Turning it off stops those messages.
11. Profile and appearance
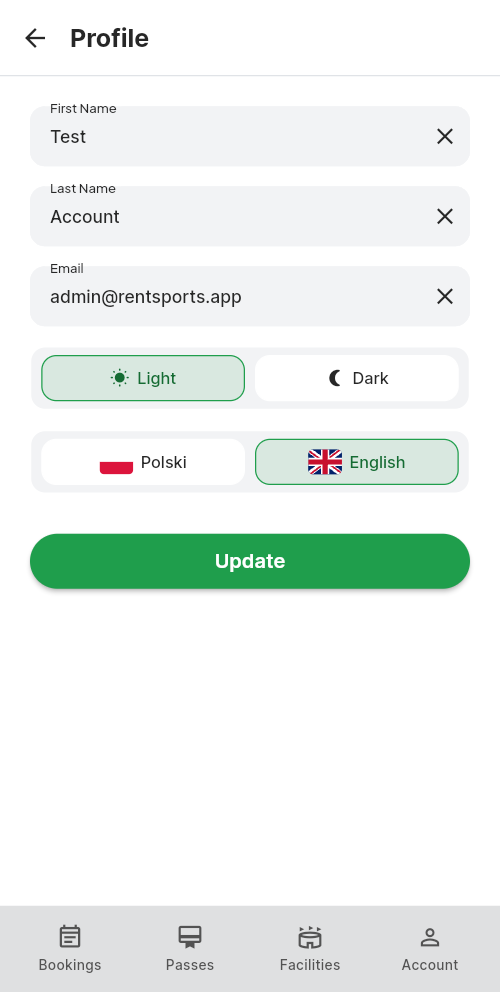
The User profile screen holds the first name, surname and email address, plus two appearance settings. The phone number cannot be changed, because you sign in with it.
Details
All three fields are required, and the address is checked for a valid shape. The Update button saves the changes. This is where you correct the email address if a typo crept in when the account was created.
Theme
The Light and Dark switch changes how the app looks. The choice is remembered on the device, so the app opens in it next time.
Language
Polish and English are available. The change takes effect at once, without pressing Update, and covers not only the app's screens but also the language of the messages the system sends.
12. Transactions
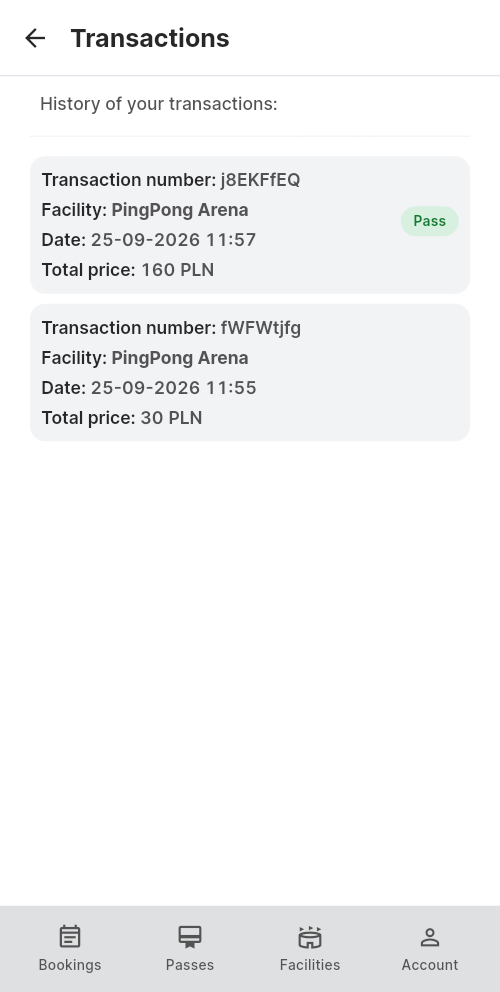
Under Transactions, in the Account tab, you find the history of your payments, newest first. Each row carries the transaction number, the venue, the date and the amount paid.
Transaction details
Opening a row adds the payment status and the list of bookings covered by that transaction, each with its date, table, party size and price. A cancelled booking is marked clearly in that list, so it is visible what you actually paid for and what was refunded.
An unpaid transaction
A transaction with a pending status offers the Resume payment button described in chapter five.
13. Managing the account
The Account tab is where you find what concerns you rather than any single booking: the profile, notifications, transactions, documents and two operations on the account itself.
Terms and policies
The Terms and policies entry opens the Terms & Conditions and Privacy Policy, the documents shared across all of RENTSPORTS. A specific venue's own rules, where published, appear in that venue's details or at checkout for a booking there, not in this entry.
Signing out
Signing out ends the session on this device. The account, the bookings and the passes are untouched; you come back to them by signing in again with the same number.
Deleting the account
The Delete account entry asks for confirmation and removes your account together with your profile details and your way of signing in. This cannot be undone, so consider it only once active bookings and passes have been used or called off. Settled bookings and transactions stay in the records of the venues you booked at. If you last signed in a while ago, the app asks you to sign in again before deleting.
Deleting the account is not the same as signing out. Signing out can be put off with no consequences at all; deletion cannot be reversed.
14. Common problems
The text message did not arrive
Wait a moment and use Send again. Check too that the number and country code are right. A code from an older message will be refused; always use the newest one.
No confirmation and no door code arrived
The usual cause is a typo in the email address. Check it in your profile and correct it, then look in the junk folder. Remember as well that the code is created once the payment clears, not when the booking is made.
The booking disappeared before I paid
An unpaid booking holds its slot only for the time the venue set. After that the slot returns to the pool. If the payment was interrupted, check the transactions to see whether it can be resumed.
The calendar shows no slots
Three possible causes: the venue published no schedule for that day, every hour is already taken, or you picked today and the remaining hours have passed. Days beyond the venue's booking window cannot be picked in the calendar at all.
The booking says "No key"
If the venue issues no codes at all, this is normal and entry works some other way. If it does issue them, the code was not created, and with the slot close it is worth contacting the venue.
There is no cancel button
The venue's deadline has passed. It is counted in hours before the booking starts, and the one that applies is the one that was in force when the booking was made.
A venue is missing from the list
Check whether the filters are narrowing it: the chosen town or the selected sports. The venue may also have been switched off by its owner for the time being. On the map, only venues with coordinates are shown.
15. FAQ
Do I need a password?
No. Signing in works with a phone number and a single-use code from a text message. There is no password to remember and none to reset.
Can I book several hours at once?
Yes. In the calendar you mark any number of available hours, and the price adds up in the summary. A venue may however cap how many bookings one customer holds within a single day.
When is the slot certain?
Once the payment has cleared. Before that the booking merely holds the slot, and only for the time to pay the venue set.
Does a pass work at every venue?
No. A pass belongs to the venue you bought it at, because that venue sets its price, its entries and its period of validity.
What happens to a pass entry when I cancel?
It returns to the pass's pool, provided the cancellation falls before the venue's deadline.
Will the door code work after the booking ends?
No. The code works during the booked hours and expires on its own. The venue may add a few minutes' leeway at each end.
Does changing the language change the messages too?
Yes. Changing the language in the profile covers both the app's screens and the text of the messages sent to you.
Do I have to pay online?
It depends on the venue. Some settle on site; the booking is then made without paying in the app, and the confirmation says so.
How is a venue's own rules different from the Terms & Conditions?
RENTSPORTS' own Terms & Conditions apply across the whole app and cover using it. A venue's own rules, where that venue has published them, describe the rules that apply on that specific venue's own premises and are separate from the Terms & Conditions.