Dokumentacja panelu Panel documentation
Instrukcja panelu administratora RENTSPORTS, od założenia konta do pierwszej w pełni automatycznej rezerwacji. Każdy rozdział opisuje jeden ekran panelu. A guide to the RENTSPORTS admin panel, from creating the account to the first fully automatic booking. Each chapter covers one screen of the panel.
1. Zakładanie konta klienta
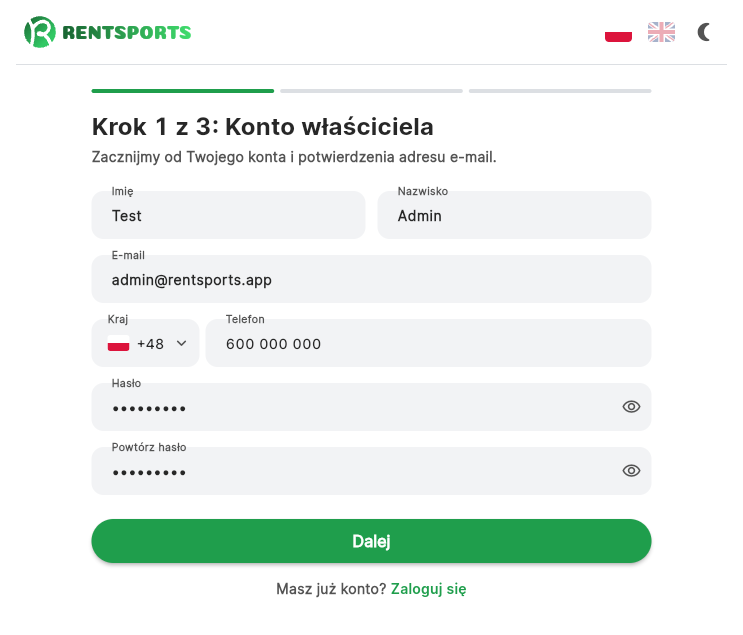
Konto zakładasz samodzielnie, bez kontaktu z nami. Kreator prowadzi przez trzy kroki: konto właściciela wraz z potwierdzeniem adresu e-mail, dane klienta oraz subskrypcję zakończoną płatnością. Pasek postępu u góry ekranu wskazuje bieżący krok.
Krok 1: konto właściciela
W tym kroku zakładasz konto osoby, która będzie właścicielem firmy w systemie. Konto właściciela ma najwyższe uprawnienia: obejmuje dane klienta i subskrypcję, pozwala dodawać obiekty oraz nadawać dostęp administratorom.
- Imię i Nazwisko.
- E-mail w poprawnym formacie. Jeśli konto o tym adresie już istnieje, kreator wyświetli komunikat o nieudanym utworzeniu konta.
- Telefon z numerem kierunkowym kraju.
- Hasło liczące co najmniej 8 znaków, zawierające małą literę, wielką literę, cyfrę i znak specjalny, oraz jego powtórzenie. Przełącznik „Pokaż hasło” odsłania wpisywaną treść.
Po zatwierdzeniu formularza system tworzy konto i wysyła wiadomość z linkiem weryfikacyjnym. Kreator czeka na ekranie potwierdzenia i przechodzi dalej sam, gdy klikniesz link. Masz tam też trzy przyciski: ponowne wysłanie wiadomości, dostępne co 30 sekund, Sprawdziłem, kontynuuj oraz Popraw adres e-mail, jeśli podałeś zły adres.
Podaj adres firmowy, nie prywatny. Adres właściciela pełni jednocześnie funkcję loginu i odbiera powiadomienia o rozliczeniach.
Jeśli wiadomość weryfikacyjna nie dociera, sprawdź folder ze spamem. Link możesz wysłać ponownie z tego samego ekranu.
Krok 2: dane klienta
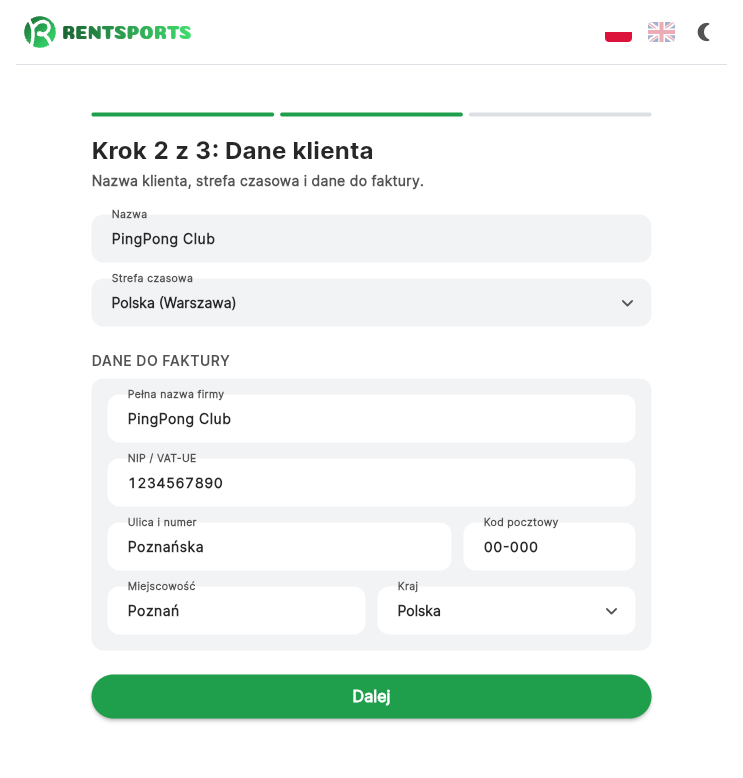
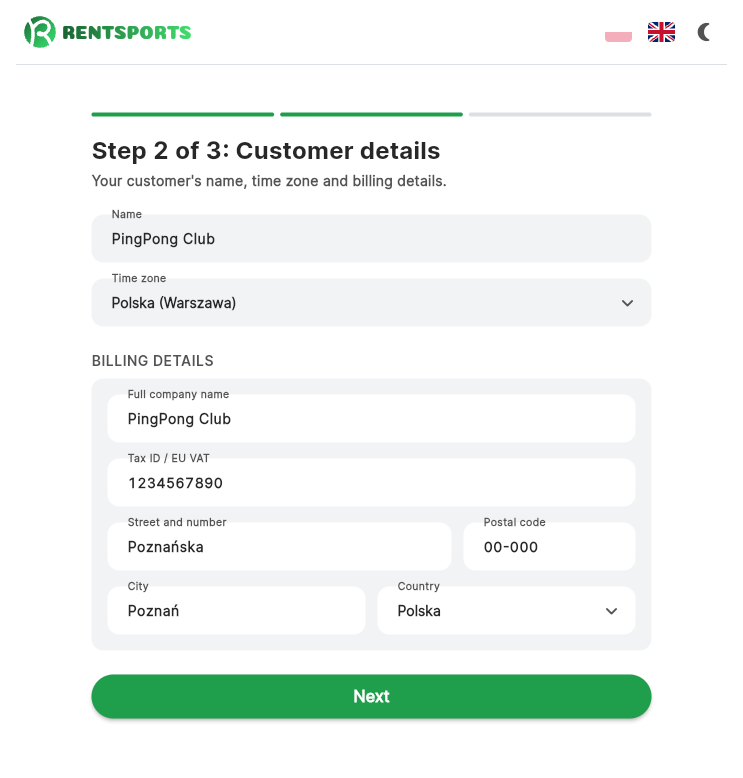
Krok drugi obejmuje nazwę klienta, strefę czasową oraz dane do faktury.
- Nazwa klienta, czyli nazwa firmy w systemie. Pole jest wymagane.
- Strefa czasowa, wybierana z listy. Dostępne są: Polska (Warszawa), Niemcy (Berlin), Czechy (Praga), Słowacja (Bratysława), Litwa (Wilno), Ukraina (Kijów), Wielka Brytania (Londyn), Hiszpania (Madryt) oraz Włochy (Rzym).
Strefa czasowa wyznacza sposób liczenia godzin rezerwacji i terminów anulowania. Jeśli siedziba firmy leży w innej strefie niż obiekt, wybierz strefę obiektu.
Sekcja Dane do faktury jest wymagana, bo z niekompletnego adresu nie da się wystawić faktury. Wyjątkiem jest numer NIP, którego nie każdy podmiot posiada. Adres do faktury obsługujemy obecnie wyłącznie dla Polski.
- Pełna nazwa firmy w brzmieniu, jakie ma widnieć na fakturze.
- NIP / VAT-UE. Polski NIP składa się z dziesięciu cyfr, a numer VAT-UE z dwuliterowego kodu kraju i od dwóch do dwunastu znaków, na przykład
DE123456789. Spacje i myślniki możesz wpisywać swobodnie. Błędny format blokuje przejście do kolejnego kroku. - Ulica i numer.
- Kod pocztowy w formacie
00-000. - Miejscowość oraz Kraj, obecnie ustawiony na Polskę.
Krok 3: subskrypcja
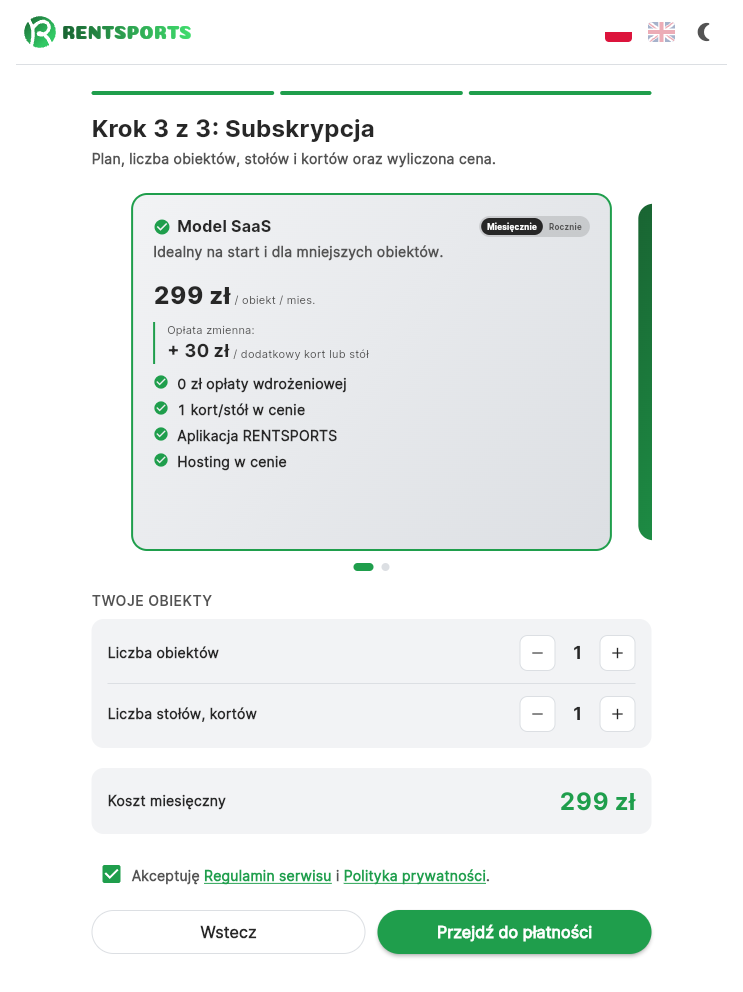
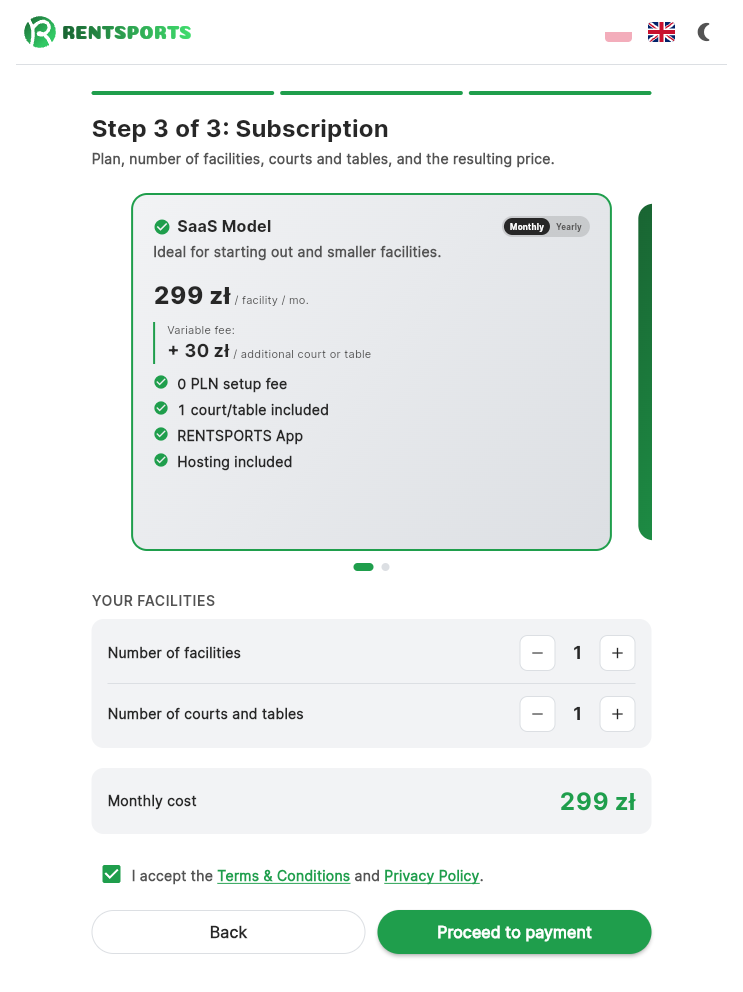
W kroku trzecim wybierasz model współpracy oraz skalę wdrożenia, a panel przelicza kwotę na bieżąco.
- Model SaaS albo Własna Instancja. Pierwszy udostępnia aplikację pod marką RENTSPORTS, drugi obejmuje dedykowane wdrożenie z aplikacją pod marką klubu i osobną subdomeną, objęte jednorazową opłatą wdrożeniową.
- Okres rozliczeniowy: miesięczny albo roczny. Po wybraniu okresu rocznego karta planu podaje cenę roczną za obiekt wraz z kwotą, jaką zapłaciłbyś przy rozliczeniu miesięcznym.
- Liczba obiektów, od 1 do 10. Wartość ta wyznacza limit, którego nie przekroczysz bez zmiany planu.
- Liczba kortów lub stołów łącznie, nie mniejsza niż liczba obiektów i nie większa niż 50. Jeden kort lub stół na obiekt zawiera się w cenie podstawowej, a każdy kolejny podlega opłacie zmiennej.
Podsumowanie pod licznikami podaje koszt za wybrany okres rozliczeniowy, czyli miesięczny albo roczny, a dla Własnej Instancji dodatkowo jednorazową opłatę wdrożeniową. Jeśli pobranie aktualnego cennika się nie powiedzie, panel wyświetli kwoty orientacyjne i wyraźnie to zaznaczy.
Przed przejściem do płatności zaznacz zgodę „Akceptuję regulamin i politykę prywatności”. Próba kontynuowania bez tej zgody kończy się komunikatem z prośbą o jej zaznaczenie.
Płatność
- Przycisk płatności przekierowuje do Stripe Checkout.
- Po opłaceniu wracasz do panelu, który wyświetla ekran przetwarzania. Utworzenie konta klienta zajmuje zwykle kilka sekund.
- Po zakończeniu panel otwiera się z pustą listą obiektów.
Przerwanie płatności cofa kreator do kroku drugiego i czyści wpisane dane, więc trzeba je podać ponownie. Jeśli płatność się powiodła, ale utracisz sesję, po prostu zaloguj się ponownie.
Po utworzeniu konta wysyłamy na podany adres wiadomość powitalną z linkiem do logowania. W załączeniu znajdziesz trzy dokumenty w formacie PDF, do zachowania: Regulamin, Politykę prywatności oraz Umowę powierzenia przetwarzania danych (DPA), czyli Załącznik nr 1 do Regulaminu, opisujący przetwarzanie danych osobowych Twoich klientów. Dokumenty przychodzą w języku, w którym wypełniałeś kreator, a ich aktualne wersje pozostają dostępne w panelu i na stronie.
2. Dodanie obiektu
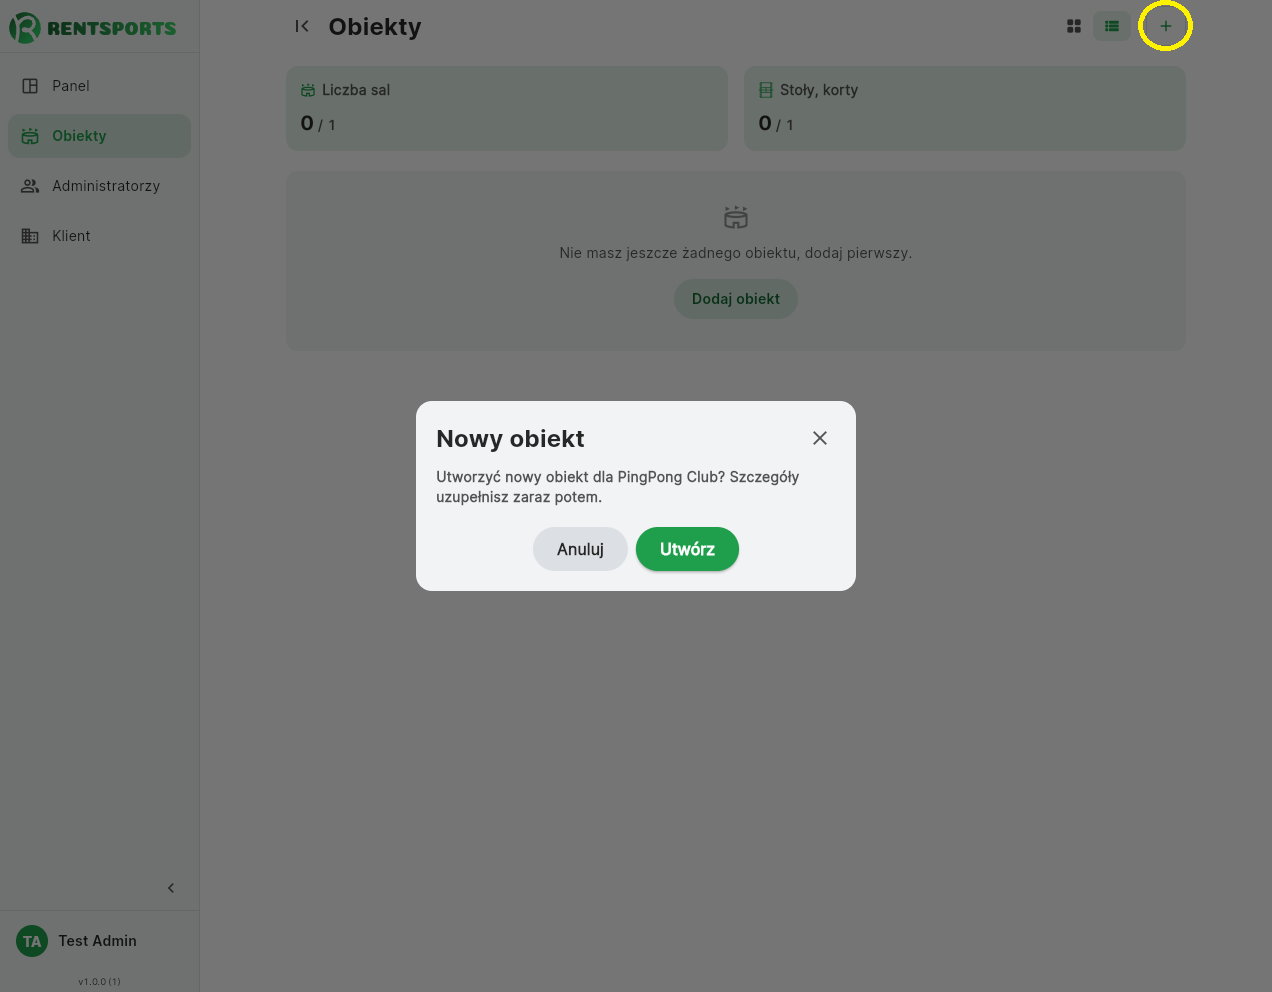
Obiekt dodajesz wyłącznie z panelu właściciela, przyciskiem Dodaj obiekt. Administrator obiektu takiego przycisku nie zobaczy.
Limit obiektów
Liczba obiektów wynika z subskrypcji. Po osiągnięciu limitu panel wyświetla komunikat z aktualną liczbą opłaconych obiektów i wskazuje zakładkę Subskrypcja jako miejsce, w którym limit podnosisz. Podniesienie limitu zmienia kwotę rozliczenia i wymaga potwierdzenia nowej kwoty. Jeśli subskrypcja została zakończona, panel poprosi najpierw o jej wznowienie.
Przebieg dodawania
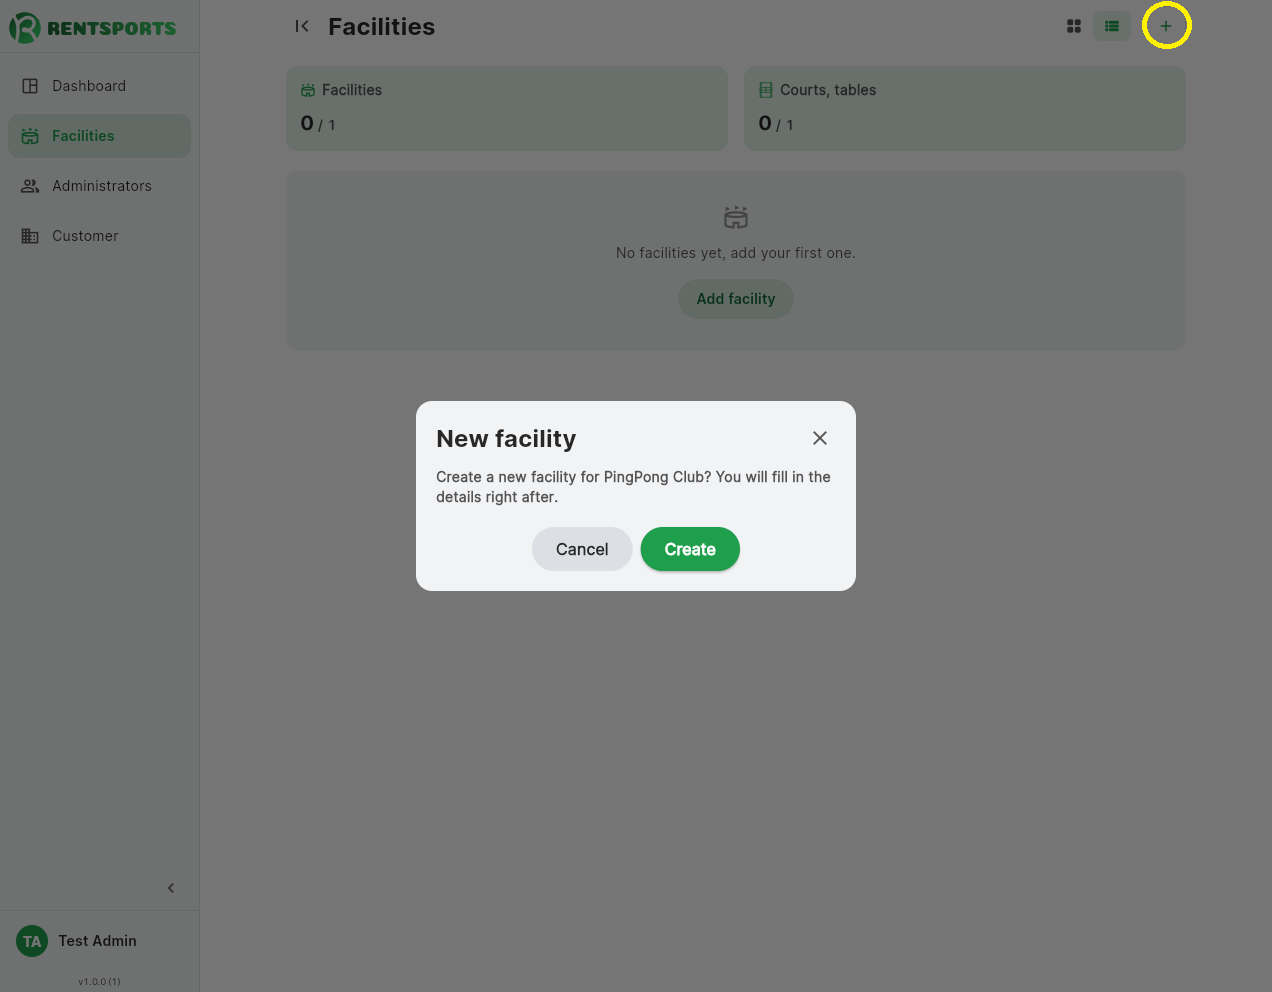
Przycisk Dodaj obiekt otwiera okno z pytaniem o potwierdzenie utworzenia obiektu. Po potwierdzeniu system tworzy obiekt i otwiera ekran Szczegóły w trybie edycji, opisany w kolejnym rozdziale. Nazwę, adres i pozostałe dane wprowadzasz właśnie tam, na tym samym ekranie, na który wracasz przy każdej późniejszej zmianie.
Obiekt bez pełnych danych
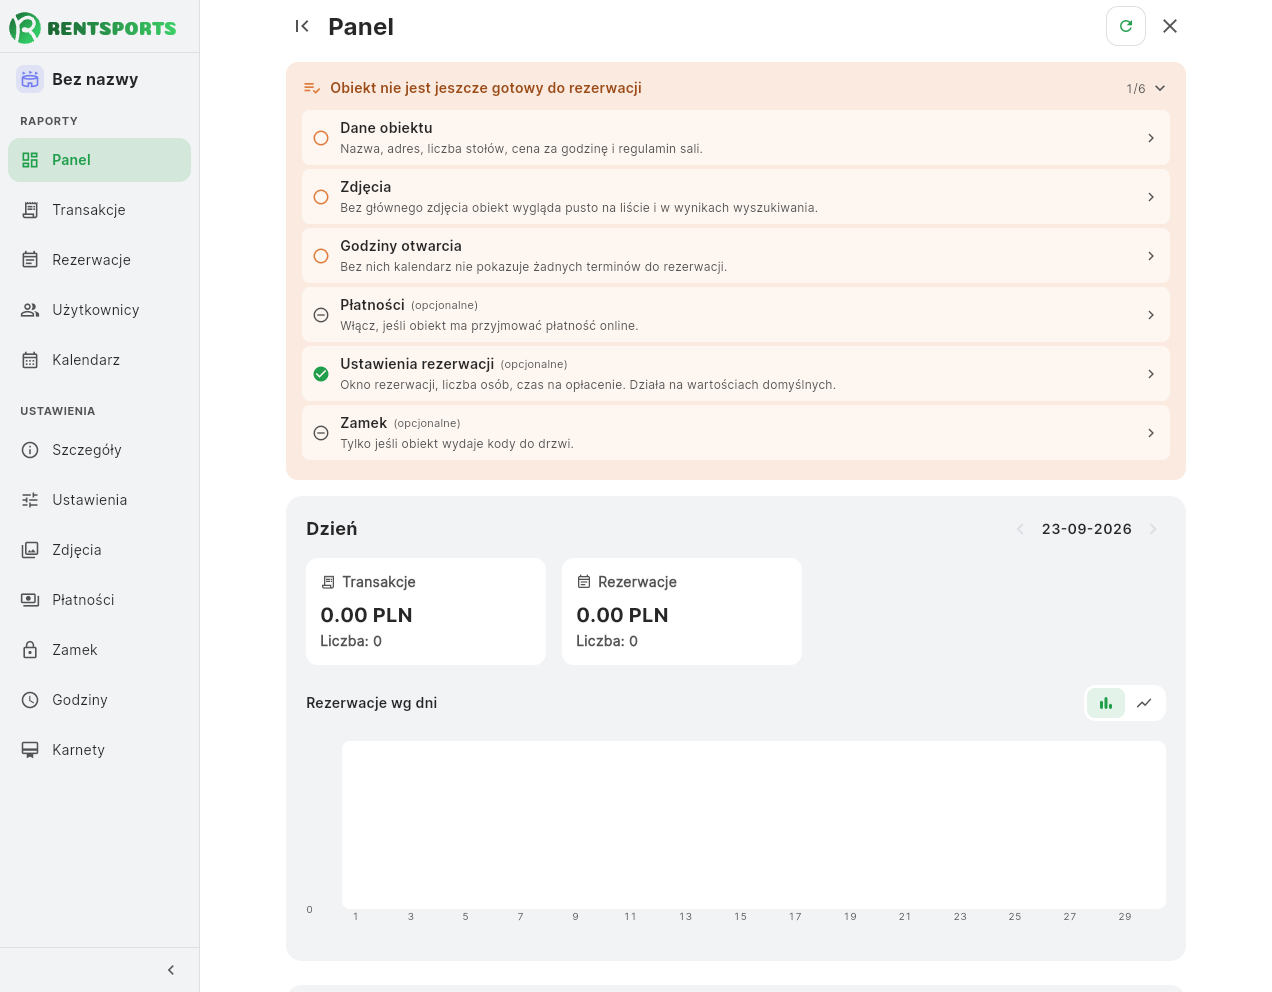
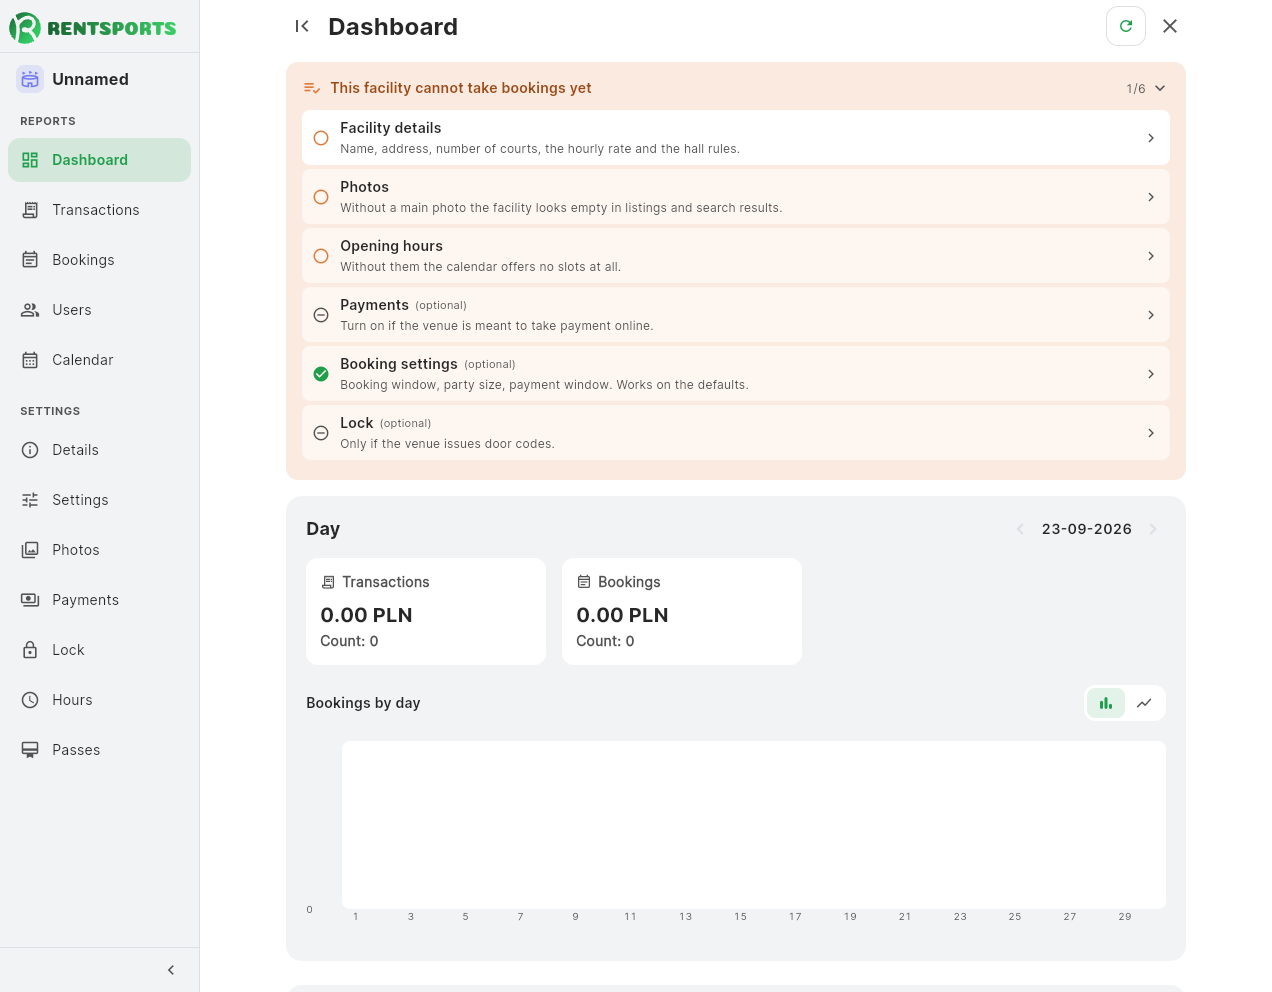
Nowy obiekt powstaje jako nieaktywny, bez nazwy, adresu, godzin i zdjęć. Do czasu uzupełnienia konfiguracji ekran Panel tego obiektu wyświetla u góry listę kontrolną zatytułowaną „Obiekt nie jest jeszcze gotowy do rezerwacji” wraz z licznikiem ukończonych pozycji, na przykład 2/6. Lista obejmuje sześć pozycji:
- Dane obiektu. Nazwa, adres, link do mapy, liczba kortów lub stołów, regulamin sali oraz opis po polsku i po angielsku. Informacje są opcjonalne. Cena może wynosić 0 zł, na przykład w obiekcie bezpłatnym. Pozycja wymagana.
- Zdjęcia. Pozycja wymagana; bez zdjęcia głównego obiekt prezentuje się pusto na liście i w wynikach wyszukiwania.
- Godziny otwarcia. Pozycja wymagana; dopóki kalendarz nie zawiera godzin, obiekt nie oferuje żadnych terminów.
- Płatności. Pozycja wymagana tylko przy włączonych płatnościach online. Zalicza się po uzupełnieniu kompletu danych PayU.
- Ustawienia rezerwacji. Pozycja nieobowiązkowa; do czasu zmiany obiekt pracuje na wartościach domyślnych, opisanych w rozdziale Ustawienia.
- Zamek. Pozycja nieobowiązkowa, przeznaczona dla obiektów wydających kody do drzwi. Zalicza się po podaniu identyfikatora zamka i włączeniu generowania kodów.
Listę możesz zwinąć do samego nagłówka z licznikiem. Dopóki któraś z pozycji wymaganych pozostaje nieukończona, obiektu nie da się aktywować, a panel wskaże, czego brakuje. Pozycje nieobowiązkowe niczego nie blokują. Po ukończeniu wszystkich pozycji wymaganych w tym samym miejscu pojawia się pasek informujący, czy obiekt jest widoczny dla klientów.
Kolejność, która oszczędza czas
Po utworzeniu obiektu warto iść w tej kolejności, bo każdy kolejny krok korzysta z poprzedniego:
- Dane podstawowe i adres na mapie.
- Dyscypliny, a potem lista kortów i stołów.
- Godziny otwarcia i cena, po których można wygenerować kalendarz.
- Ustawienia: okno rezerwacji, limity, czas na opłacenie i termin anulowania.
- Płatności PayU, jeśli obiekt ma przyjmować wpłaty online.
- Zamek TTLock, jeśli wejście ma działać bezobsługowo.
- Zdjęcia, które decydują o wyglądzie obiektu na liście i w wynikach wyszukiwania.
- Aktywacja obiektu.
Kalendarz rezerwacji generuje się z godzin otwarcia. Jeśli zmienisz godziny po jego wygenerowaniu, panel zaproponuje wygenerowanie go na nowo. Zrób to, bo inaczej nowe godziny nie pojawią się w aplikacji.
3. Konfiguracja obiektu
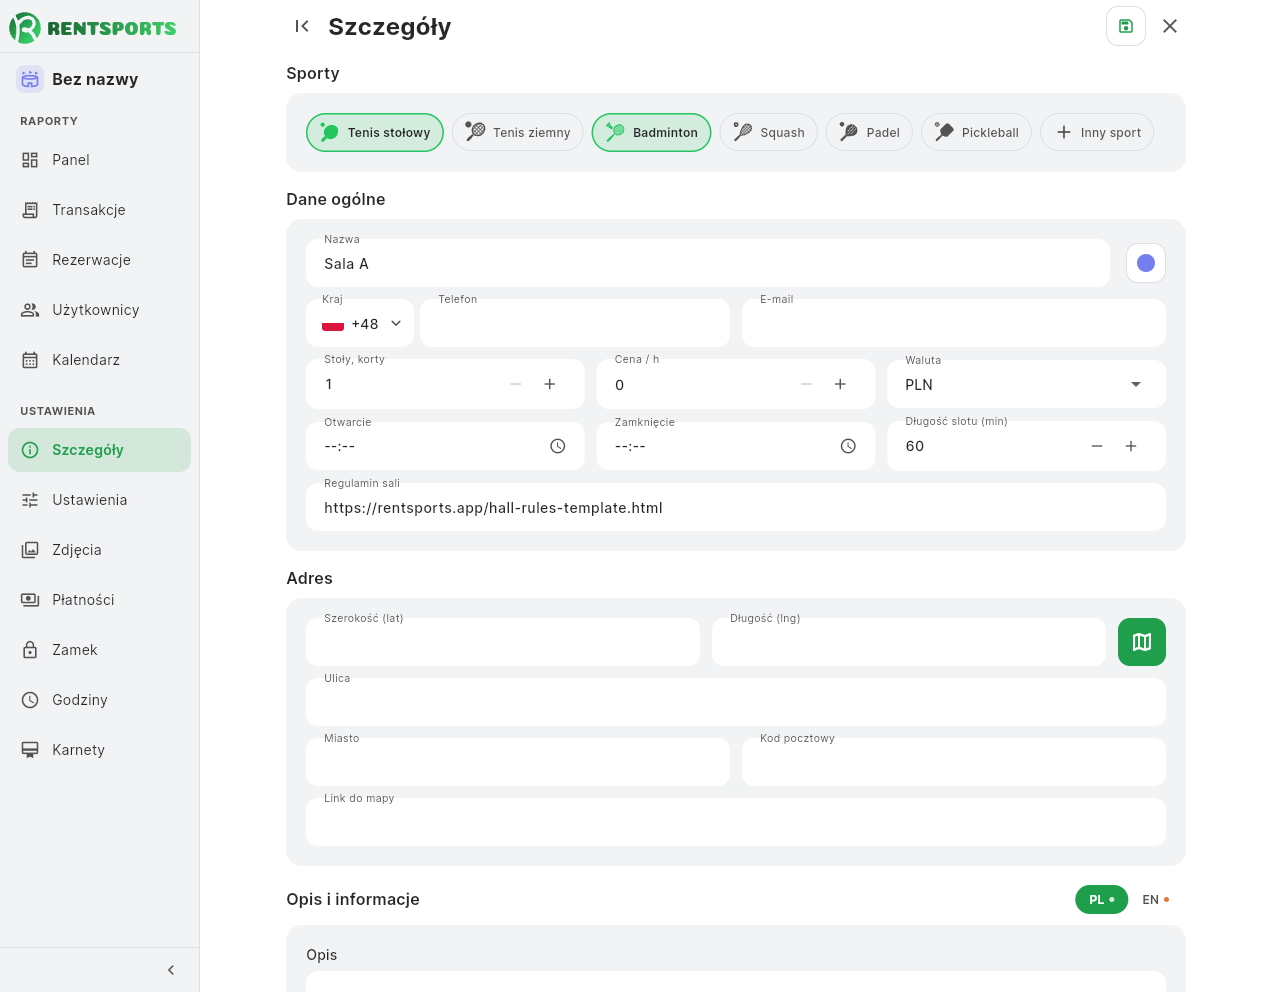
Na ekranie Szczegóły opisujesz obiekt i warunki, na jakich działa: adres, dyscypliny, liczbę kortów, cenę i godziny otwarcia. Pola są zablokowane, dopóki nie włączysz edycji przyciskiem w nagłówku. Poniżej opisujemy każdą sekcję po kolei.
Sporty
Sekcja otwierająca ekran. Wybrane tu dyscypliny decydują o tym, co obiekt oferuje klientom. Katalog obejmuje tenis stołowy, tenis ziemny, badminton, squash, padel i pickleball, a każdą pozycję włączasz i wyłączasz kliknięciem.
Dyscyplinę spoza katalogu dodajesz kafelkiem Inny sport: podajesz jej nazwę i wybierasz ikonę z listy. Kliknięcie własnej dyscypliny otwiera ten sam formularz, w którym możesz zmienić jej nazwę lub ikonę albo usunąć ją z obiektu.
Dane ogólne
- Nazwa obiektu wraz z przypisanym mu kolorem, wybieranym z palety obok pola nazwy. Kolor identyfikuje obiekt na liście hal i na wykresach statystyk.
- Telefon i E-mail, widoczne dla klientów jako dane kontaktowe obiektu. E-mail wybierasz z listy administratorów tego obiektu i właścicieli konta; domyślnie jest to właściciel. Na ten adres wysyłamy też ostrzeżenia z monitoringu, dlatego nie wpisujesz go ręcznie, tylko wskazujesz istniejące konto.
- Korty albo Stoły, czyli ich liczba, od 1 do 50. Nazwa pola idzie za dyscypliną wybraną powyżej: przy samym tenisie stołowym są to stoły, a przy samych dyscyplinach kortowych korty. Gdy obiekt łączy tenis stołowy z dyscypliną kortową albo ma dyscyplinę wpisaną własnoręcznie, są to miejsca. Tym samym słowem podpisujemy je w kalendarzu, na rezerwacjach i na transakcjach. System numeruje je kolejno; nie mają odrębnych nazw.
- Cena za godzinę oraz Waluta.
- Otwarcie i Zamknięcie, wyznaczające dobowy zakres pracy obiektu.
- Długość slotu w minutach, od 30 do 240, ustawiana co 30 minut. Slot stanowi podstawową jednostkę rezerwacji.
- Regulamin sali: link do zasad obowiązujących na tym konkretnym obiekcie (wejście, strój, zasady korzystania), odrębnych od ogólnego Regulaminu serwisu RENTSPORTS. Pole jest wymagane, bez niego panel nie zapisze danych ogólnych. Nowy obiekt, oraz każdy istniejący jeszcze nieuzupełniony, dostaje domyślnie link do wzorcowego szablonu z polami do wypełnienia; podmień go na link do własnej, gotowej strony, gdy tylko ją opublikujesz. Klient widzi ten link w dwóch miejscach: na ekranie szczegółów obiektu oraz przy płatności, obok Regulaminu serwisu i Polityki prywatności.
Po zapisaniu zmienionych godzin otwarcia panel proponuje wygenerowanie kalendarza rezerwacji na nowo dla całego tygodnia. Zmiany wprowadzone wcześniej w poszczególnych dniach zostaną wtedy utracone. Obiekt bez wygenerowanego kalendarza nie oferuje żadnych terminów. Sposób dopracowania pojedynczych godzin opisuje rozdział Godziny.
Adres
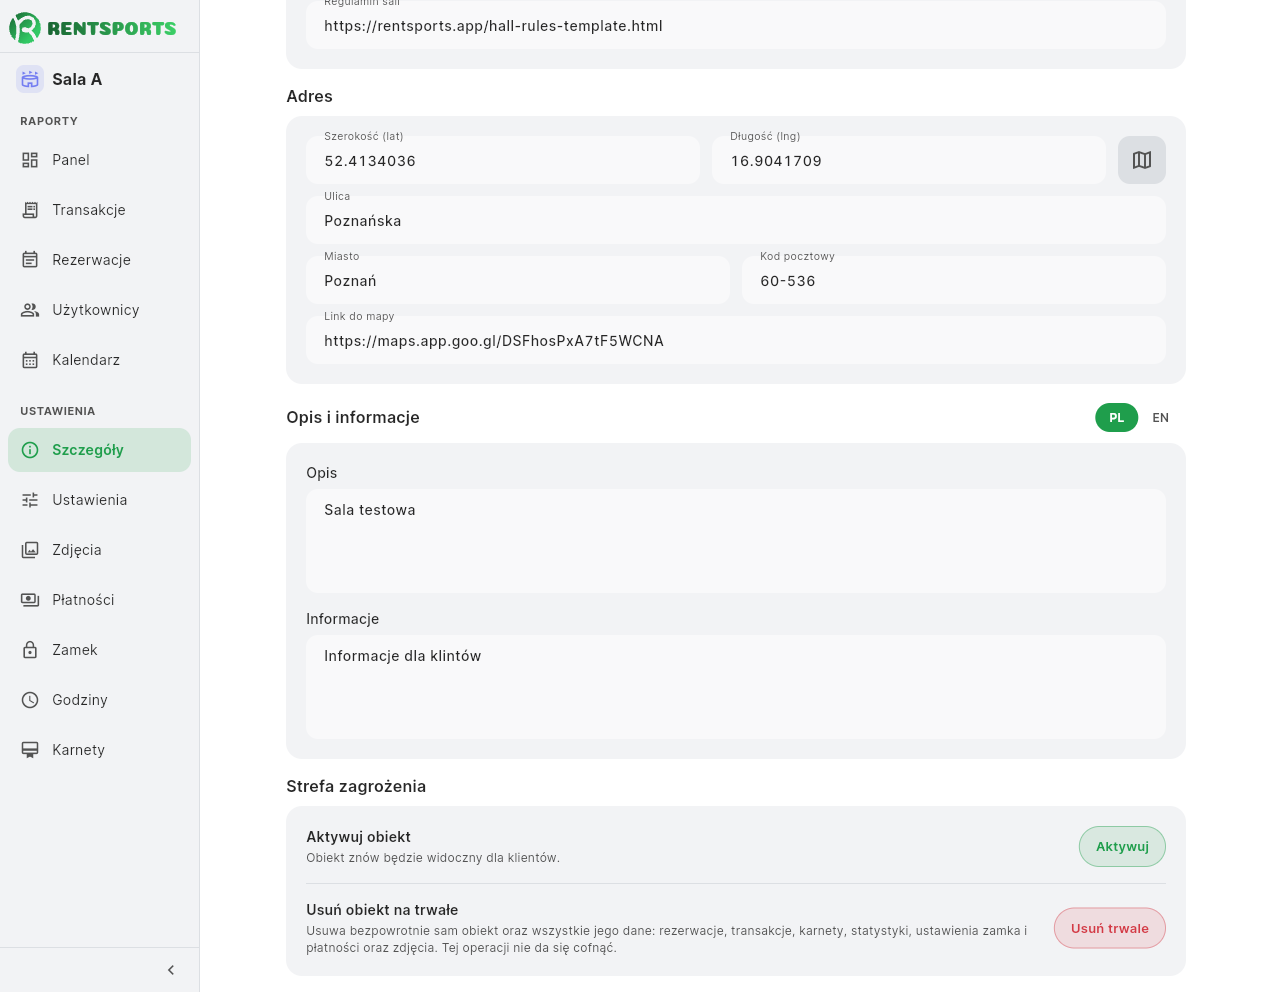
Położenie obiektu ustalasz na mapie, a nie przez wpisanie adresu. Przycisk mapy otwiera okno wyboru punktu, po którego wskazaniu system uzupełnia współrzędne oraz ulicę, miasto i kod pocztowy. Pola te pozostają do odczytu. Współrzędne decydują o położeniu obiektu w widoku mapy w aplikacji klienta.
Jedynym polem adresu, które wypełniasz samodzielnie, jest Link do mapy. Korzysta z niego przycisk nawigacji w aplikacji. Jeśli pole jest puste, panel po wskazaniu punktu na mapie sam wpisuje link do tego miejsca. Możesz go podmienić na link do wizytówki obiektu w Mapach Google.
Adres i link do mapy są wymagane. Bez nich panel nie zapisze danych obiektu i przy brakujących polach pokaże, co trzeba uzupełnić. Przy pustym adresie komunikat odsyła do wyboru punktu na mapie, bo ulicy i miasta nie wpisuje się ręcznie.
Opis i informacje
Sekcja zawiera dwa pola tekstowe, prowadzone niezależnie po polsku i po angielsku. Przełącznik języka nad kartą obejmuje oba pola naraz, a kropka wskazuje język, w którym nie ma jeszcze treści. Klient otrzymuje wersję zgodną z językiem swojej aplikacji.
- Opis przedstawia obiekt. Klient czyta go na ekranie szczegółów obiektu, razem ze zdjęciami, jeszcze przed dokonaniem rezerwacji. Opis jest wymagany w obu językach: polskim i angielskim. Przełącznik PL/EN nad polem zmienia wersję, a kropka przy języku oznacza, że tej wersji jeszcze brakuje.
- Informacje są opcjonalne. To krótka notatka praktyczna dla osoby, która już zarezerwowała: jak dotrzeć do wejścia, gdzie zaparkować albo gdzie szukać obsługi na miejscu.
Treść pola Informacje trafia w dwa miejsca. Klient widzi ją przy potwierdzonej rezerwacji w aplikacji, a system dopisuje ją do wiadomości z potwierdzeniem rezerwacji, jako akapit zatytułowany „Uwaga”. Dotyczy to rezerwacji opłaconych online, rozliczanych na miejscu i opłaconych karnetem. Jest to jedyny fragment tej wiadomości, którego treść ustalasz z panelu.
Strefa zagrożenia
Sekcja zamykająca ekran Szczegóły, widoczna wyłącznie dla właściciela konta i oddzielona od pozostałej konfiguracji. Nie widzi jej administrator dodany z innego klubu, nawet jeśli w swoim klubie jest właścicielem. Obejmuje dwie czynności o trwałych skutkach.
- Dezaktywuj obiekt. Obiekt znika z listy dostępnej klientom, natomiast wszystkie jego dane, czyli rezerwacje, ustawienia i historia, pozostają nienaruszone. Obiekt możesz w dowolnej chwili aktywować ponownie tym samym przyciskiem.
- Usuń obiekt na trwałe. Usuwa bezpowrotnie sam obiekt oraz wszystkie jego dane: rezerwacje, transakcje, karnety, statystyki, ustawienia zamka i płatności oraz zdjęcia. W oknie potwierdzenia wpisujesz nazwę obiektu. Tej operacji nie da się cofnąć.
4. Ustawienia
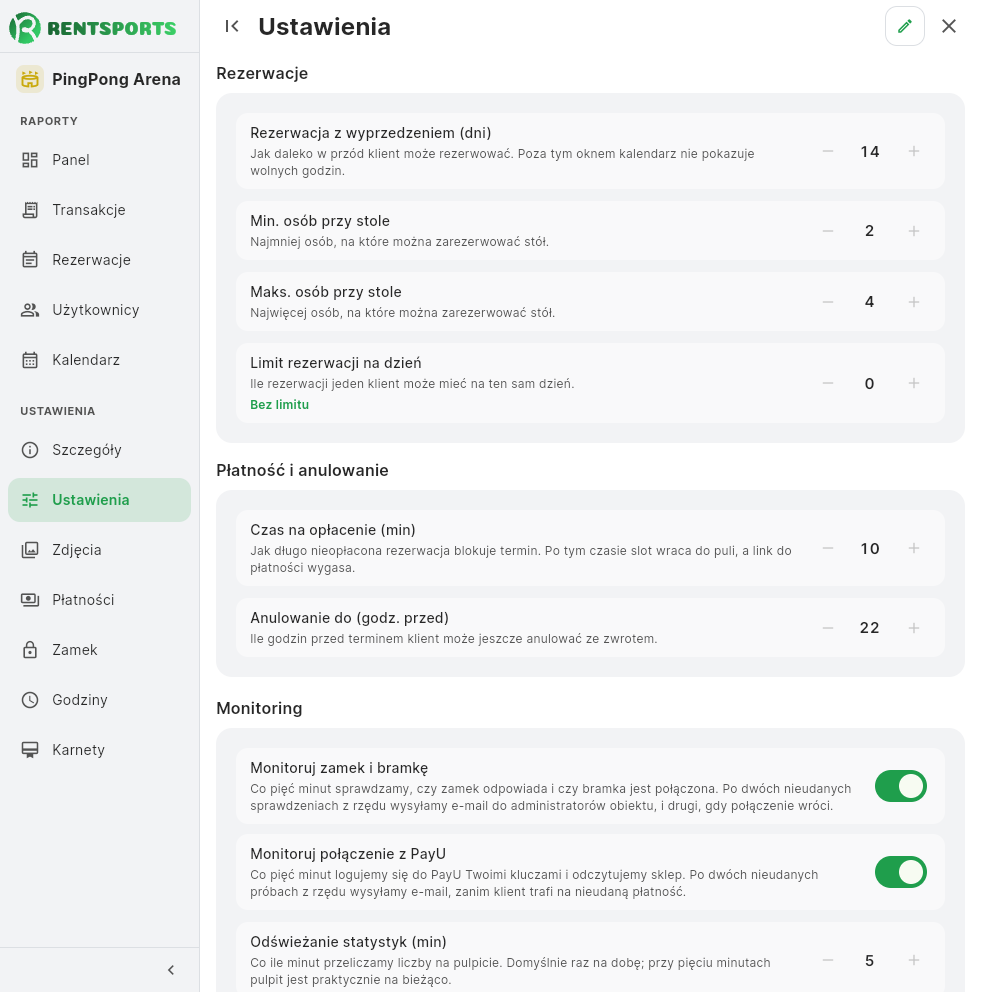
Ustawienia mają w menu obiektu własną pozycję, osobną od Szczegółów. Ustalasz tu zasady, na jakich klient rezerwuje: jak daleko w przyszłość może sięgnąć, ile ma czasu na zapłatę i do kiedy wolno mu się wycofać.
- Okno rezerwacji, w dniach, od 1 do 365. Wyznacza, jak daleko w przyszłość klient może zarezerwować termin. Wartość domyślna wynosi 30 dni.
- Limit rezerwacji na dzień przypadający na jednego klienta, od 0 do 20. Wartość 0 oznacza brak limitu i jest ustawieniem domyślnym. Limit chroni przed zajęciem całego dnia przez jedną osobę.
- Minimalna i maksymalna liczba osób na rezerwację, obie w zakresie od 1 do 50. Maksimum nie może być niższe od minimum. Klient podaje liczbę osób przy każdej rezerwacji, a minimum wyznacza wartość początkową i dolną granicę tego wyboru.
- Czas na opłacenie, w minutach, od 5 do 1440, czyli do doby. Wartość domyślna wynosi 30 minut. Po jego upływie termin wraca do puli wolnych, a link do płatności traci ważność.
- Termin bezkosztowego anulowania, w godzinach, od 0 do 168, czyli do siedmiu dni. Wartość domyślna wynosi 24 godziny. Wartość 0 pozwala klientowi anulować rezerwację ze zwrotem aż do jej rozpoczęcia.
Każde z tych pól ma wartość domyślną, więc obiekt działa poprawnie także wtedy, gdy niczego tu nie zmienisz. Panel sprawdza podane wartości przy zapisie i odrzuca te spoza dozwolonego zakresu, wskazując, jaki zakres obowiązuje.
Monitoring
Druga część tego ekranu pilnuje, czy obiekt jest w stanie obsłużyć klienta. Obie kontrole są wyłączone, dopóki ich nie włączysz.
- Monitoruj zamek i bramkę. Co pięć minut sprawdzamy, czy zamek odpowiada i czy bramka jest połączona. Po dwóch nieudanych sprawdzeniach z rzędu piszemy na adres e-mail z danych obiektu, do administratorów przypisanych do obiektu i do właściciela, a drugi list przychodzi, gdy połączenie wróci. Ostrzeżenie wysyłamy raz na awarię, nie co pięć minut.
- Monitoruj połączenie z PayU. W tym samym rytmie logujemy się do PayU Twoimi kluczami i odczytujemy sklep, na te same adresy, więc o problemie dowiadujesz się, zanim klient trafi na nieudaną płatność.
- Odświeżanie statystyk w minutach, od 5 do 1440. Wartość domyślna to 1440, czyli raz na dobę. Im mniejsza liczba, tym szybciej rezerwacje i wpłaty pojawiają się w kartach miesiąca i na wykresach.
Bramka odłączona od internetu oznacza, że kod do drzwi w ogóle nie powstanie, a nie tylko że nie otworzysz drzwi zdalnie. Dlatego sprawdzenie połączenia pokazuje wtedy ostrzeżenie zamiast potwierdzenia, nawet jeśli sam zamek odpowiada.
Gdzie zobaczysz problem
Nie musisz czekać na e-mail ani wchodzić w te ustawienia. Komunikat o awarii pokazujemy na Pulpicie, na samej górze, tuż pod informacją czy sala jest aktywna. Jest widoczny dla każdego, kto otworzy panel tego obiektu, i znika sam, gdy kolejne sprawdzenie się powiedzie.
W komunikacie znajdziesz:
- co nie odpowiada, zamek z bramką czy połączenie z PayU,
- co to oznacza dla klienta, czyli czego nie da się teraz zrobić na obiekcie,
- kiedy sprawdzaliśmy ostatnio i ile razy z rzędu się nie udało,
- błąd zgłoszony przez urządzenie albo przez PayU, słowo w słowo,
- na jakie adresy poszło ostrzeżenie, a jeśli nie miało dokąd pójść, prośbę o uzupełnienie adresu e-mail w szczegółach obiektu.
Przycisk Sprawdź w komunikacie przenosi od razu do sekcji Zamek albo Płatności, gdzie możesz uruchomić sprawdzenie połączenia ręcznie i zobaczyć pełny wynik. Dopóki nie minęły dwa nieudane sprawdzenia z rzędu, komunikat jest żółty i mówi wprost, że ostrzeżenia jeszcze nie wysłaliśmy; po drugiej porażce robi się czerwony i wtedy wychodzi e-mail.
5. Zdjęcia
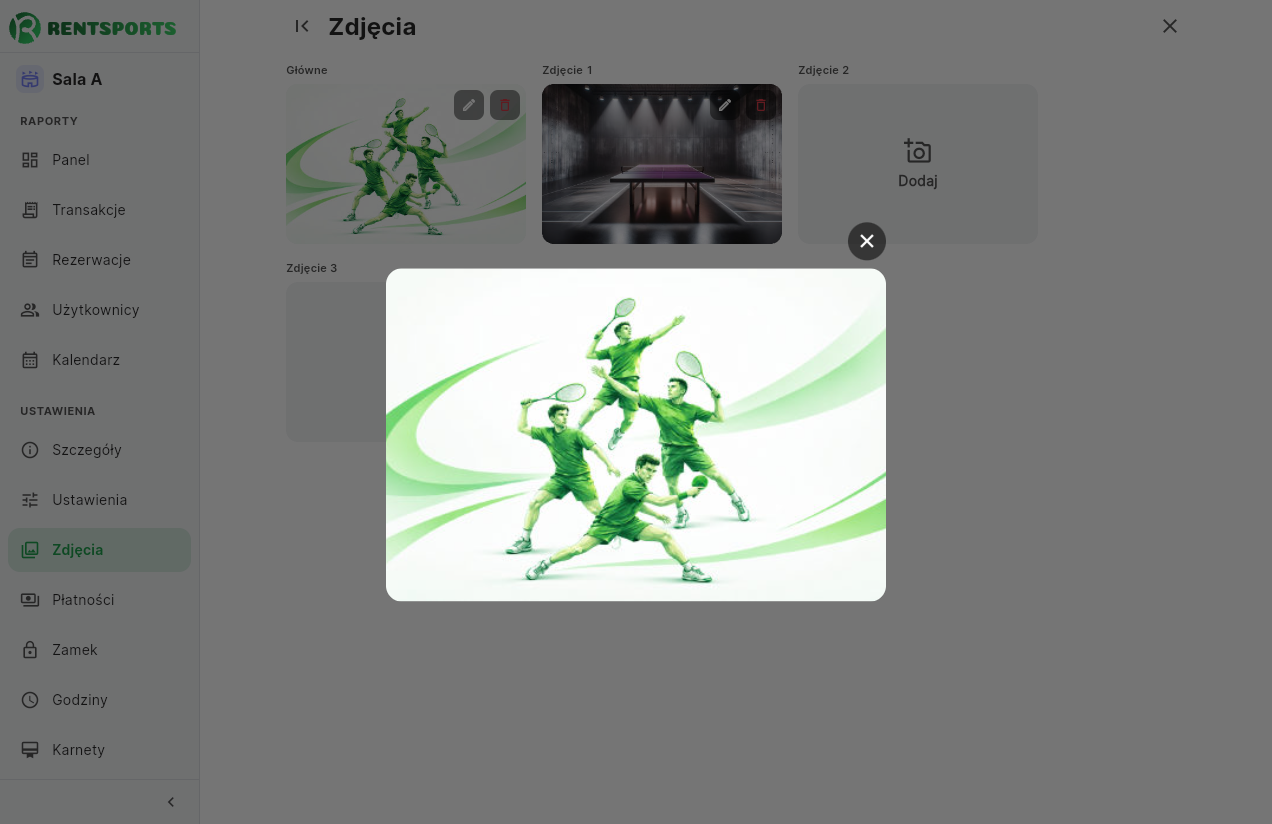
Zdjęcia, które tu wgrasz, klient widzi na liście obiektów i w ich szczegółach. Masz cztery pola: zdjęcie główne, pokazywane jako pierwsze, oraz trzy uzupełniające, oznaczone jako Zdjęcie 1, Zdjęcie 2 i Zdjęcie 3.
Puste pole zawiera przycisk dodania, który otwiera okno wyboru pliku z dysku. Po wskazaniu pliku panel wyświetla podgląd i komunikat o wysyłaniu, a po jego zakończeniu zapisuje zdjęcie przy obiekcie. Pole z wgranym zdjęciem udostępnia w prawym górnym rogu dwa przyciski: podmiany pliku oraz usunięcia zdjęcia.
Zdjęcie główne reprezentuje obiekt na liście obiektów i w wynikach wyszukiwania, dlatego bez niego nie da się aktywować obiektu. Komplet zdjęć klient ogląda na ekranie szczegółów obiektu, zanim przejdzie do rezerwacji.
Wgrać można plik graficzny w formacie JPG, PNG, WebP lub GIF. Przed wysłaniem panel zmniejsza zdjęcie i zapisuje je jako JPEG, więc duże zdjęcie prosto z aparatu nie spowalnia aplikacji klienta. Innych rodzajów plików system nie przyjmie.
6. Integracja PayU
Wpłaty klientów trafiają bezpośrednio na Twoje konto w PayU. Nie pośredniczymy w nich i nie przetrzymujemy środków. Do integracji potrzebujesz własnego konta firmowego w PayU.
Płatności online można wyłączyć
Cała ta integracja jest opcjonalna. Decyduje o tym przełącznik Płatności online na tym samym ekranie.
- Włączone. Klient płaci kartą przez PayU w momencie rezerwacji. Wymaga uzupełnionej i zweryfikowanej konfiguracji opisanej niżej.
- Wyłączone. Rezerwacja jest potwierdzana bez płatności, a rozliczenie następuje na miejscu. Użyj tego, jeśli obiekt przyjmuje tylko gotówkę albo terminal na recepcji. Wtedy reszta tego rozdziału Cię nie dotyczy.
Wyłączenie płatności online wyłącza też karnety, bo nie ma czym za nie zapłacić. Panel powie o tym wprost przy próbie ich włączenia.
Dopóki dane PayU są niekompletne lub błędne, panel utrzymuje płatności wyłączone, nawet jeśli przestawisz przełącznik. Po zapisie zobaczysz wtedy komunikat „Zapisano, ale połączenie z PayU nie działa. Płatności online pozostają wyłączone do czasu poprawienia danych poniżej”.
Krok 1: konto i punkt płatności w PayU
- Załóż konto firmowe na poland.payu.com i przejdź weryfikację firmy. PayU wymaga danych rejestrowych i rachunku bankowego.
- Zaloguj się do panelu sprzedawcy: secure.payu.com.
- Utwórz punkt płatności, po angielsku „point of sale”, w skrócie POS. Każdy punkt ma własny komplet kluczy.
Zakładanie i konfigurację konta opisuje PayU: Konfiguracja konta. Pomoc w języku polskim: centrum pomocy PayU.
Krok 2: co wpisujesz w panelu
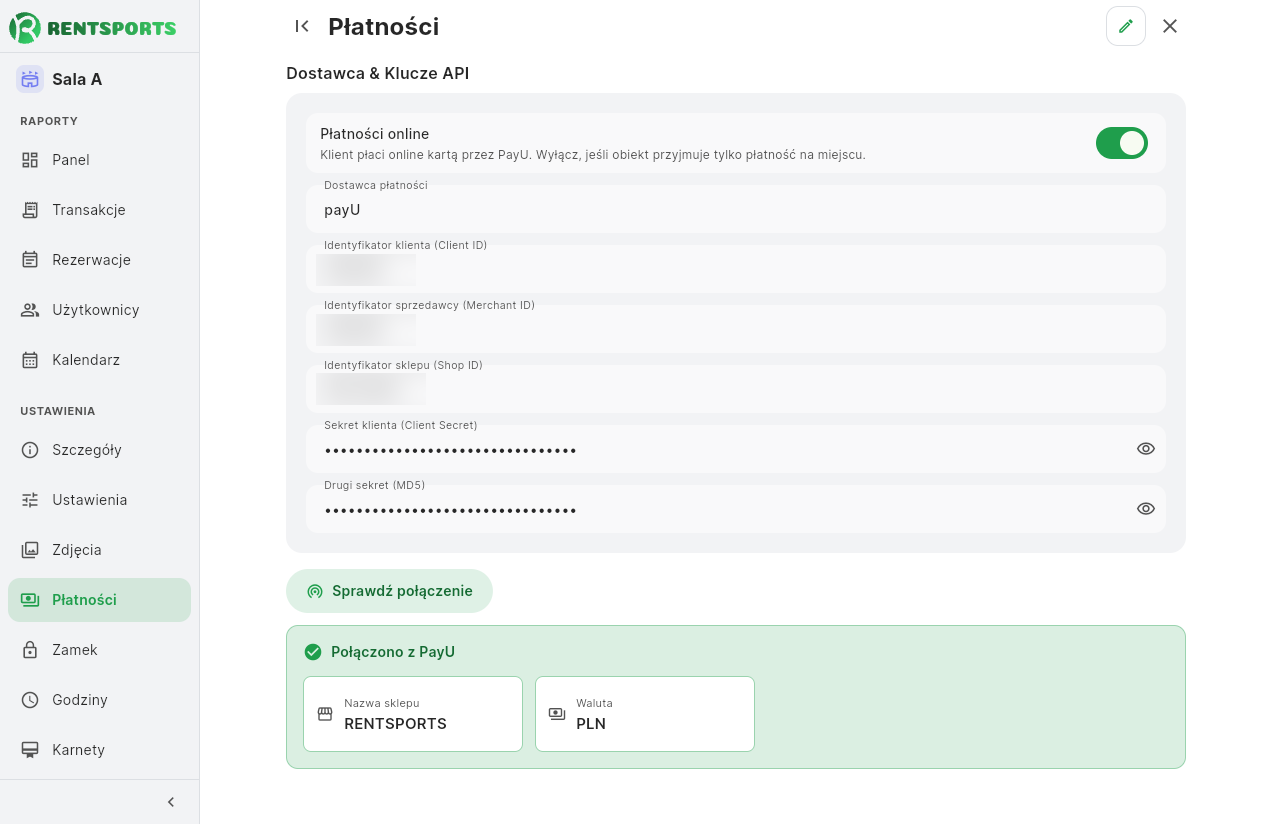
Wszystkie poniższe znajdziesz w panelu PayU, w ustawieniach punktu płatności. Wpisujesz je w sekcji płatności w konfiguracji swojego obiektu.
| Pole w RENTSPORTS | Co to jest w PayU |
|---|---|
| Dostawca płatności | Pole tylko do odczytu; obecnie obsługujemy wyłącznie PayU |
| Identyfikator sprzedawcy (Merchant ID) | POS ID punktu płatności |
| Identyfikator sklepu (Shop ID) | Identyfikator sklepu przypisany do punktu |
| Identyfikator klienta (Client ID) | OAuth client_id punktu płatności |
| Sekret klienta (Client Secret) | OAuth client_secret punktu płatności |
| Drugi sekret (MD5) | Drugi klucz, którym PayU podpisuje powiadomienia o płatności |
To wszystko, czego potrzebujemy od Ciebie. Adresów integracji z PayU nie podajesz, konfigurujemy je po naszej stronie.
Krok 3: sprawdzenie połączenia
Przycisk Sprawdź połączenie uwierzytelnia się w PayU i próbuje odczytać Twój sklep. Jest dostępny po włączeniu płatności online.
Po udanym teście panel pokazuje nazwę sklepu i walutę odczytane z PayU. To najlepsze potwierdzenie, że klucze prowadzą do właściwego punktu płatności, a nie do cudzego albo do testowego. Nazwy sklepu nigdzie nie wpisujesz, bierze się wprost z PayU.
Gdy test się nie udaje, komunikat wskazuje przyczynę:
- „PayU odrzucił dane logowania. Sprawdź Client ID i Client Secret.”: błędne klucze OAuth.
- „Autoryzacja przeszła, ale sklep o tym Shop ID nie istnieje.”: klucze są dobre, pomyliłeś Shop ID.
- „Autoryzacja przeszła, ale ten punkt płatności nie ma dostępu do tego sklepu.”: klucze pochodzą z innego punktu płatności niż wskazany sklep.
- „Nie udało się odczytać sklepu.”: sprawdź Merchant ID i uprawnienia punktu.
- „Brak odpowiedzi z PayU. Spróbuj ponownie za chwilę.”: chwilowy problem sieciowy.
Upewnij się, że wpisujesz klucze produkcyjne, a nie z konta testowego PayU. Klucze testowe wyglądają identycznie, a przy nich żadna prawdziwa płatność nie dojdzie.
Dokumentacja PayU po polsku: developers.payu.com/europe/pl, w tym przebiegi płatności.
7. Integracja TTLock
Po opłaceniu rezerwacji system generuje sześciocyfrowy kod PIN ważny w jej godzinach i wysyła go do zamka przez bramkę WiFi. Po zakończeniu rezerwacji kod przestaje otwierać drzwi.
Generowanie kodów można wyłączyć
Ta integracja też jest opcjonalna. Decyduje o tym przełącznik Generuj kod do zamka na tym samym ekranie.
- Włączony. Po opłaceniu rezerwacji klient dostaje kod PIN otwierający zamek w godzinach swojej rezerwacji.
- Wyłączony. System nie generuje kodów. Użyj tego, jeśli obiekt ma recepcję, wpuszcza gości osobiście albo używa własnego systemu dostępu. Wtedy reszta tego rozdziału Cię nie dotyczy.
Przełączniki płatności i klucza są od siebie niezależne. Możesz mieć obiekt z płatnościami online i obsługą na miejscu, obiekt w pełni bezobsługowy, albo obiekt z kodem do drzwi i płatnością gotówką.
Krok 1: sprzęt
- Zamek lub kontroler w standardzie TTLock: klamka, wkładka albo sterownik do elektrozaczepu. Musi mieć klawiaturę, bo wejście odbywa się kodem.
- Bramka WiFi TTLock, model G2 lub G3. Bez niej kod nie dotrze do zamka zdalnie.
- Bramka musi być w zasięgu Bluetooth zamka, w praktyce około 5 do 10 metrów, oraz w zasięgu WiFi z dostępem do internetu.
Krok 2: konfiguracja w aplikacji TTLock
- Zainstaluj aplikację TTLock, do pobrania ze strony ttlock.com.
- Załóż konto i dodaj zamek. Konto, na którym zamek jest zarejestrowany, to konto administratora zamka i właśnie je podasz w panelu.
- Dodaj bramkę i sparuj ją z zamkiem. W aplikacji przy zamku powinno pojawić się oznaczenie połączenia przez bramkę.
- Sprawdź, czy zamek odpowiada zdalnie: spróbuj otworzyć go z aplikacji, będąc poza zasięgiem Bluetooth. Jeśli to działa, integracja też zadziała.
Zdalne sterowanie przez bramkę musi działać w aplikacji TTLock zanim skonfigurujesz integrację u nas. Jeśli nie działa tam, nie zadziała i tutaj, a przyczyna leży po stronie sprzętu lub sieci.
Krok 3: skąd wziąć ID zamka
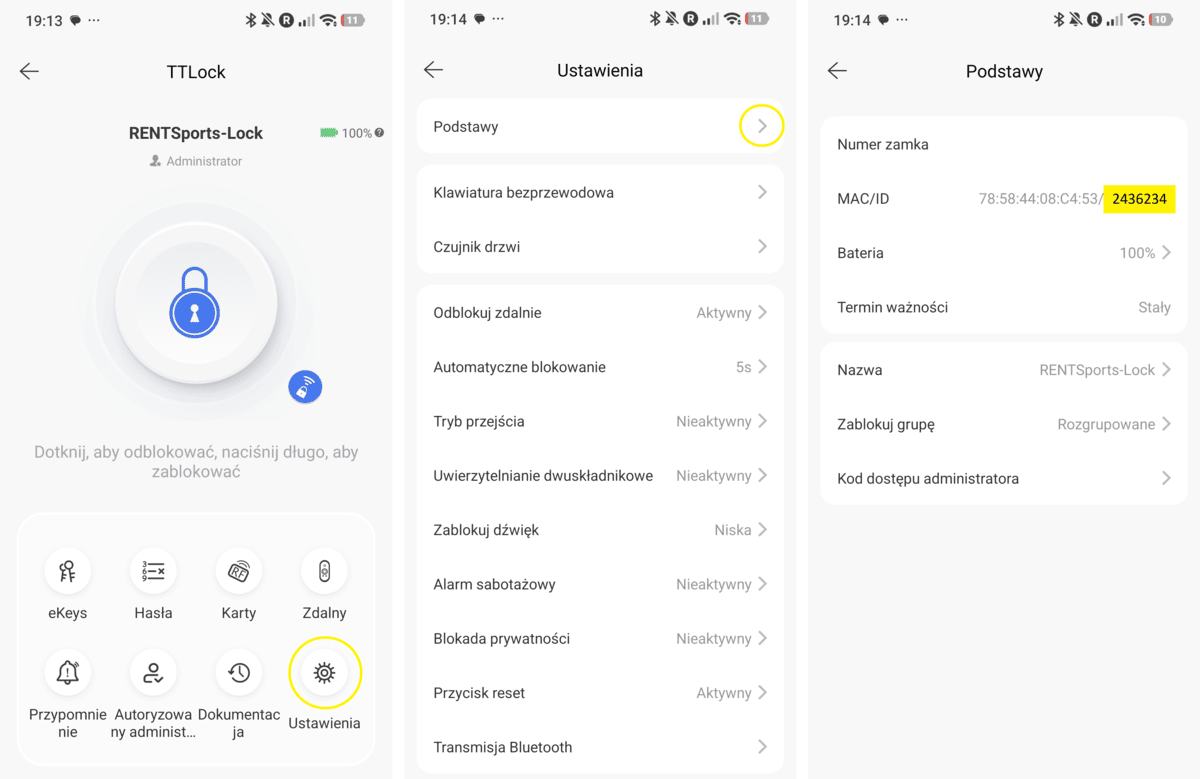
ID zamka odczytasz wprost z aplikacji TTLock, nie trzeba do tego niczego więcej:
- Otwórz aplikację TTLock i wybierz zamek z listy.
- Wejdź w ustawienia zamka, ikona koła zębatego na stronie zamka.
- Otwórz informacje podstawowe, po angielsku „Basics”.
- Znajdziesz tam numer zamka, adres MAC, Lock ID oraz wersję oprogramowania. Lock ID to liczba, którą przepisujesz do naszego panelu.
Ten sam opis w dokumentacji TTLock: strona informacji o zamku. Pozostałe instrukcje aplikacji: ttlockdoc.ttlock.com.
Krok 4: co wpisujesz w panelu
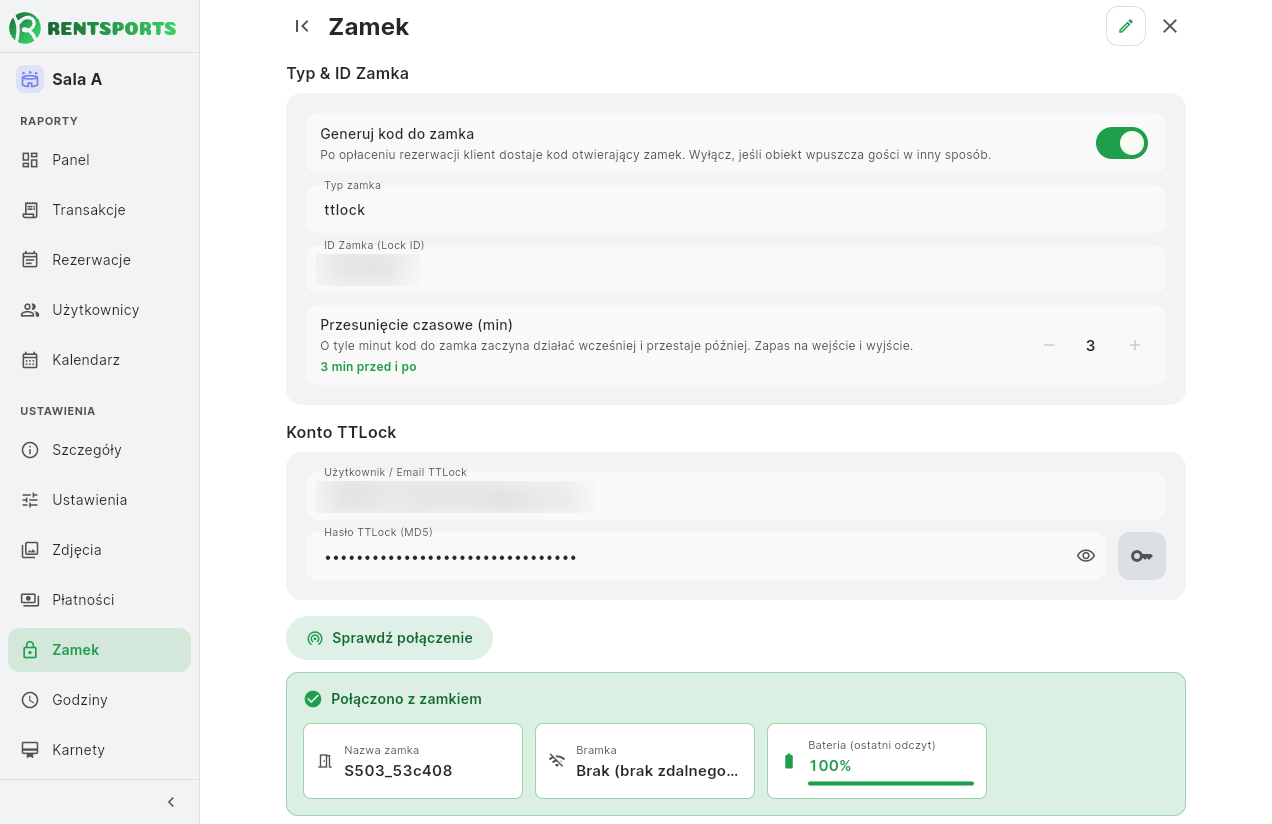
| Pole | Co wpisać |
|---|---|
| Konto TTLock | Login konta, na którym zarejestrowany jest zamek |
| Hasło TTLock (MD5) | Hasło do tego konta |
| Typ zamka (Lock Type) | Pole tylko do odczytu; obecnie obsługujemy wyłącznie standard TTLock |
| ID Zamka (Lock ID) | Liczba odczytana z aplikacji TTLock, zgodnie z krokiem 3 |
| Przesunięcie czasowe (min) | Od 0 do 15 minut, domyślnie 0. O tyle kod zaczyna działać wcześniej i przestaje później |
Przesunięcie działa symetrycznie: stanowi zapas na wejście przed rozpoczęciem rezerwacji i na wyjście po jej zakończeniu. Wartość 0 ogranicza ważność kodu dokładnie do godzin rezerwacji. Ustawiaj je rozważnie, ponieważ przy 15 minutach kod poprzedniego klienta zachowuje ważność jeszcze kwadrans po rozpoczęciu kolejnej rezerwacji.
Kluczy API do TTLock nie podajesz, konfigurujemy je po naszej stronie.
Krok 5: sprawdzenie połączenia
Przycisk Sprawdź połączenie loguje się do TTLock i sprawdza, czy zamek o podanym ID odpowiada. Jest dostępny po włączeniu generowania kodów.
Po udanym teście panel pokazuje nazwę zamka, poziom baterii oraz stan bramki. Nazwa potwierdza, że trafiłeś na właściwy zamek, stan bramki mówi, czy zamek jest osiągalny zdalnie, a baterię warto sprawdzać co jakiś czas, bo rozładowany zamek nie otworzy drzwi żadnym kodem.
Gdy test się nie udaje, komunikat wskazuje przyczynę:
- „TTLock odrzucił dane logowania. Sprawdź konto, hasło i klucze aplikacji.”: sprawdź konto i hasło TTLock.
- „Autoryzacja przeszła, ale zamek o tym ID nie odpowiada. Sprawdź ID zamka.”: logowanie jest dobre, ale ID zamka jest błędne albo zamek nie ma łączności przez bramkę.
- „Klucze aplikacji TTLock nie są skonfigurowane. To ustawienie globalne, skontaktuj się z obsługą.”: napisz na contact@rentsports.app.
- „Brak odpowiedzi z TTLock. Spróbuj ponownie za chwilę.”: chwilowy problem.
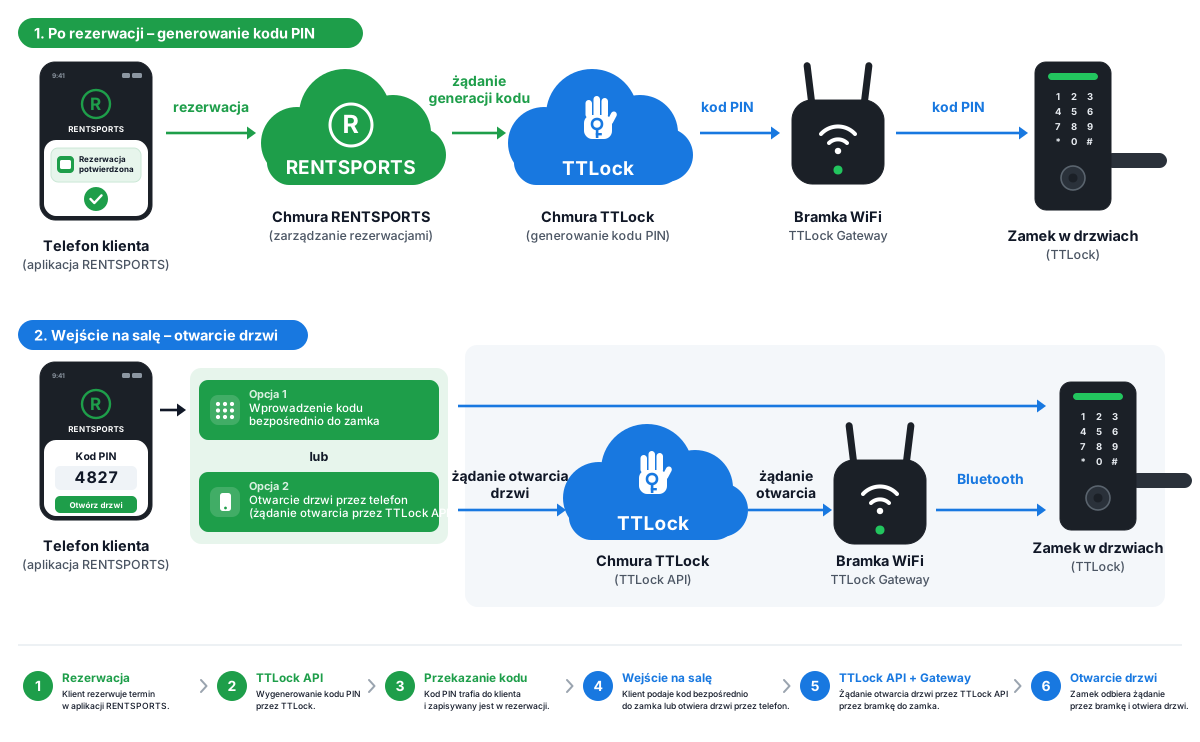
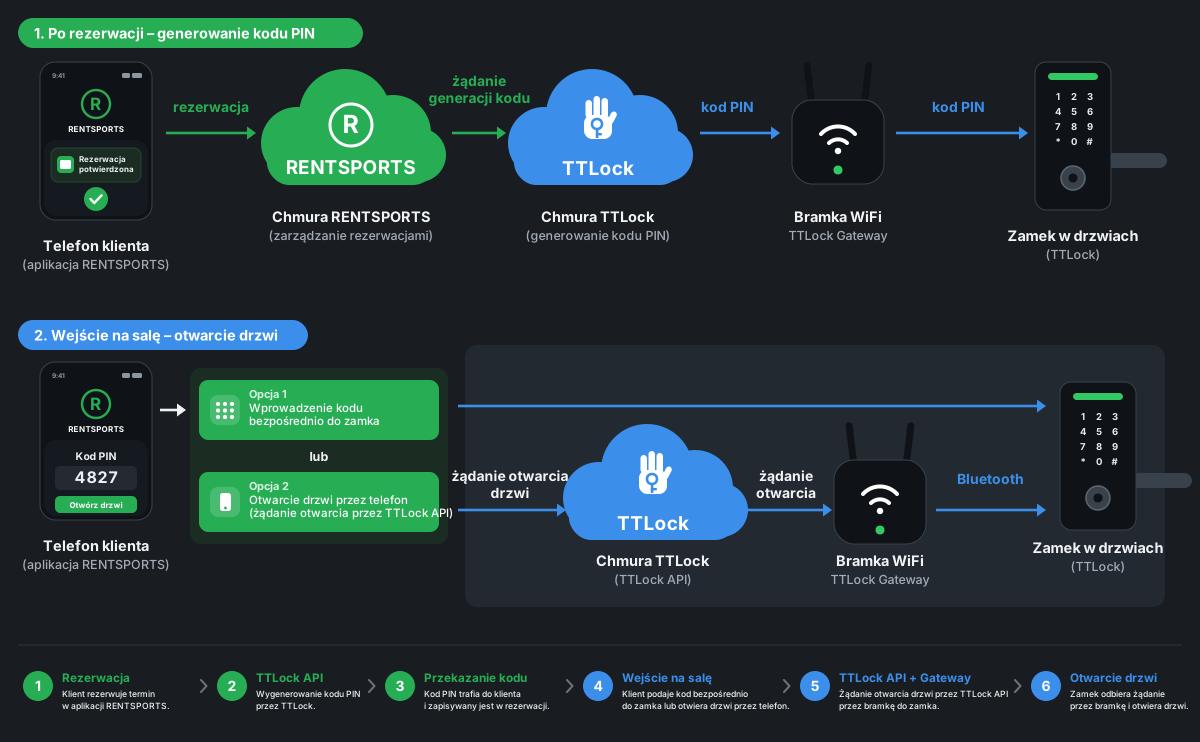
Kod możesz też wygenerować ręcznie dla pojedynczej rezerwacji, przyciskiem Generuj klucz w jej szczegółach. Przycisk pojawia się przy rezerwacji opłaconej, która nie ma jeszcze wydanego kodu, i wysyła kod klientowi ponownie. Przydaje się, gdy klient zgubił wiadomość.
8. Godziny
Siatkę godzin system układa sam, z godzin otwarcia podanych w Szczegółach. Tutaj ją poprawiasz: tydzień rozpisany jest na siedem kolumn, po jednej na dzień, a w każdej stoją godziny tego dnia. Zrobisz z nimi trzy rzeczy.
- Dodanie godziny. Przycisk w nagłówku kolumny dopisuje do wybranego dnia nowy slot wraz z jego mnożnikiem ceny.
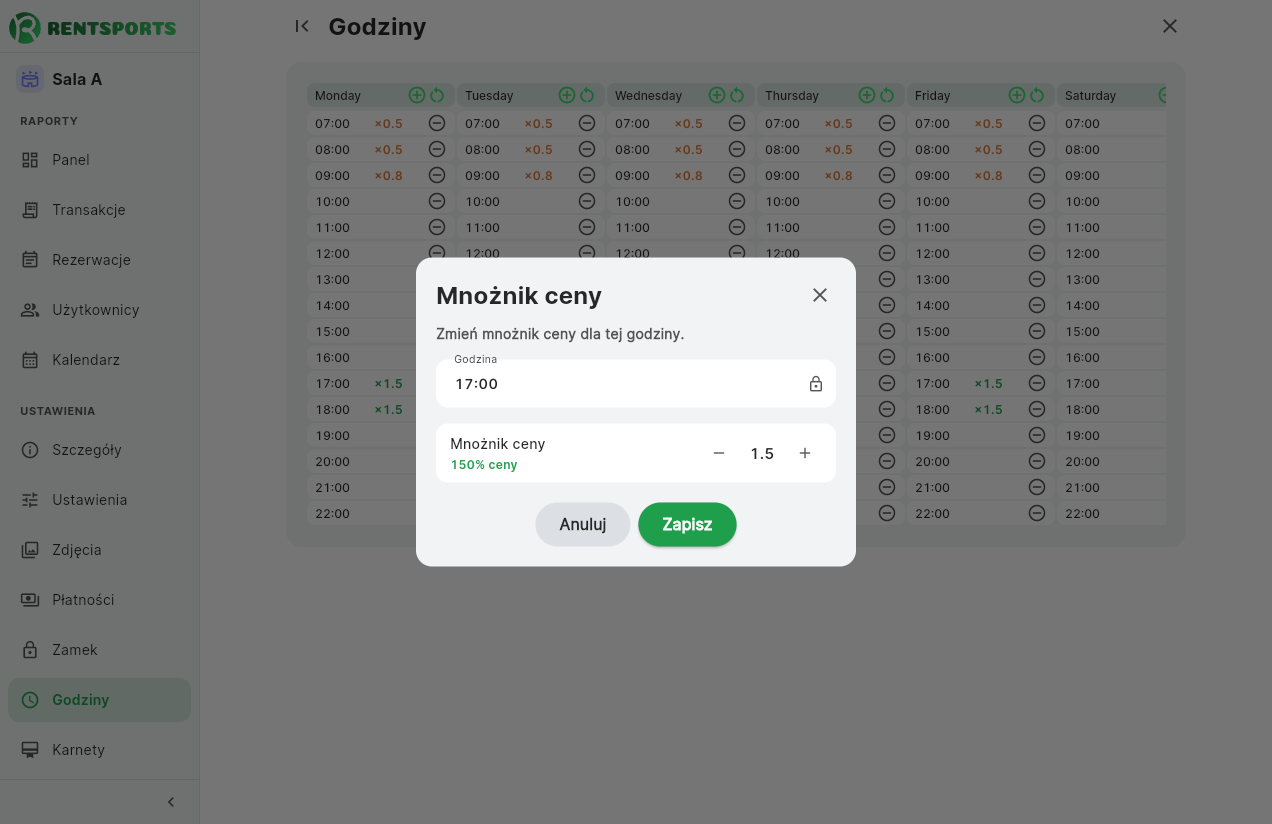
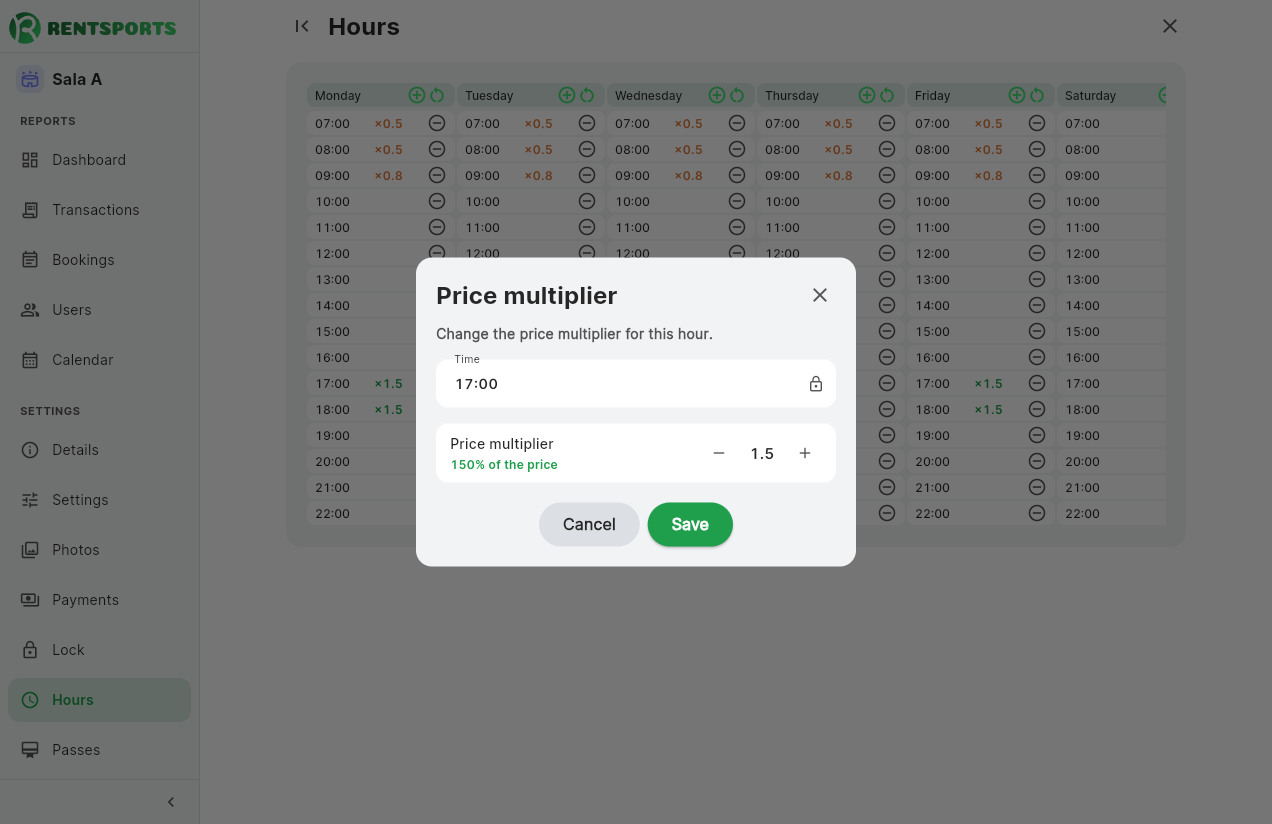
- Zmiana mnożnika ceny. Dwukrotne kliknięcie slotu otwiera okno mnożnika obowiązującego dla tej jednej godziny w tym jednym dniu, na przykład 1,5 na weekendowy wieczór albo 0,8 na tańszą godzinę poranną. Mnożnik ustawiasz od 0 do 3, co 0,1. Cena podstawowa pochodzi z konfiguracji obiektu, a mnożnik jedynie ją przelicza. Sloty o mnożniku innym niż 1,0 panel oznacza wartością widoczną przy godzinie, na przykład ×1,5.
- Usunięcie godziny. Ikona przy slocie usuwa go z danego dnia, po uprzednim potwierdzeniu. W ten sposób blokujesz na stałe konkretną godzinę w konkretnym dniu tygodnia, na przykład wtedy, gdy kort w każdy czwartkowy wieczór służy treningom i nie ma trafiać do oferty.
- Przywrócenie dnia. Druga ikona w nagłówku kolumny ustawia godziny tego dnia na nowo według godzin otwarcia obiektu. Wprowadzone w nim zmiany zostaną utracone.
Usunięty slot nie wraca samoczynnie. Aby go przywrócić, dodaj go ponownie z tego samego ekranu.
Ponowne wygenerowanie kalendarza z konfiguracji obiektu nadpisuje całą siatkę tygodnia, a więc usuwa wprowadzone tu mnożniki i przywraca usunięte sloty. Panel ostrzega o tym przed wykonaniem operacji.
9. Karnety
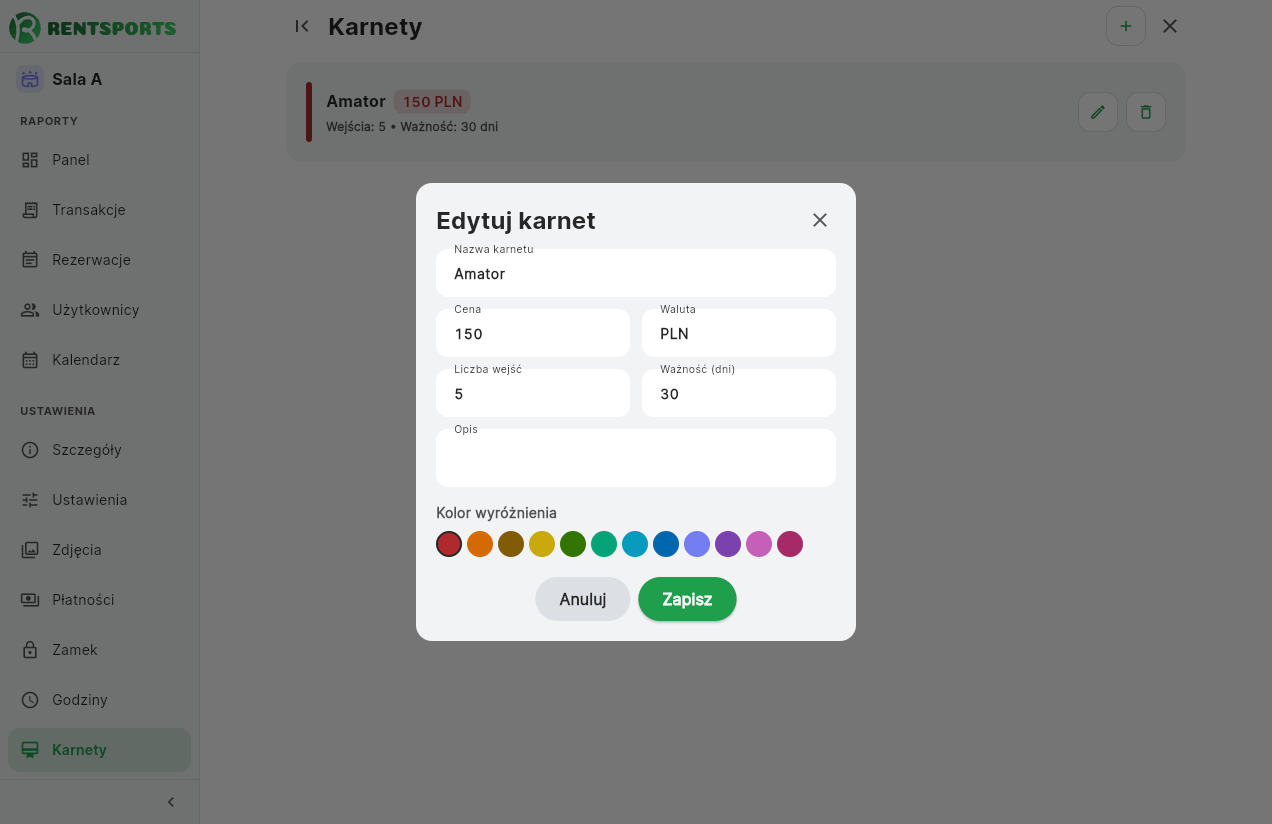
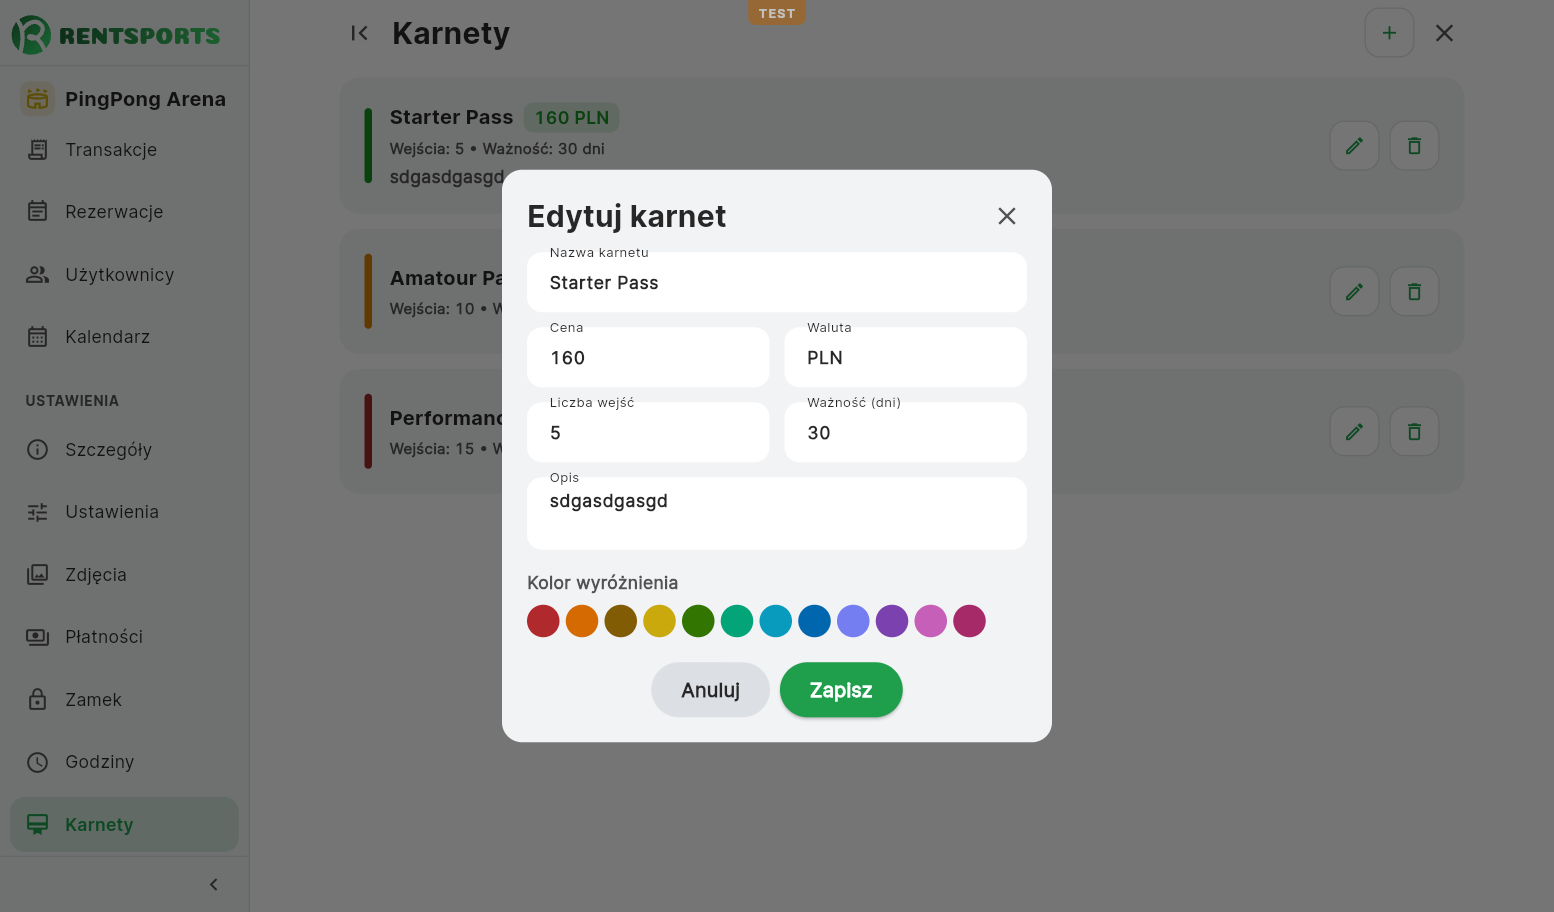
Karnet uprawnia klienta do korzystania z obiektu w ramach opłaconej z góry puli wejść lub przez określony czas. Karnety definiujesz osobno dla każdego obiektu, a formularz obejmuje następujące pola.
- Nazwa karnetu oraz Opis, widoczne dla klienta w aplikacji.
- Cena i Waluta. Pozostawienie waluty pustej oznacza PLN.
- Liczba wejść, co najmniej 1. Panel nie zapisze karnetu bez wejść.
- Ważność w dniach, liczona od dnia zakupu, co najmniej 1 dzień.
- Kolor wyróżnienia, wybierany z palety, którym karnet jest oznaczany na liście.
Oba ograniczenia obowiązują równocześnie, więc karnet na dziesięć wejść ważny 90 dni wygasa po wykorzystaniu puli albo po upływie terminu, zależnie od tego, co nastąpi wcześniej. Lista karnetów podsumowuje te wartości w formacie „Wejścia: 10 • Ważność: 90 dni”, a przy każdej pozycji udostępnia przyciski edycji i usunięcia.
Sprzedaż karnetów wymaga włączonych płatności online. Przy wyłączonych płatnościach przycisk dodania karnetu pozostaje nieaktywny, a nad istniejącą listą pojawia się informacja, że klienci nie mogą ich obecnie kupić.
10. Raporty
Cztery zestawienia opisane niżej, razem z Pulpitem z rozdziału Statystyki, widzi każdy administrator przypisany do obiektu. Uprawnienia do sekcji konfiguracji niczego tu nie ograniczają: raporty dostaje każdy, kto obsługuje obiekt.
Transakcje
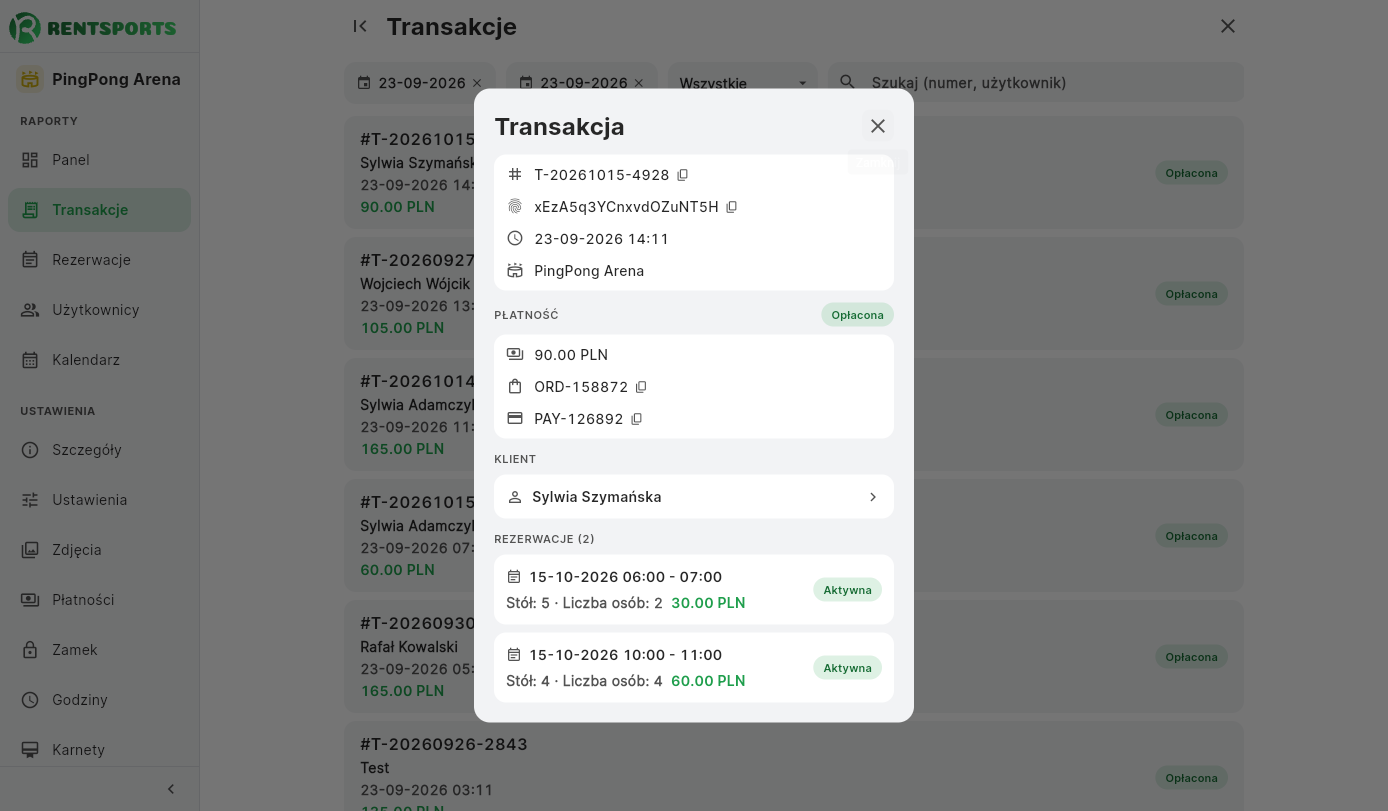
Zestawienie wpłat z zakresem dat oraz filtrem statusu obejmującym transakcje zatwierdzone, oczekujące, nieudane i pochodzące z karnetów. Wyszukiwarka przeszukuje numer transakcji oraz nazwę klienta.
Rezerwacje
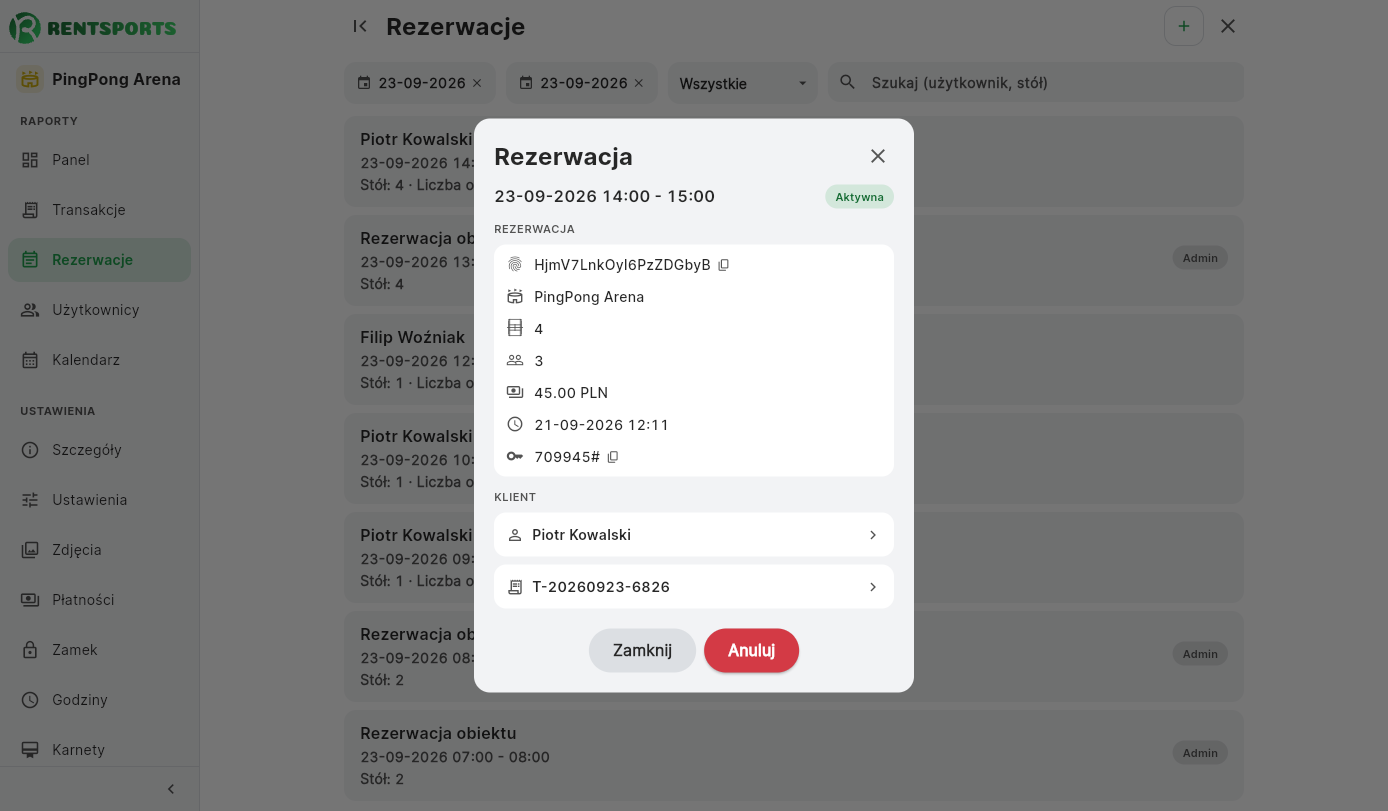
Te same rezerwacje przedstawione jako lista. Zakres dat zawęża listę, a filtr statusu obejmuje rezerwacje aktywne, anulowane, opłacone karnetem, dodane przez administratora oraz te, dla których nie wydano kodu do zamka. Wyszukiwarka przeszukuje nazwę klienta oraz numer kortu lub stołu. Rezerwację ręczną dodajesz również stąd, a anulowanie z poziomu listy uruchamia zwrot na zasadach określonych w ustawieniach obiektu.
Użytkownicy
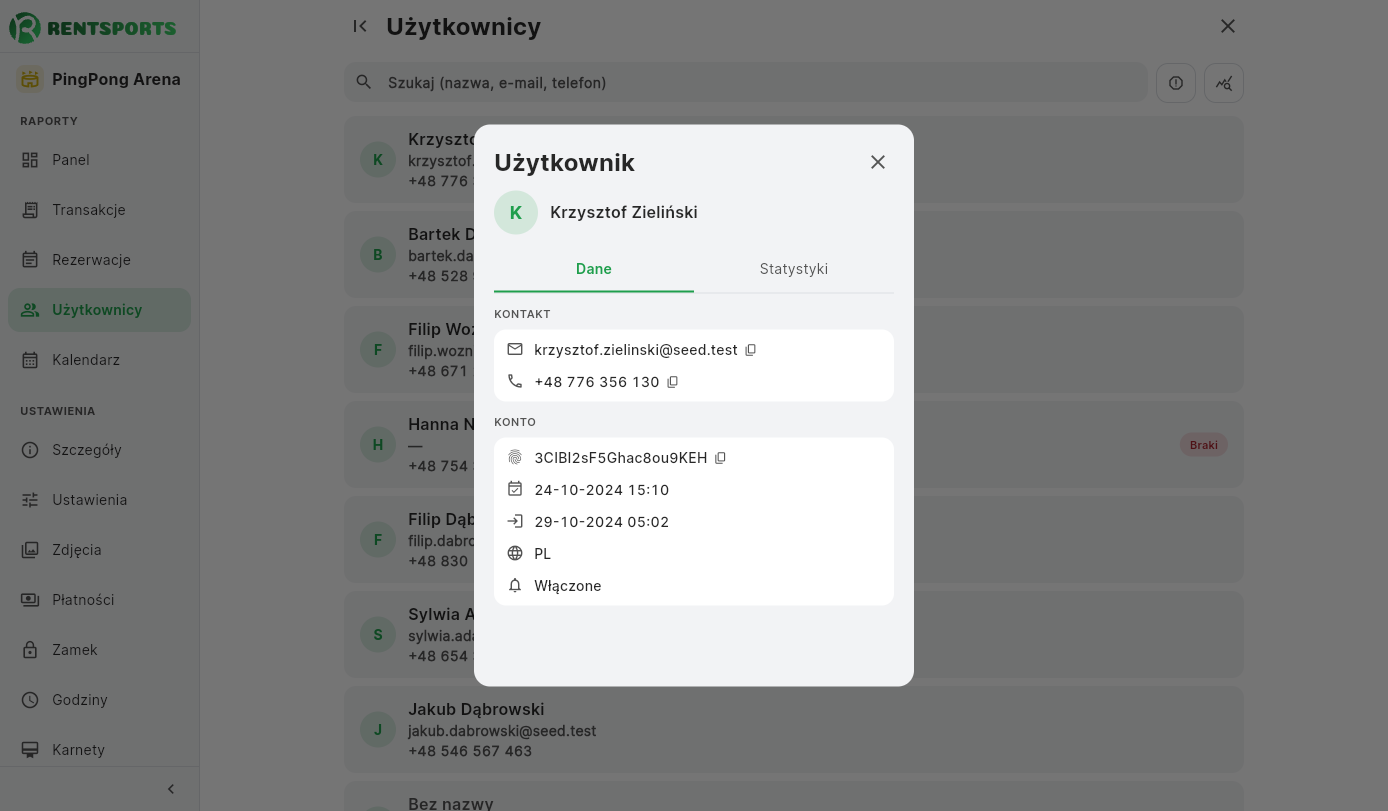
Lista klientów, którzy dokonali rezerwacji w tym obiekcie, z wyszukiwaniem po nazwie, adresie e-mail i numerze telefonu. Przełącznik Tylko z brakami ogranicza listę do kont o niekompletnym profilu, a przełącznik statystyk dodaje do każdego wiersza liczbę i wartość rezerwacji danego klienta.
Kalendarz
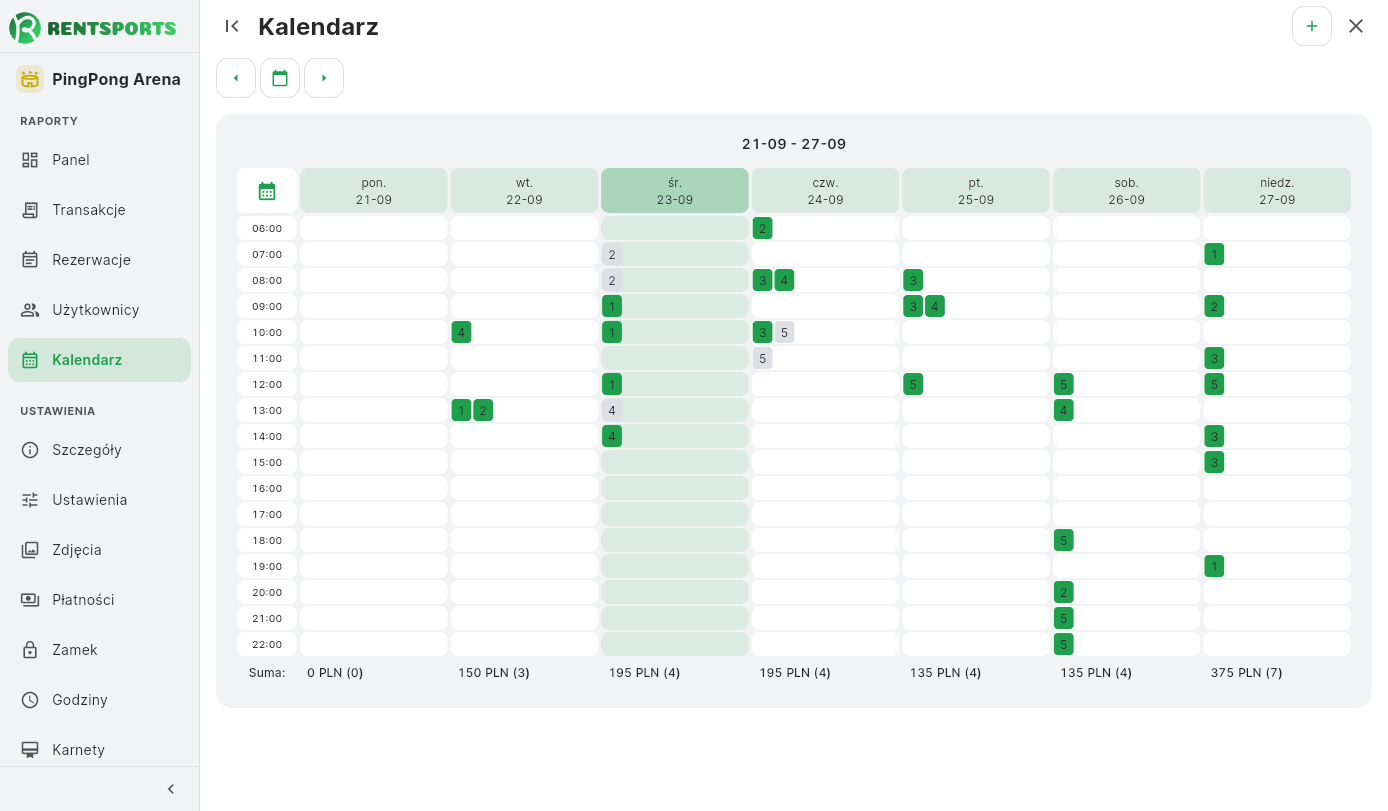
Wizualna siatka rezerwacji w układzie siedmiu dni i godzin. Przełącznik widoku dziennego i tygodniowego zmienia nagłówek oraz to, o ile przesuwają się strzałki: o jeden dzień albo o cały tydzień. Rezerwacje z tej samej godziny stoją obok siebie, uporządkowane numerem kortu lub stołu. Stąd też dodajesz rezerwację ręcznie, tak samo jak z sekcji Rezerwacje (patrz niżej).
11. Dodanie rezerwacji
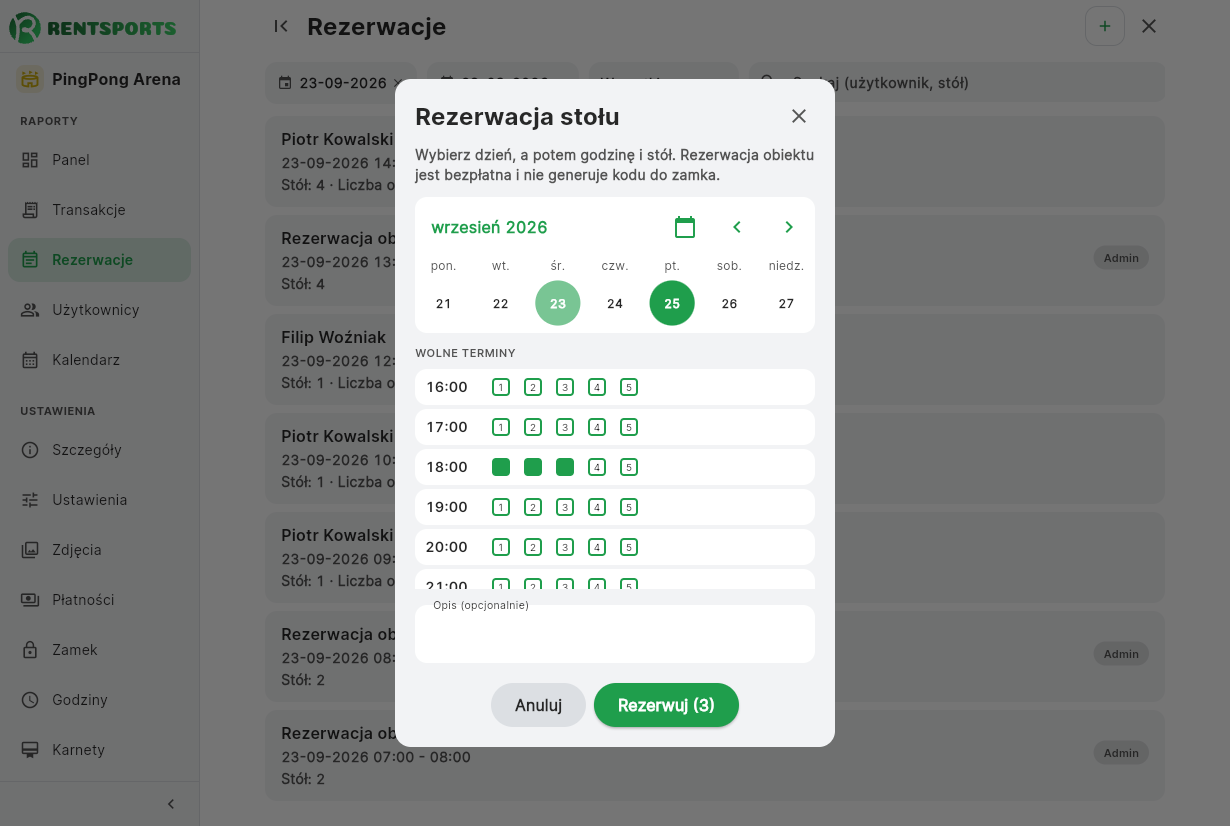
Rezerwację obiektu, czyli blokadę stołu bez udziału klienta (na przykład na trening albo serwis), dodajesz ręcznie z panelu, tym samym oknem niezależnie od tego, skąd je otworzysz.
Skąd to wywołać
Przycisk Dodaj rezerwację znajdziesz w trzech miejscach: w nagłówku sekcji Rezerwacje, w pustym stanie listy rezerwacji (gdy żadna pozycja nie pasuje do filtrów) oraz w nagłówku Kalendarza. Wszystkie trzy otwierają identyczne okno „Rezerwacja stołu”.
Wybór terminu
W oknie wybierasz najpierw dzień z kalendarza tygodniowego. Pod spodem pojawia się lista wolnych terminów: każda godzina otwarcia obiektu tego dnia to osobny wiersz z ponumerowanymi stołami. Wolny stół ma pole wyboru, zajęty tylko numer, bez możliwości zaznaczenia, więc nie da się przypadkiem zdublować rezerwacji z tego poziomu. Możesz zaznaczyć od razu kilka terminów, także na różnych stołach i o różnych godzinach, i zapisać je jednym kliknięciem przycisku Rezerwuj (N), gdzie N to liczba zaznaczonych slotów. Opcjonalne pole opisu (maksymalnie dwie linijki) pozwala dopisać notatkę, na przykład powód blokady.
Jeśli w danym dniu nie zostały już żadne wolne godziny, panel pokazuje „Na dziś nie ma już wolnych godzin.”, a jeśli obiekt jest tego dnia zamknięty: „Obiekt jest zamknięty tego dnia.”.
Cena i dane klienta
Rezerwacja dodana tą drogą jest zawsze bezpłatna i nie generuje kodu do zamka. Okno nie ma pola ceny ani pól na dane osoby rezerwującej; na liście rezerwacji taka pozycja jest oznaczona jako rezerwacja administratora. Jeśli klient ma zapłacić i dostać kod do drzwi, rezerwację składa przez aplikację, nie przez ten formularz.
Ochrona przed podwójną rezerwacją
Zajęty stół nie ma pola wyboru, więc z tego okna nie zdublujesz rezerwacji. Jeśli ktoś inny zajmie ten sam termin w tej samej chwili, panel pokazuje błąd „Termin zajęty” z listą kolidujących terminów i nie zapisuje żadnej rezerwacji z tej partii; zaznacz wtedy inne godziny i zapisz ponownie.
Widoczność na liście
Rezerwacje dodane tą drogą pojawiają się na liście Rezerwacje i w Kalendarzu tak samo jak zwykłe, oznaczone jako rezerwacja administratora. Filtr statusu na liście Rezerwacje pozwala pokazać wyłącznie takie pozycje, co ułatwia odróżnienie własnych blokad terminu od rezerwacji klientów.
Anulowanie
Odwołujesz je tak samo jak zwykłą rezerwację, z listy albo z Kalendarza. Ponieważ nie przechodziły przez kasę, anulowanie nie generuje zwrotu, bo nie ma powiązanej transakcji: pełne zasady odwoływania opisuje kolejny rozdział.
12. Rezygnacja z rezerwacji
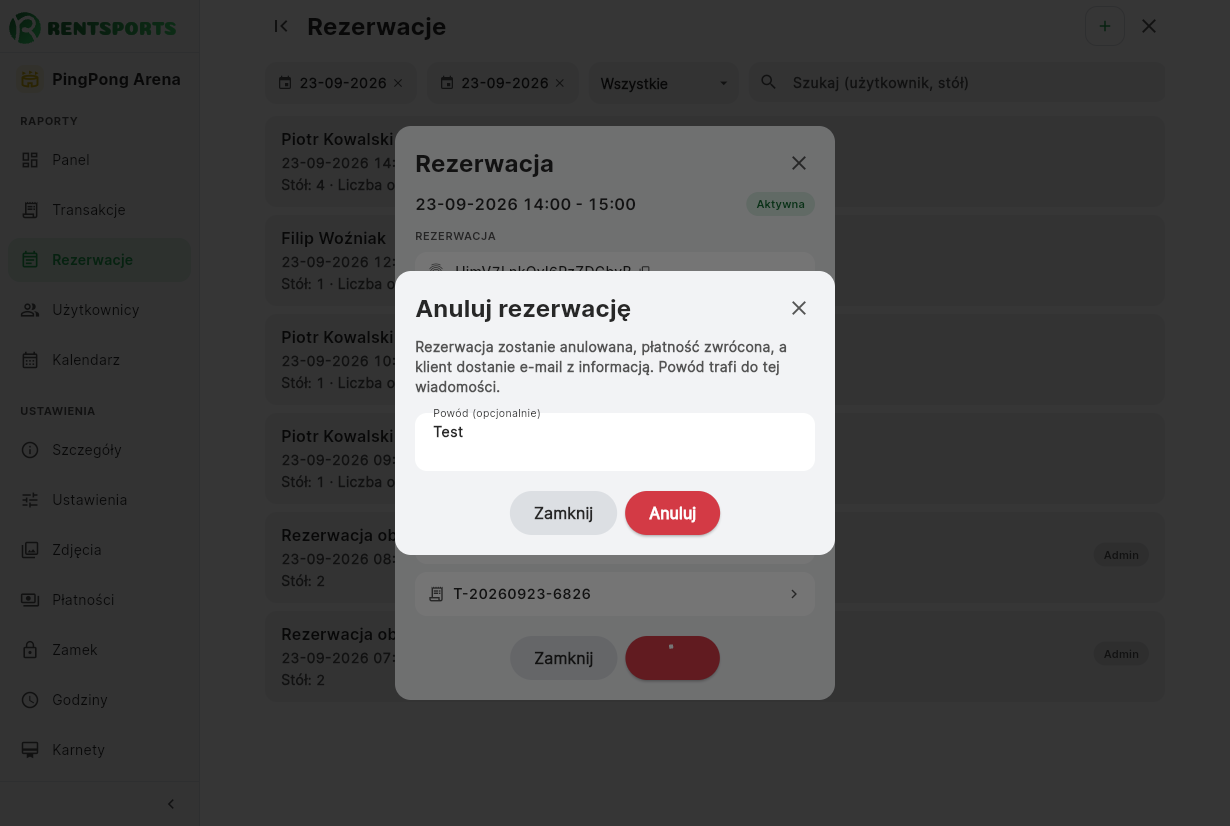
Rezerwację można odwołać z dwóch stron: robi to klient w aplikacji albo Ty z panelu. Obie drogi zwalniają termin i obie potrafią uruchomić zwrot, ale rządzą się innymi zasadami, a różnica jest istotna w codziennej pracy.
Kiedy odwołuje klient
Klienta obowiązuje termin bezkosztowego anulowania, który ustawiasz w Ustawieniach obiektu w godzinach od 0 do 168, czyli do siedmiu dni. Wartość domyślna to 24 godziny, a zero pozwala odwołać rezerwację aż do jej rozpoczęcia. Po upływie terminu przycisk odwołania znika z aplikacji i rezerwacji nie da się już odwołać z konta klienta.
Zmiana tego ustawienia nie działa wstecz. Rezerwacje złożone wcześniej zachowują termin, który obowiązywał w chwili ich składania, więc skrócenie terminu nie odbiera im prawa do odwołania. Nowe ustawienie dotyczy wyłącznie rezerwacji przyszłych.
Kiedy odwołujesz Ty
Anulowanie z panelu nie podlega terminowi granicznemu. Obsługa może odwołać rezerwację w dowolnym momencie, także po jego upływie, bo to Ty odpowiadasz za obiekt i to Ty rozstrzygasz sytuacje wyjątkowe: awarię oświetlenia, zalany kort, pomyłkę przy rezerwacji telefonicznej.
Rezerwację odwołasz z listy rezerwacji oraz z grafiku. Uprawnienie ma wyłącznie administrator przypisany do tego obiektu; samo posiadanie konta administratora w systemie nie wystarczy.
Co się dzieje ze zwrotem
Zwrot uruchamia się automatycznie, przez PayU, na to samo źródło, z którego przyszła wpłata. Nie wymaga to od Ciebie żadnej czynności. Nie każda rezerwacja go jednak generuje:
- Rezerwacja opłacona online. Zwrot pełnej kwoty przez PayU. Czas zaksięgowania zależy od banku klienta i zwykle wynosi kilka dni roboczych.
- Rezerwacja opłacona karnetem. Wejście wraca do puli karnetu, niezależnie od tego, czy rezerwację odwołuje klient z aplikacji, czy Ty z panelu. Pieniądze nie wracają, bo za tę rezerwację nie zapłacono osobno.
- Rezerwacja rozliczana na miejscu. Nie powstało żadne zamówienie PayU, więc nie ma czego zwracać. Termin po prostu wraca do puli.
- Rezerwacja nieopłacona. Wygasła blokada terminu, za którą nic nie pobrano. Bez zwrotu. Taką rezerwację możesz też usunąć z panelu przyciskiem Usuń w jej szczegółach; klient dostaje wtedy wiadomość o anulowaniu.
- Rezerwacja dodana ręcznie przez administratora. Nie przechodziła przez kasę, więc nie ma powiązanej transakcji ani zwrotu.
Kod do drzwi
Odwołanie rezerwacji usuwa wydany do niej kod, żeby nie otwierał drzwi w terminie, który już do nikogo nie należy. Dotyczy to obu dróg odwołania.
Usunięcie kodu wymaga łączności z zamkiem przez bramkę. Przy bramce offline kod zostanie w zamku do końca swojego okna ważności, czyli do końca odwołanej rezerwacji. Nie jest to groźne, bo okno i tak wygasa samo, ale warto o tym wiedzieć przy obiekcie bez stałego połączenia.
Gdzie to widać później
Rezerwacja odwołana zostaje w systemie i jest widoczna na liście rezerwacji pod filtrem statusu. Klient nie widzi jej już wśród swoich rezerwacji, ale znajduje ją w szczegółach swojej transakcji, wyraźnie oznaczoną. Dzięki temu zawsze widać, za co klient faktycznie zapłacił i co zostało zwrócone.
13. Administratorzy
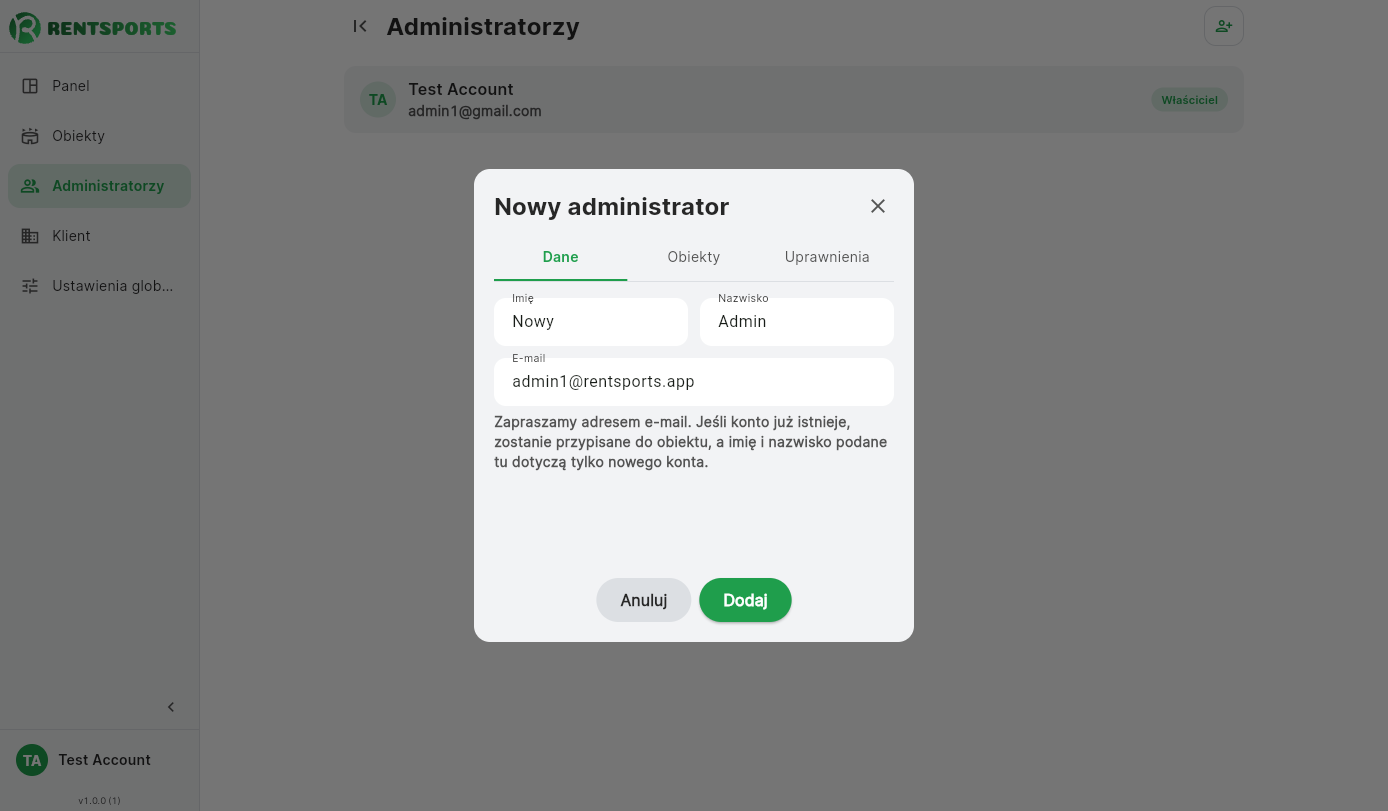
Administratorów dodajesz z panelu właściciela. Formularz prowadzi przez trzy zakładki: Dane, Obiekty i Uprawnienia. Każdemu administratorowi przypisujesz obiekty oraz sekcje konfiguracji, do których uzyskuje dostęp.
- Podaj adres e-mail. Imię i nazwisko są opcjonalne, administrator uzupełni je przy ustawianiu hasła.
- Zaznacz obiekty, którymi administrator ma zarządzać.
- Zaznacz sekcje konfiguracji, które ma otwierać: Szczegóły, Ustawienia, Zdjęcia, Płatności, Zamek, Godziny oraz Karnety. Na starcie zaznaczone są wszystkie.
Po zapisaniu nowy administrator otrzymuje wiadomość z linkiem do ustawienia hasła. Jeśli konto o podanym adresie już istnieje, system przypisuje do niego wybrane obiekty i wysyła powiadomienie do tej osoby, zamiast zakładać drugie konto. Jej dotychczasowe uprawnienia pozostają bez zmian.
Administrator widzi i obsługuje wyłącznie obiekty, które mu przypisałeś, także w raportach. Wszystkie obiekty konta widzi tylko właściciel.
Ograniczenia obejmują wyłącznie sekcje konfiguracji. Raporty, czyli Panel, Kalendarz, Rezerwacje, Transakcje i Użytkownicy, pozostają dostępne dla każdego administratora przypisanego do obiektu.
Administrator z dostępem do obiektu widzi dane osobowe klientów, którzy w nim rezerwują. Nadawaj dostęp tylko osobom, które faktycznie obsługują obiekt.
Administrator z innego klubu
Możesz dodać osobę, która ma już konto w RENTSPORTS, na przykład właściciela innego klubu. W Twoim obiekcie obowiązują wtedy wyłącznie uprawnienia, które jej nadasz, niezależnie od roli, jaką pełni gdzie indziej. Działa to w obie strony: ograniczenia ustawione u Ciebie nie zmieniają jej uprawnień w jej własnym klubie, a ona sama nie może w Twoim obiekcie wyjść poza nadane sekcje ani go aktywować, dezaktywować czy usunąć.
Sekcje Płatności i Zamek chronią klucze PayU i hasło do zamka nie tylko w panelu: osoba bez tych sekcji nie odczyta ich w żaden sposób. Lista kontrolna konfiguracji obiektu pokazuje administratorowi tylko kroki z sekcji, do których ma dostęp.
Usunięcie administratora
Administratora usuwasz w oknie jego edycji przyciskiem Usuń, po potwierdzeniu. Jeśli jego konto służy też do czegoś innego, bo jest administratorem w innym klubie albo korzysta z aplikacji klienta, odbierany jest mu tylko dostęp do Twoich obiektów, a konto zostaje. Konto używane wyłącznie u Ciebie jest usuwane w całości. Konta właściciela nie da się usunąć w ten sposób.
14. Statystyki
System prezentuje podsumowania w dwóch miejscach: osobno dla każdego obiektu oraz zbiorczo dla wszystkich obiektów klienta.
Panel obiektu
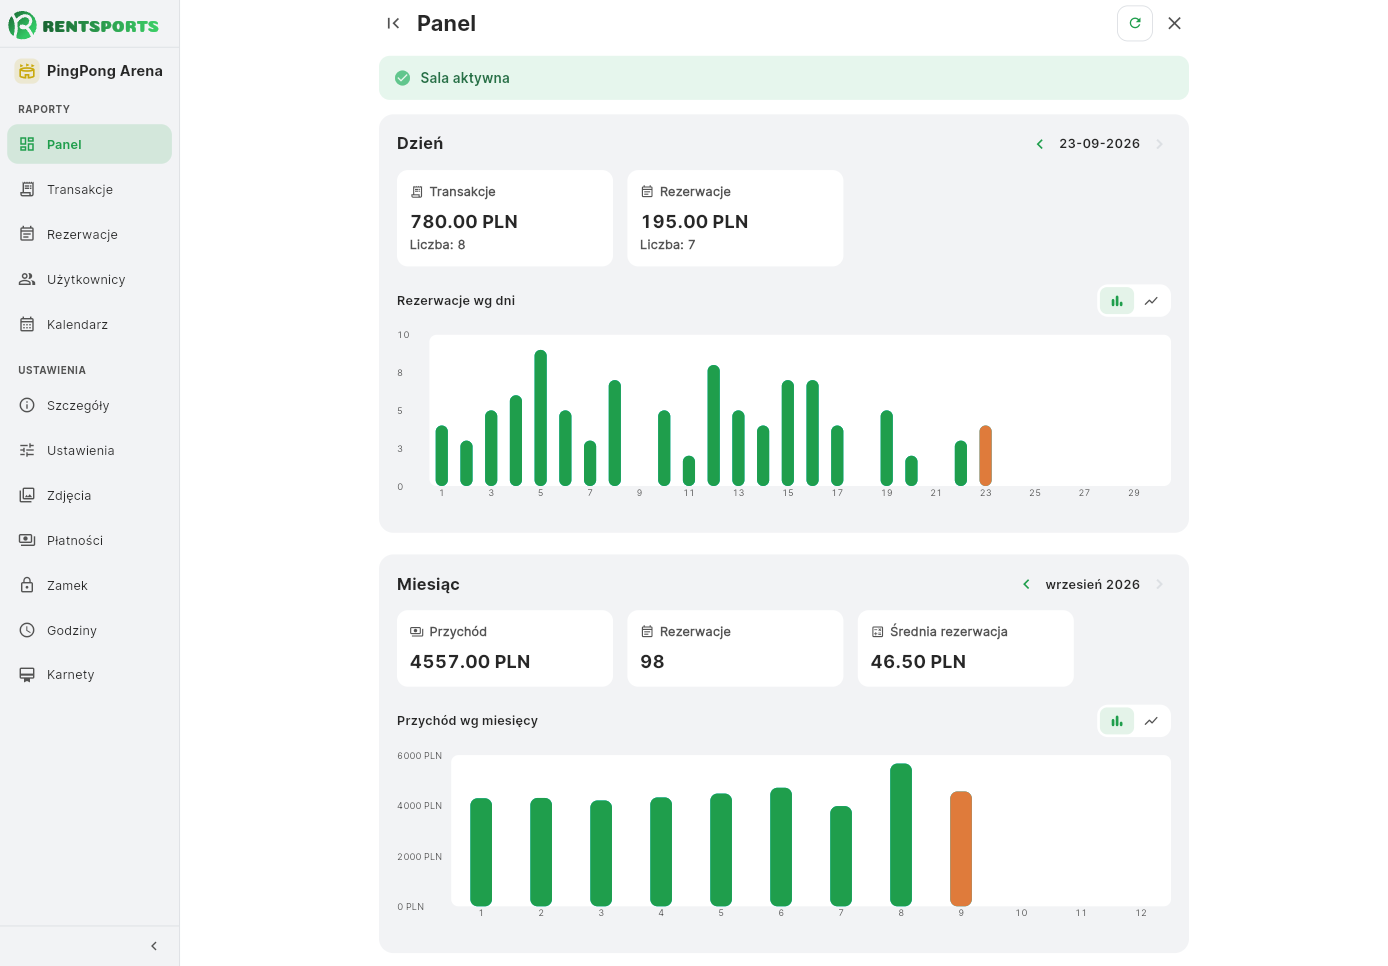
Ekran otwierający panel każdej hali. Dopóki konfiguracja pozostaje niekompletna, u góry widnieje lista kontrolna opisana w rozdziale drugim. Poniżej znajdują się dwie karty. Karta Dzień podaje liczbę rezerwacji i sumę wpłat wraz z wykresem dziennym, a karta Miesiąc te same wartości uzupełnione o średnią wartość rezerwacji i wykres przychodu według miesięcy. Strzałki przy każdej karcie przesuwają wybrany okres, a pod kartami widnieje lista najbliższych rezerwacji.
Panel klienta
Osobna pozycja Panel w menu właściciela, obok pozycji Obiekty. Zamiast danych pojedynczej hali przedstawia zestawienie porównawcze wszystkich obiektów, w którym każdy występuje w przypisanym mu kolorze. Legenda nad wykresami wiąże kolory z nazwami obiektów.
Obiekt bez uzupełnionej nazwy nie pojawi się na wykresach zbiorczych.
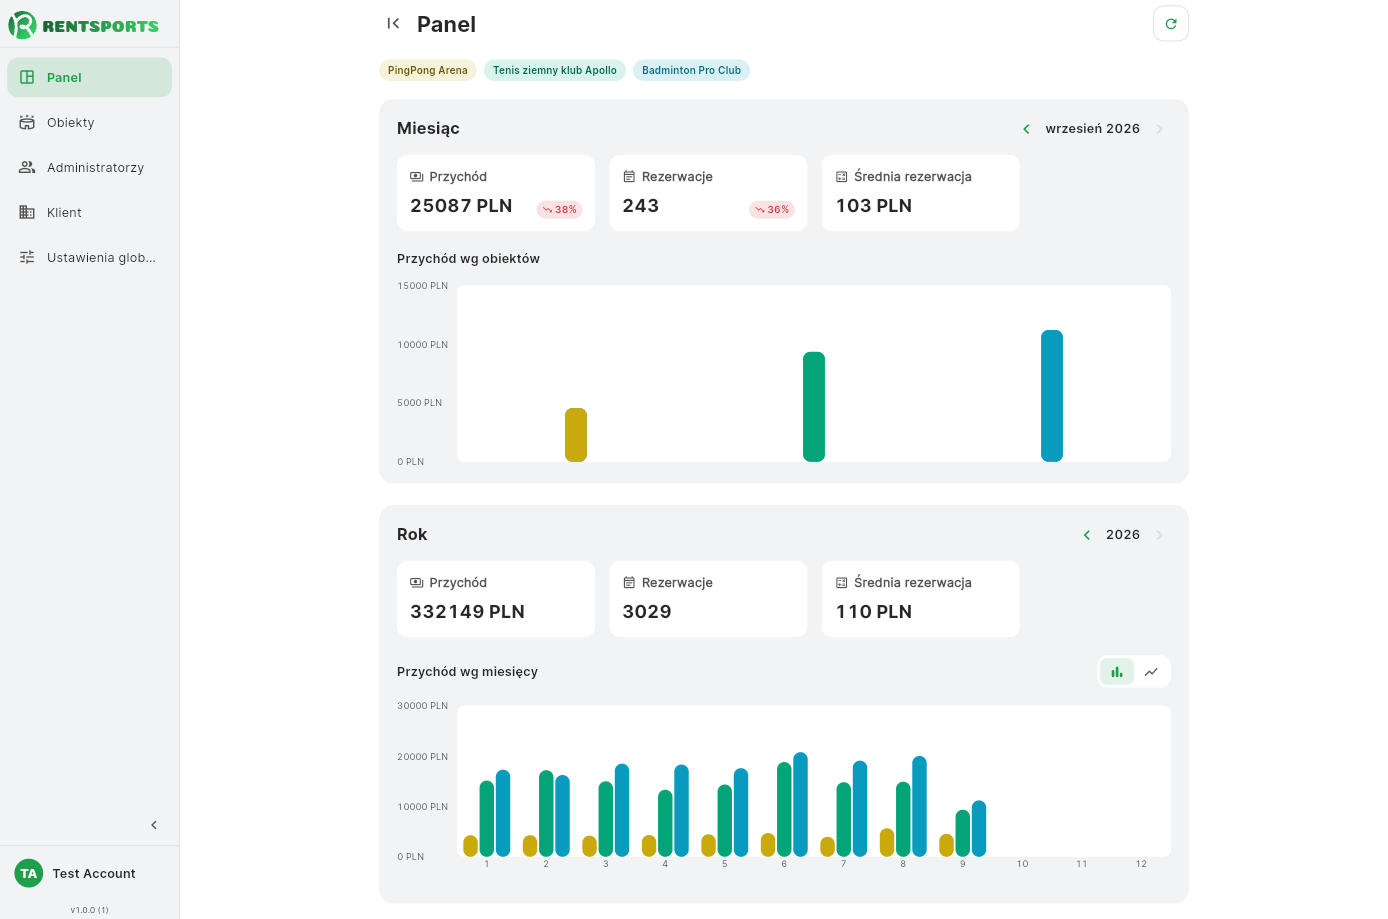
Karta dnia korzysta z bieżących danych, dzięki czemu rezerwacja lub wpłata pojawia się w niej od razu. Zestawienia miesięczne i wykresy odświeżają się raz na dobę, w nocy, więc dane bieżącego dnia trafiają do nich nazajutrz. Jeśli potrzebujesz ich wcześniej, użyj przycisku przeliczenia statystyk od wybranego dnia.
15. Klient
Do tej sekcji wchodzi wyłącznie właściciel konta. Znajdzie w niej dwie zakładki: dane firmy używane na fakturach oraz stan subskrypcji.
Dane klienta
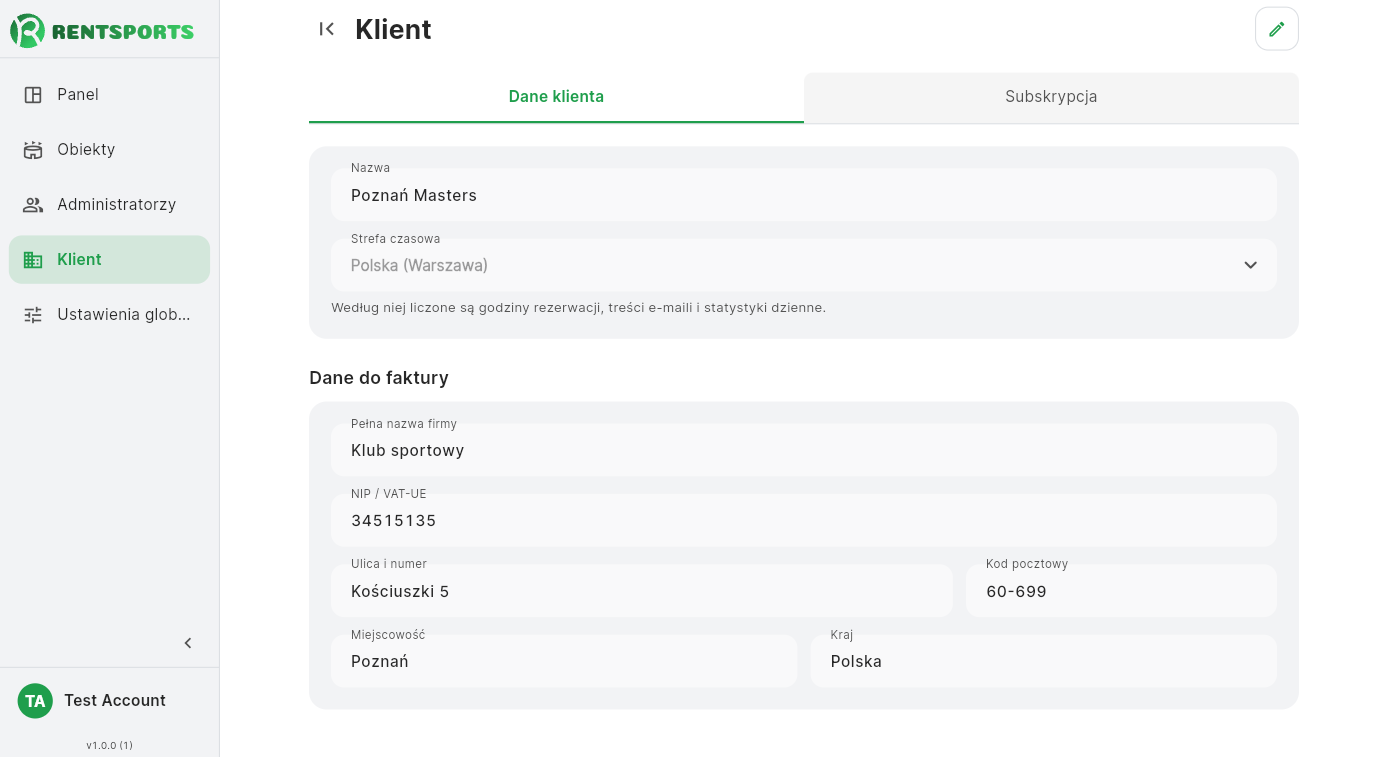
Dane firmy do faktury, edytowalne przyciskiem Edytuj/Zapisz: nazwa firmy, NIP lub numer VAT-UE, adres do faktury i strefa czasowa. To te same dane, które podałeś przy rejestracji w kroku 2, tu możesz je poprawić.
Usunięcie konta
Na dole zakładki Dane klienta, w strefie zagrożenia, właściciel znajduje przycisk Usuń trwale. Usuwa on całe konto klienta: wszystkie obiekty razem z rezerwacjami, transakcjami, karnetami, statystykami, ustawieniami zamków i płatności oraz zdjęciami. Administratorzy tracą dostęp do panelu.
Usunięcie potwierdzasz na dwa sposoby: wpisujesz dokładną nazwę klienta i podajesz swoje hasło. Dopóki obu nie ma, przycisk pozostaje nieaktywny.
- Subskrypcja zostaje anulowana od razu, bez zwrotu za bieżący, już opłacony okres. Jeśli anulowanie się nie powiedzie, nic nie zostaje usunięte i możesz spróbować ponownie później.
- Faktury za subskrypcję pozostają u operatora płatności, bo wymagają tego przepisy. Po usunięciu konta nie zalogujesz się już do panelu, więc pobierz je wcześniej z Historii płatności.
- Klienci aplikacji zachowują swoje konta. Znika jedynie ich powiązanie z Twoimi obiektami.
- Administratorzy, których konta służą też do czegoś innego, na przykład do innego klubu albo do aplikacji klienta, zachowują konto. Pozostałe konta administratorów są usuwane.
- Na adres właściciela wysyłamy wiadomość z potwierdzeniem usunięcia.
Usunięcia konta nie da się cofnąć. Jeśli chcesz tylko przestać płacić i zachować dostęp do końca opłaconego okresu, wybierz Rezygnację, opisaną niżej.
Subskrypcja
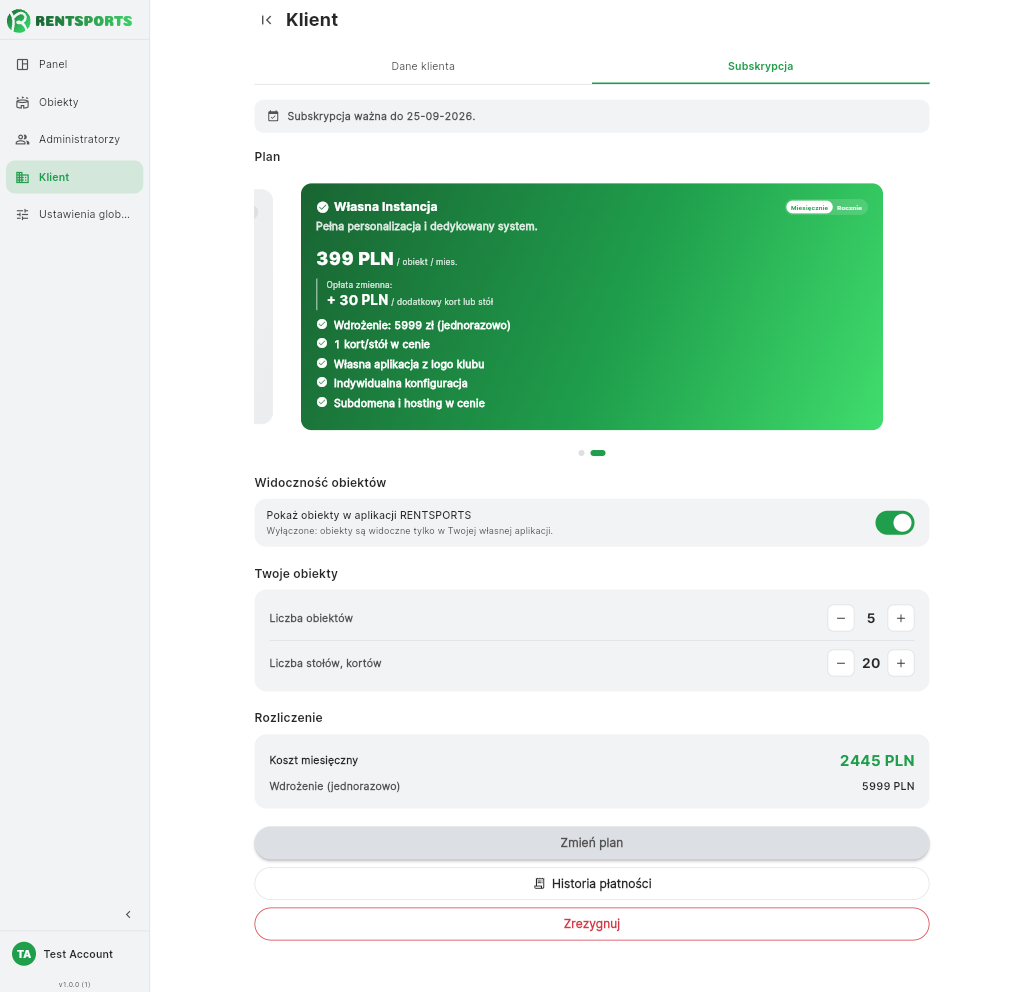
Zakładka pozostaje aktywna bez przełączania w tryb edycji. Plan, liczbę obiektów, liczbę kortów lub stołów oraz okres rozliczeniowy zmieniasz bezpośrednio, a panel przelicza kwotę po każdej zmianie. Przycisk zmiany planu pozostaje nieaktywny, dopóki wybór odpowiada stanowi zapisanemu.
Własna Instancja
Własna Instancja to osobna wersja aplikacji klienckiej, wydana pod Twoją marką i ze stylem, który sam definiujesz: nazwa, logo i kolorystyka. Pokazuje wyłącznie Twoje obiekty, klient nie widzi w niej innych klubów. Publikujemy ją jako osobną aplikację w Google Play i Apple App Store, razem z własną subdomeną wersji przeglądarkowej, i obejmuje ją jednorazowa opłata wdrożeniowa. Model SaaS korzysta ze wspólnej aplikacji RENTSPORTS, w której Twoje obiekty stoją obok obiektów innych klubów.
Widoczność obiektów
Przełącznik Pokaż obiekty w aplikacji RENTSPORTS pojawia się przy Własnej Instancji. Włączony sprawia, że Twoje obiekty są widoczne także we wspólnej aplikacji RENTSPORTS, obok obiektów innych klubów, więc trafiają do jej ruchu. Wyłączony zostawia je tylko w Twojej własnej aplikacji. Przełącznik obejmuje wszystkie Twoje obiekty naraz, nie pojedynczy.
Zmiana planu
Jeśli masz już aktywną subskrypcję, zmiana działa od razu, tego samego dnia, i rozlicza się proporcjonalnie do reszty okresu. Przejście z modelu SaaS na Własną Instancję dolicza do niej jednorazową opłatę wdrożeniową. Jeśli subskrypcja została wcześniej zakończona albo nigdy nie została opłacona, zmiana planu przekierowuje do nowej płatności i zaczyna działać po jej opłaceniu.
Z Własnej Instancji nie da się samodzielnie wrócić do modelu SaaS. Potrzebna jest do tego pomoc obsługi.
Historia płatności
Przycisk Historia płatności otwiera stronę naszego operatora płatności, na której znajdziesz listę wszystkich opłat za subskrypcję, faktury do pobrania oraz kartę, z której pobierane są należności, wraz z możliwością jej zmiany. Przycisk pojawia się, gdy subskrypcja została choć raz opłacona. Po zakończeniu wracasz do panelu.
Rozliczenie roczne
Przy wyborze okresu rocznego naliczamy 10% rabatu od sumy dwunastu opłat miesięcznych.
Rezygnacja
Rezygnację składasz w panelu. Dostęp zachowujesz do końca opłaconego okresu, po czym subskrypcja nie odnawia się.
16. Typowe problemy
Cztery sytuacje, które zgłaszacie najczęściej. Przy każdej piszemy, co sprawdzić w pierwszej kolejności, zanim napiszesz do nas.
Klient nie dostał kodu PIN
Sprawdź kolejno, czy płatność ma status opłaconej, czy bramka WiFi jest podłączona, czy zamek jest przypisany do obiektu oraz czy test połączenia kończy się powodzeniem. Najczęstszą przyczyną pozostaje bramka umieszczona poza zasięgiem zamka albo brak połączenia z internetem na obiekcie.
Rezerwacja zniknęła przed opłaceniem
Po upływie czasu na opłacenie, domyślnie 30 minut, termin wraca do puli wolnych, aby nie blokować go pozostałym klientom. Jeżeli klienci nie zdążają z płatnością, wydłuż ten czas na ekranie Ustawienia.
Zwrot nie dotarł do klienta
Zwrot uruchamia się wyłącznie przy anulowaniu w terminie bezkosztowego anulowania i wyłącznie dla rezerwacji faktycznie opłaconej. Czas zaksięgowania środków zależy od banku klienta i zwykle wynosi kilka dni roboczych.
Nie widzę sekcji, o której mowa w instrukcji
Najprawdopodobniej pracujesz na koncie administratora obiektu, podczas gdy opisana sekcja należy do panelu właściciela albo nie została Ci udostępniona. Zakres uprawnień zweryfikuj u właściciela konta.
Nie znalazłeś odpowiedzi? Napisz na contact@rentsports.app, najlepiej z numerem rezerwacji lub transakcji.
17. Najczęstsze pytania
Odpowiadamy na pytania, które dostajemy najczęściej: o rezerwacje, płatności, dostęp do obiektu i rozliczenia.
Jak wygląda wdrożenie: SaaS a Własna Instancja?
W modelu SaaS nie ma osobnego wdrożenia. Twoje obiekty pojawiają się w istniejącej aplikacji RENTSPORTS, obecnej już w Google Play i App Store, więc od skonfigurowania obiektu do pierwszej rezerwacji mijają godziny, nie tygodnie. Własna Instancja to nowa aplikacja pod Twoją marką, publikowana jako osobna pozycja w Google Play i Apple App Store. Wymaga oddzielnego wdrożenia i testów oraz przejścia recenzji w obu sklepach, więc całość zajmuje zwykle około miesiąca. Warto ten czas uwzględnić, jeśli start ma się zgrać z otwarciem obiektu albo z kampanią.
Jak klient rezerwuje kort albo salę?
Klient wybiera obiekt z listy albo z mapy, filtruje po dyscyplinie, wskazuje kort lub stół i godziny na interaktywnym kalendarzu, po czym płaci online. Cały proces odbywa się w aplikacji na Androida, iOS albo w przeglądarce, bez kontaktu z obsługą.
Jak klient wchodzi na obiekt bez obsługi?
Po zaksięgowaniu płatności system generuje kod PIN ważny dokładnie w godzinach rezerwacji i wysyła go do zamka przez bramkę WiFi. Kod wygasa automatycznie po zakończeniu rezerwacji. Możesz ustawić kilkuminutowe wyprzedzenie, żeby klient wszedł chwilę przed startem.
Jakie zamki są obsługiwane?
Dowolny zamek lub kontroler w standardzie TTLock: klamka, wkładka albo sterownik do elektrozaczepu. Potrzebna jest też bramka WiFi TTLock G2 lub G3, umieszczona w zasięgu Bluetooth zamka, czyli około 5 do 10 metrów.
Jak działają płatności i gdzie trafiają pieniądze?
Klient płaci online przez PayU, kartą lub Google Pay. Środki trafiają bezpośrednio na Twoje konto w bramce płatniczej, my ich nie pośredniczymy ani nie przetrzymujemy. System sam odnotowuje wpłatę i wysyła potwierdzenie.
Co się dzieje przy anulowaniu rezerwacji?
Anulowanie w terminie, który sam ustalasz, uruchamia automatyczny zwrot przez PayU, bez Twojego udziału. Domyślnie termin wynosi 24 godziny przed startem, a możesz go ustawić w zakresie od zera, czyli anulowania do samego początku, do siedmiu dni przed.
Czy system obsługuje karnety i abonamenty?
Tak. Sprzedajesz karnety na określoną liczbę wejść albo na okres. Cenę, zakres i czas ważności ustalasz osobno dla każdego obiektu, a klient widzi stan swojego karnetu w aplikacji.
Jakie dyscypliny obsługuje system?
W katalogu masz tenis stołowy, tenis ziemny, badminton, squash, padel i pickleball. Każdą inną dyscyplinę dodajesz sam, z własną nazwą, ikoną i kolorem, więc system nie ogranicza się do sportów rakietowych.
Czy mogę prowadzić kilka obiektów na jednym koncie?
Tak. Na jednym koncie prowadzisz wiele obiektów, a każdemu administratorowi nadajesz dostęp tylko do wybranych hal i wybranych sekcji panelu. Właściciel widzi statystyki i rozliczenia całej firmy, administrator obiektu pracuje na swoim grafiku.
Ile kosztuje system i jak się rozliczam?
Model SaaS kosztuje 299 zł za salę miesięcznie, własna instancja 399 zł plus jednorazowe wdrożenie 5999 zł. Do tego 30 zł za każdy dodatkowy kort lub stół, bo jeden jest w cenie. Za system płacisz przez Stripe, a przy płatności rocznej naliczamy 10% rabatu.
Ile trwa uruchomienie i czego potrzebuję na start?
Konto zakładasz sam w panelu i od razu konfigurujesz obiekt. Potrzebujesz zamka TTLock, bramki WiFi, aktywnego konta firmowego PayU i stałego łącza na obiekcie. Poprawność konfiguracji zamka i płatności sprawdzisz w panelu funkcją testu połączenia.
1. Creating the customer account
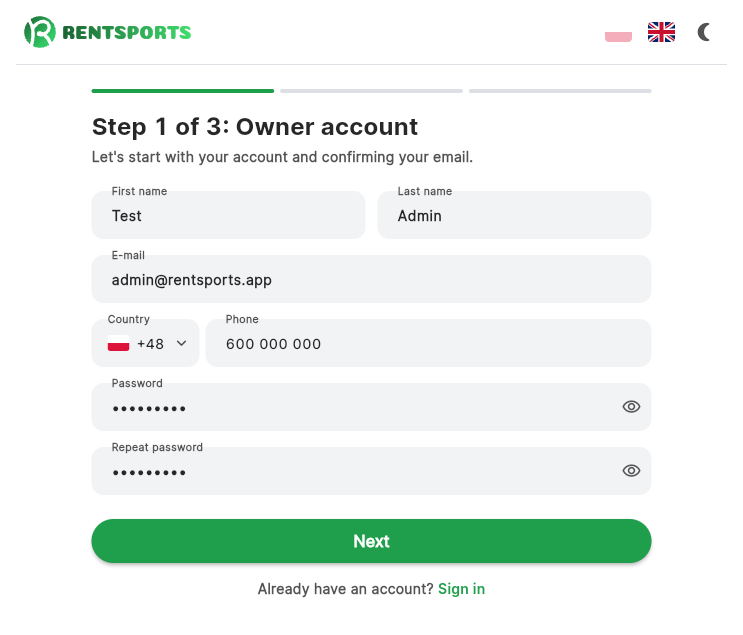
You create the account yourself, with no contact from us. The wizard covers three steps: the owner account together with email confirmation, the customer details, and the subscription ending in payment. The progress bar at the top of the screen marks the current step.
Step 1: the owner account
This step creates the account for the person who will own the company in the system. The owner account carries the highest permissions: it covers the customer details and the subscription, and it may add venues and grant access to administrators.
- First name and last name.
- Email in a valid format. If an account already exists for that address, the wizard reports that the account could not be created.
- Phone with its country calling code.
- Password of at least 8 characters, including a lower-case letter, an upper-case letter, a digit and a special character, and its confirmation. The "show password" toggle reveals what you type.
Once the form is submitted, the system creates the account and sends a message containing a verification link. The wizard waits on a confirmation screen and moves on by itself once you click the link. It also offers three buttons there: resend the message, available every 30 seconds, I have checked, continue, and Correct the email address if you mistyped it.
Use a company address, not a personal one. The owner's address serves as the login and receives the billing notices.
If the verification message does not arrive, check your spam folder. You can send the link again from the same screen.
Step 2: customer details
The second step covers the customer name, the time zone and the billing details.
- Name of the customer, that is the company name in the system. The field is required.
- Time zone, chosen from a list. The options are Poland (Warsaw), Germany (Berlin), Czechia (Prague), Slovakia (Bratislava), Lithuania (Vilnius), Ukraine (Kyiv), the United Kingdom (London), Spain (Madrid) and Italy (Rome).
The time zone determines how booking hours and cancellation deadlines are counted. If the company's registered office sits in a different zone than the venue, choose the venue's zone.
The Billing details section is required, since an invoice cannot be issued from an incomplete address. The tax ID is the exception, as not every entity has one. Billing addresses are currently supported for Poland only.
- Full company name as it should appear on the invoice.
- Tax ID / EU VAT. A Polish NIP consists of ten digits, and an EU VAT number of a two-letter country code followed by two to twelve characters, for example
DE123456789. You may type spaces and dashes freely. An invalid format blocks the move to the next step. - Street and number.
- Postal code in the
00-000format. - City and Country, currently set to Poland.
Step 3: the subscription
In the third step you choose the model and the scale of the deployment, and the panel recalculates the amount as you go.
- SaaS Model or Private Instance. The first provides the app under the RENTSPORTS brand; the second covers a dedicated deployment with the app under the club's brand and its own subdomain, subject to a one-time setup fee.
- Billing period: monthly or yearly. With the yearly period selected, the plan card states the yearly price per venue together with the amount you would pay under monthly billing.
- Number of facilities, from 1 to 10. This value sets the limit you cannot exceed without changing the plan.
- Number of courts or tables in total, no fewer than the number of facilities and no more than 50. One court or table per facility is included in the base price; every further one is subject to a variable fee.
The summary below the counters states the cost for the selected billing period, monthly or yearly, and for the Private Instance additionally the one-time setup fee. If current pricing cannot be fetched, the panel shows estimated amounts and marks them clearly.
Before proceeding to payment, tick "I accept the terms and privacy policy". Attempting to continue without it produces a message asking you to accept them.
Payment
- The payment button redirects to Stripe Checkout.
- Once paid, you return to the panel, which shows a processing screen. Creating the customer account usually takes a few seconds.
- When that completes, the panel opens with an empty venue list.
Abandoning the payment returns the wizard to the second step and clears what you typed, so you have to enter it again. If the payment succeeded but you lose the session, simply sign in again.
Once the account is created we send a welcome message to the address you gave, with a link to sign in. Attached to it are three documents as PDFs to keep: the Terms and Conditions, the Privacy Policy and the Data Processing Agreement, Annex 1 to the Terms, covering the personal data of your own customers. They arrive in the language you filled the wizard in, and their current versions stay available in the panel and on the website.
2. Adding a venue
Venues are added only from the owner panel, with the Add facility button. A venue administrator will not see that button.
The venue limit
The number of venues follows from the subscription. Once you reach the limit, the panel shows a message with the number of venues currently paid for and points at the Subscription tab as the place to raise it. Raising the limit changes the amount billed and asks you to confirm the new amount. If the subscription has ended, the panel asks you to resume it first.
How a venue is added
The Add facility button opens a dialog asking you to confirm that a venue should be created. On confirmation the system creates the venue and opens the Details screen in edit mode, described in the next chapter. The name, the address and the remaining data are entered there, on the same screen you return to for every later change.
A venue with missing details
A new venue is created inactive, with no name, address, hours or photos. Until its configuration is complete, the venue's Dashboard screen shows a checklist at the top titled "This facility cannot take bookings yet", together with a count of completed entries, for example 2/6. The list holds six entries:
- Facility details. Name, address, map link, the number of courts or tables, the hall rules and a description in both Polish and English. The info block is optional. The price may be 0, for a free venue for instance. A required entry.
- Photos. A required entry; without a main photo the venue appears empty in listings and search results.
- Opening hours. A required entry; until the calendar holds hours, the venue offers no slots at all.
- Payments. Required only while online payments are switched on. It counts as complete once the full set of PayU credentials is present.
- Booking settings. An optional entry; until you change them, the venue runs on the default values described in the Settings chapter.
- Lock. An optional entry, intended for venues that issue door codes. It counts as complete once a lock ID is present and code generation is switched on.
You can collapse the list to its header and counter. While any required entry is outstanding the venue cannot be activated, and the panel names what is missing. Optional entries block nothing. Once every required entry is complete, the same place shows a status strip stating whether the venue is visible to customers.
An order of work that saves time
Once the venue exists it pays to go in this order, as each step builds on the last:
- Basics and the map location.
- Disciplines, then the list of courts and tables.
- Opening hours and price, after which the calendar can be generated.
- Settings: booking window, limits, time to pay and cancellation deadline.
- PayU payments, if the venue is to take money online.
- The TTLock lock, if entry is to run unstaffed.
- Photos, which determine how the venue appears in listings and search results.
- Activating the venue.
The booking calendar is generated from the opening hours. If you change the hours after generating it, the panel will offer to regenerate. Do it, otherwise the new hours never reach the app.
3. Venue configuration
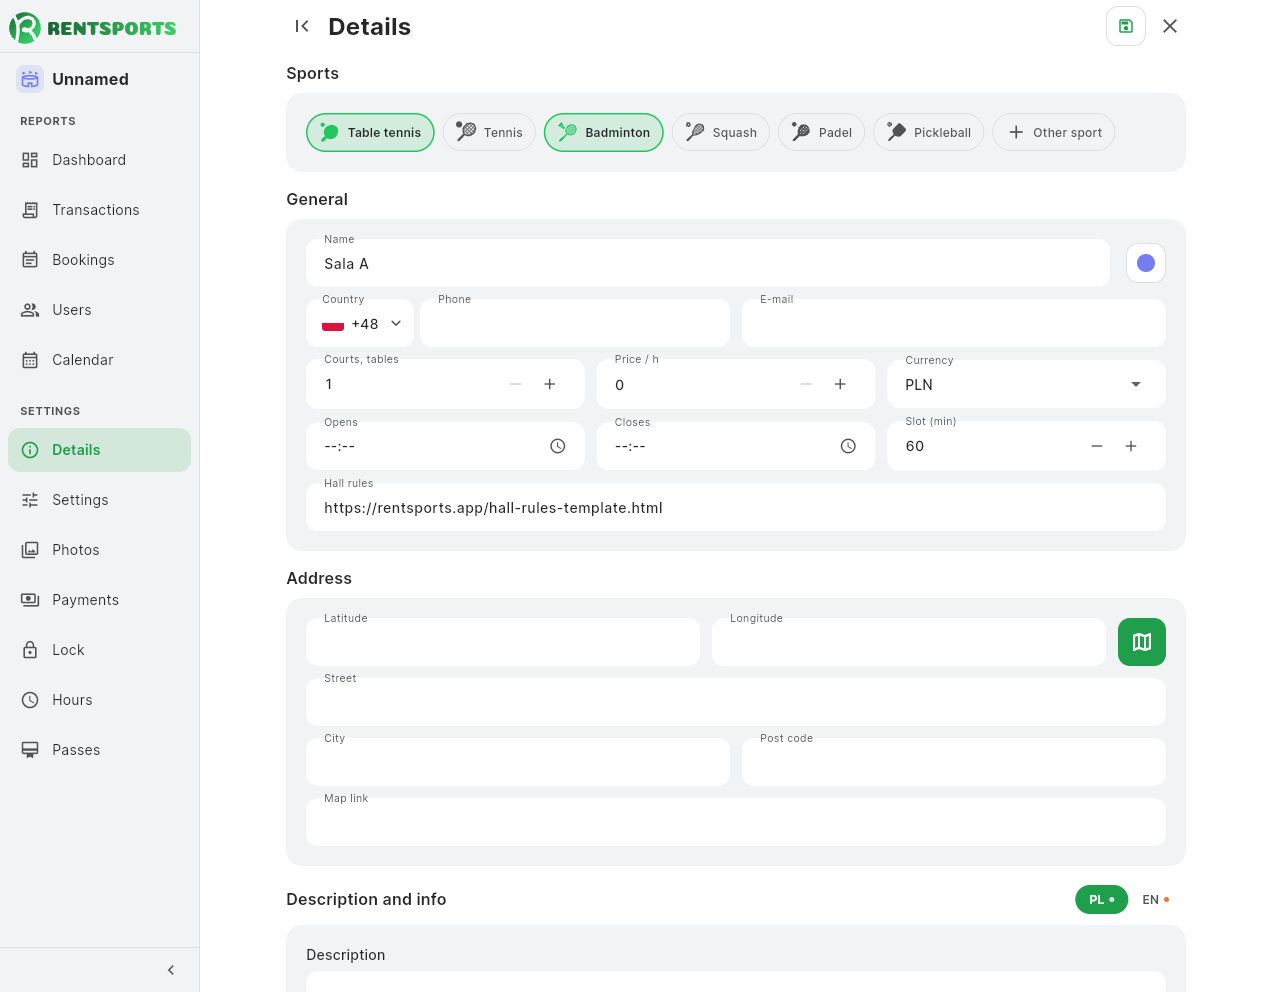
On the Details screen you describe the venue and the terms it runs on: address, sports, how many courts, the price and the opening hours. The fields stay locked until you turn editing on with the button in the header. Each section is covered below, in order.
Sports
This section opens the screen. The disciplines selected here determine what the venue offers its customers. The catalogue covers table tennis, tennis, badminton, squash, padel and pickleball, and each entry is switched on and off with a click.
A discipline outside the catalogue is added with the Other sport chip: you enter its name and pick an icon from the list. Clicking a custom discipline reopens the same form, where you can rename it, change its icon, or remove it from the venue.
General
- Name of the venue together with its assigned colour, picked from the palette beside the name field. The colour identifies the venue in the hall list and in the statistics charts.
- Phone and Email, shown to customers as the venue's contact details. You pick the email from a list of this venue's administrators and the account owners; the owner is the default. Monitoring warnings go to that address as well, which is why you choose an existing account rather than typing an address in.
- Courts or Tables, meaning how many of them, from 1 to 50. The name of the field follows the sport picked above: table tennis alone has tables, and court sports alone have courts. When the venue combines table tennis with a court sport, or has a sport you typed in yourself, they are places. We label them with that same word in the calendar, on bookings and on transactions. The system numbers them in sequence; they carry no individual names.
- Price per hour and Currency.
- Opens and Closes, defining the venue's daily operating range.
- Slot length in minutes, from 30 to 240 in steps of 30. The slot is the basic unit of a booking.
After you save changed opening hours, the panel offers to generate the booking calendar again for the whole week. Changes made earlier on individual days are lost when it does. A venue with no generated calendar offers no slots at all. Fine-tuning individual hours is covered in the Hours chapter.
Address
The venue's location is set on the map rather than by typing an address. The map button opens a point picker, and once a point is chosen the system fills in the coordinates along with the street, city and post code. Those fields stay read-only. The coordinates place the venue on the map view in the customer app.
The only address field you fill in yourself is the Map link, which the navigation button in the app uses. If it is empty, the panel fills in a link to the point you pick on the map. You can replace it with a link to the venue's own Google Maps listing.
The address and the map link are required. Without them the panel does not save the venue's details and marks what is missing. For an empty address the message points you to the map, since the street and city are not typed in by hand.
Description and info
The section holds two text fields, maintained independently in Polish and English. The language switch above the card covers both fields at once, and the dot marks the language that has no text yet. The customer receives whichever version matches the language of their app.
- Description introduces the venue. The customer reads it on the venue's details screen, alongside the photos, before making a booking. A description is required in both languages, Polish and English. The PL/EN switch above the field changes the version, and a dot next to a language means that version is still missing.
- Info is optional. It is a short practical note for someone who has already booked: how to reach the entrance, where to park, or where to find staff on site.
The Info text goes to two places. The customer sees it on a confirmed booking in the app, and the system appends it to the booking confirmation message as a paragraph headed "Note". That covers bookings paid online, settled on site and paid from a pass. It is the only part of that message whose wording you set from the panel.
Danger zone
The closing section of the Details screen, visible only to the account owner and kept apart from the rest of the configuration. An administrator added from another club does not see it, even one who owns their own club. It holds two actions with lasting consequences.
- Deactivate facility. The venue disappears from the list available to customers, while all of its data, meaning bookings, settings and history, remains intact. You can activate the venue again at any time with the same button.
- Delete facility. Permanently deletes the venue and everything on it: bookings, transactions, passes, statistics, lock and payment settings, and photos. You type the venue name in the confirmation dialog. This cannot be undone.
4. Settings
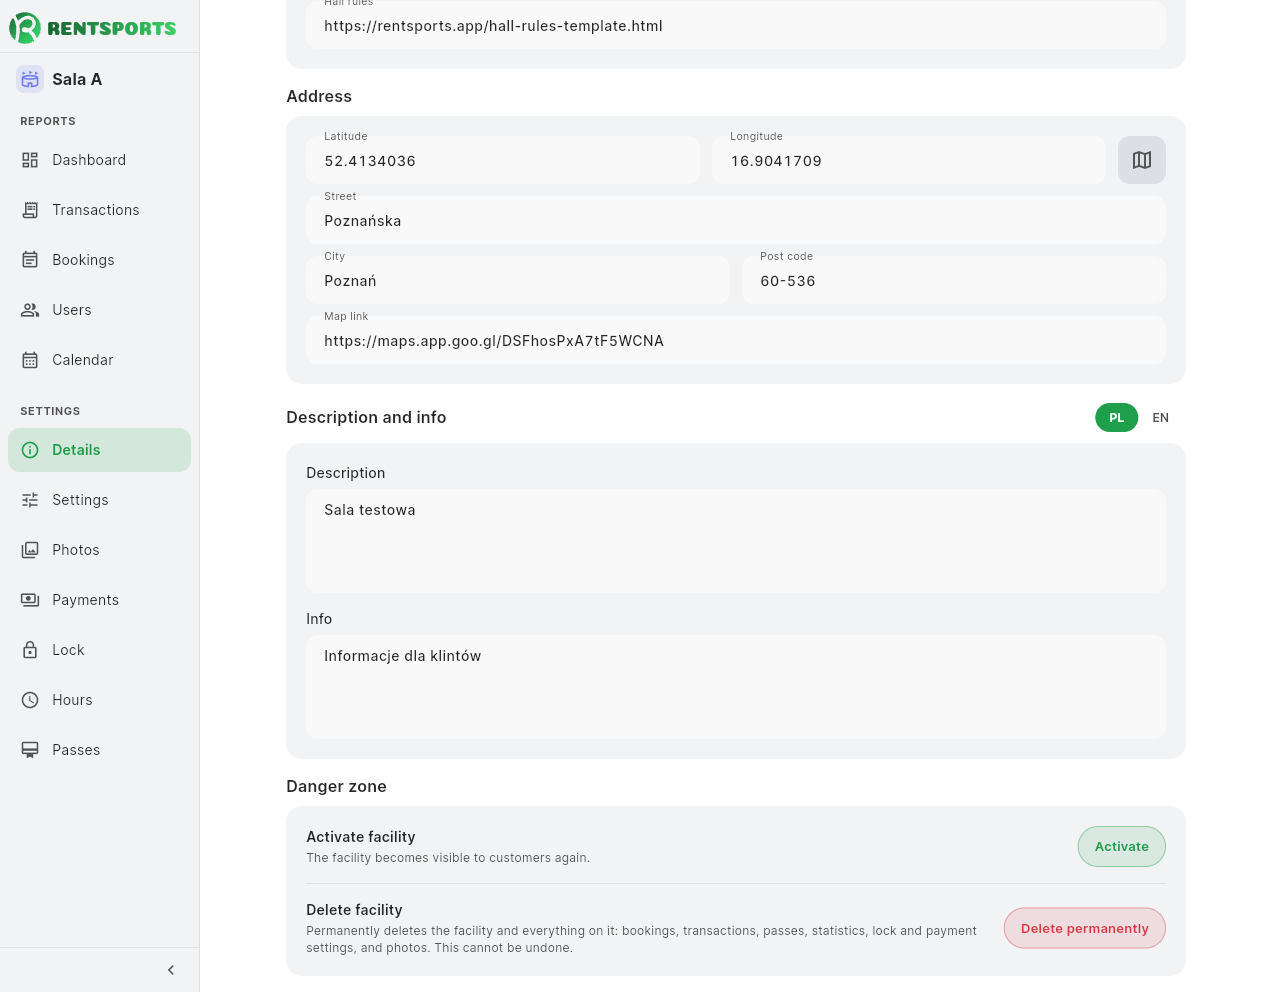
Settings has its own entry in the venue menu, separate from Details. Here you set the terms a customer books on: how far ahead they may reach, how long they have to pay, and until when they may withdraw.
- Booking window, in days, from 1 to 365. It sets how far ahead a customer may reserve a slot. The default is 30 days.
- Bookings per day for a single customer, from 0 to 20. A value of 0 means no limit and is the default. The limit prevents one person from taking a whole day.
- Minimum and maximum number of people per booking, both in the range 1 to 50. The maximum may not fall below the minimum. The customer states the party size on every booking, and the minimum sets the starting value and the floor for that choice.
- Time to pay, in minutes, from 5 to 1440, that is up to a full day. The default is 30 minutes. Once it elapses, the slot returns to the pool of free ones and the payment link expires.
- Free cancellation deadline, in hours, from 0 to 168, that is up to seven days. The default is 24 hours. A value of 0 lets the customer cancel with a refund right up to the start of the booking.
Each of these fields has a default, so the venue works correctly even if you change nothing here. The panel validates the values on save and rejects any outside the permitted range, stating which range applies.
Monitoring
The second part of this screen watches whether the venue can actually serve a customer. Both checks stay off until you turn them on.
- Monitor the lock and gateway. Every five minutes we check that the lock answers and that the gateway is connected. After two failed checks in a row we write to the email address on the facility details, to the administrators assigned to the venue and to the owner, and a second letter arrives when the connection comes back. One warning per outage, not one every five minutes.
- Monitor the PayU connection. On the same rhythm we sign in to PayU with your keys and read the shop back, to the same addresses, so you hear about a problem before a customer runs into a failed payment.
- Statistics refresh in minutes, from 5 to 1440. The default is 1440, that is once a day. The lower the number, the sooner bookings and payments show up in the month card and the charts.
A gateway cut off from the internet means the door code is never created at all, not merely that you cannot open the door remotely. That is why the connection check shows a warning rather than a confirmation then, even when the lock itself answers.
Where you see a problem
You do not have to wait for an email or come back to these settings. The failure message is shown on the Dashboard, at the very top, right under the line saying whether the facility is active. Everybody who opens this venue's panel sees it, and it disappears by itself once a check passes again.
The message tells you:
- what is not answering, the lock and gateway or the PayU connection,
- what that means for a customer, that is, what cannot be done at the venue right now,
- when we last looked and how many checks in a row have failed,
- the error reported by the device or by PayU, word for word,
- which addresses the warning went to, or, if it had nowhere to go, a request to fill in the email address on the facility details.
The Check button in the message takes you straight to the Lock or Payments section, where you can run the connection check by hand and see the full result. Until two checks in a row have failed the message is amber and says plainly that no warning has been sent yet; after the second failure it turns red and that is when the email goes out.
5. Photos
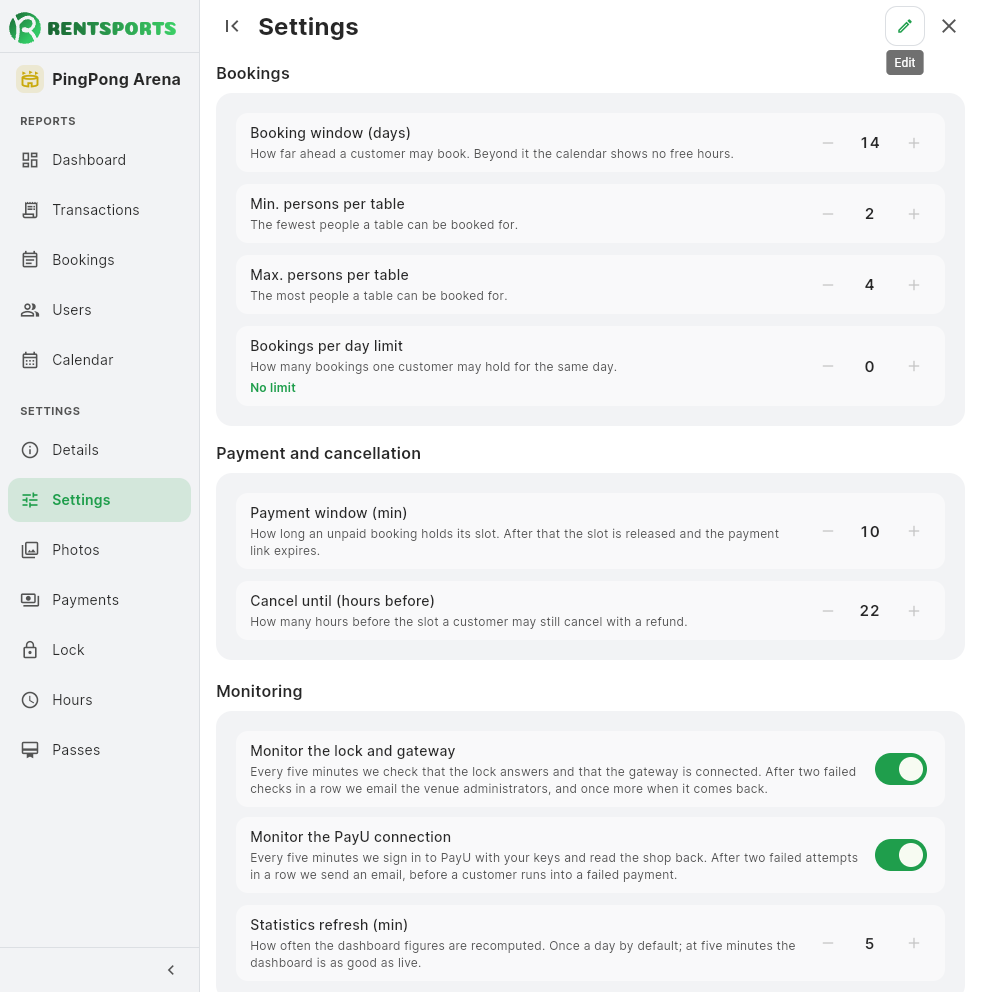
The photos you upload here are what a customer sees in the venue list and on the venue page. There are four slots: the main photo, shown first, and three more, labelled Photo 1, Photo 2 and Photo 3.
An empty slot carries an add button that opens a file picker. Once a file is selected, the panel shows a preview together with an uploading notice, and on completion stores the photo against the venue. A slot holding a photo offers two buttons in its top right corner: one to replace the file and one to delete the photo.
The main photo represents the venue in the venue list and in search results, which is why the venue cannot be activated without it. The customer views the full set on the venue's details screen, before moving on to book.
You can upload an image in JPG, PNG, WebP or GIF format. Before sending it the panel scales the photo down and saves it as a JPEG, so a large photo straight from a camera does not slow the customer app down. Other kinds of file are not accepted.
6. PayU integration
Customer payments go straight into your own PayU account. We do not intermediate in them and we do not hold the funds. The integration needs your own PayU business account.
Online payments can be switched off
This whole integration is optional. The online payments toggle on the same screen decides.
- On. The customer pays by card through PayU at the moment of booking. Requires the complete, verified configuration described below.
- Off. The booking is confirmed without payment and settled on site. Use this if the venue only takes cash or a terminal at reception. The rest of this chapter then does not apply to you.
Switching online payments off also switches off passes, since there is no way to pay for them. The panel says so directly if you try to enable them.
While the PayU details are incomplete or wrong the panel keeps payments off, even if you flip the toggle. On saving you then see the message "Saved, but the connection to PayU does not work. Online payments stay off until the details below are corrected".
Step 1: the account and point of sale at PayU
- Open a business account and complete company verification. PayU asks for registration details and a bank account.
- Sign in to the merchant panel at secure.payu.com.
- Create a point of sale, POS for short. Each one has its own set of keys.
PayU documents account setup here: Setting up your account.
Step 2: what you enter in the panel
All of the below live in the PayU panel, under the point of sale settings. You enter them in the payments section of your venue's configuration.
| Field in RENTSPORTS | What it is in PayU |
|---|---|
| Payment provider | A read-only field; PayU is currently the only supported provider |
| Merchant ID | The POS ID of the point of sale |
| Shop ID | The shop identifier attached to that point |
| Client ID | The OAuth client_id of the point of sale |
| Client Secret | The OAuth client_secret of the point of sale |
| Second Secret (MD5) | The second key, which PayU uses to sign payment notifications |
That is everything we need from you. You do not enter the PayU integration addresses; we configure those on our side.
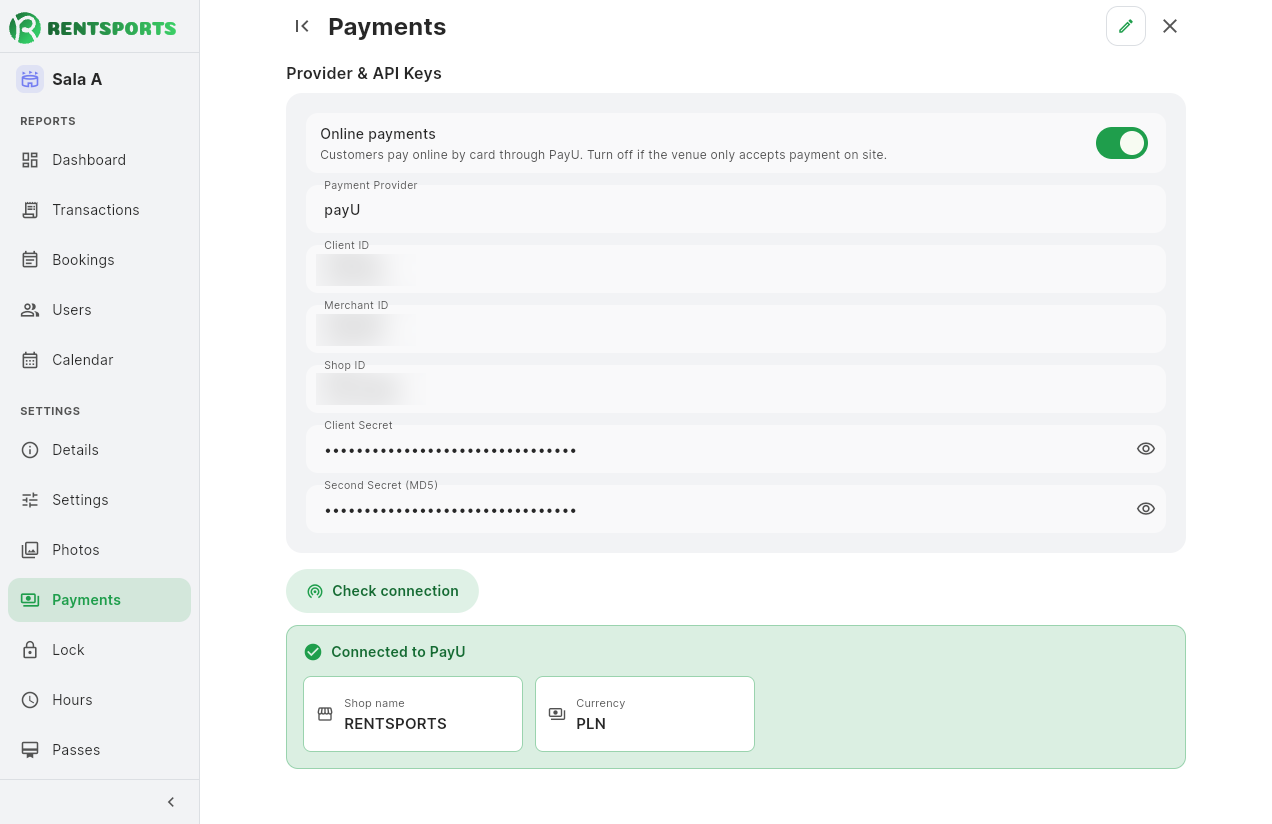
Step 3: checking the connection
The Check connection button authenticates against PayU and tries to read your shop. It becomes available once online payments are on.
After a successful test the panel shows the shop name and currency read back from PayU. That is the best confirmation that the keys lead to the right point of sale rather than somebody else's or a test one. You never type the shop name in; it comes straight from PayU.
When the test fails, the message names the cause:
- "PayU rejected the credentials. Check the Client ID and Client Secret.": the OAuth keys are wrong.
- "Authorisation worked, but no shop exists with that Shop ID.": the keys are fine, the Shop ID is wrong.
- "Authorisation worked, but this point of sale has no access to this shop.": the keys belong to a different point of sale than the shop you named.
- "Could not read the shop.": check the Merchant ID and the point's permissions.
- "No answer from PayU. Try again in a moment.": a passing network problem.
Make sure you enter the production keys, not ones from a PayU test account. Test keys look identical, and with them no real payment ever arrives.
Full PayU documentation: developers.payu.com/europe.
7. TTLock integration
Once a booking is paid for, the system generates a six-digit PIN valid for its hours and pushes it to the lock through the WiFi gateway. Once the booking ends, the code no longer opens the door.
Door codes can be switched off
This integration is optional too. The Generate door code toggle on the same screen decides.
- On. Once the booking is paid for, the customer receives a PIN that opens the lock during their hours.
- Off. No codes are generated. Use this if the venue has a reception, lets people in personally, or runs its own access system. The rest of this chapter then does not apply to you.
The payments and key toggles are independent of each other. You can have a venue with online payments and staff on site, a fully unstaffed venue, or a venue with a door code and cash payment.
Step 1: the hardware
- A TTLock-standard lock or controller: handle, cylinder or an electric strike controller. It needs a keypad, since entry is by code.
- A TTLock WiFi gateway, model G2 or G3. Without one the code cannot reach the lock remotely.
- The gateway must be within Bluetooth range of the lock, in practice 5 to 10 metres, and within WiFi range with internet access.
Step 2: setup in the TTLock app
- Install the TTLock app, available from ttlock.com.
- Create an account and add the lock. The account the lock is registered on is the lock's administrator account, and it is the one you will enter in the panel.
- Add the gateway and pair it with the lock. The app should then mark the lock as reachable through the gateway.
- Check that the lock answers remotely: try opening it from the app while out of Bluetooth range. If that works, the integration will work too.
Remote control through the gateway must work in the TTLock app before you configure the integration here. If it fails there it will fail here too, and the cause is the hardware or the network.
Step 3: where to find the Lock ID
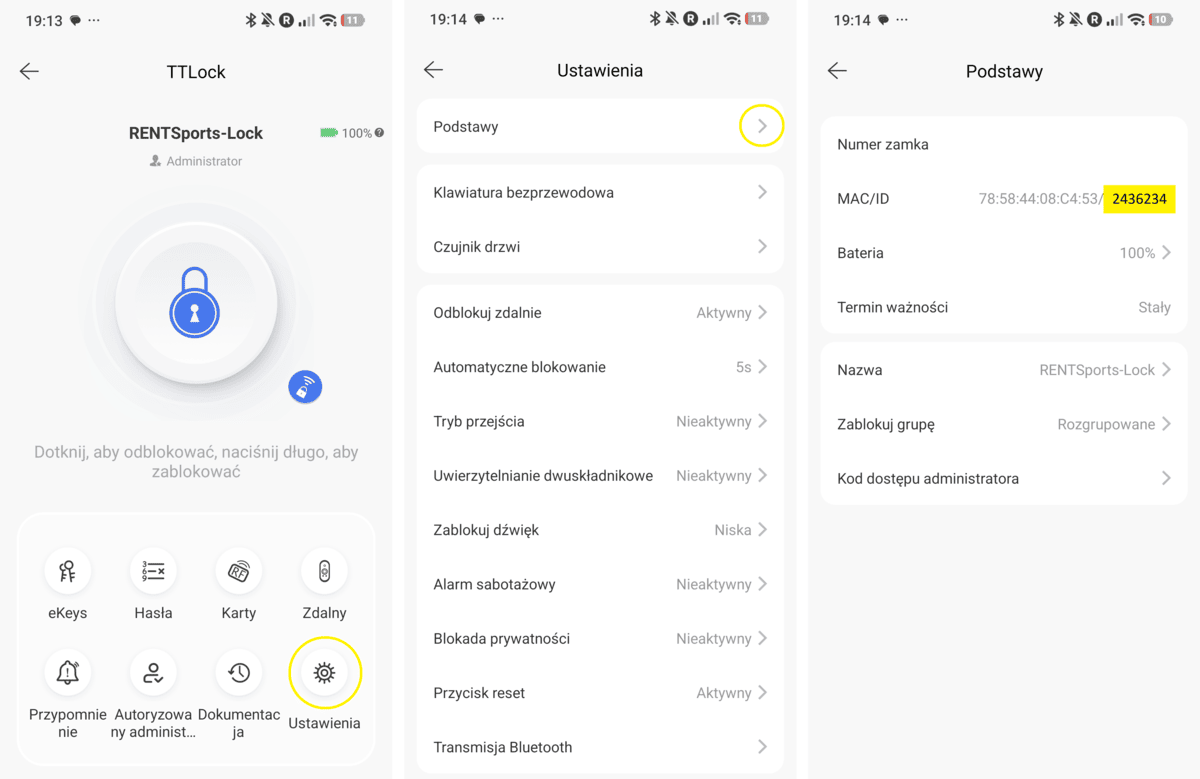
You read the Lock ID straight out of the TTLock app; nothing else is needed for it:
- Open the TTLock app and pick the lock from the list.
- Go into lock settings, the gear icon on the lock page.
- Open Basics.
- There you will find the lock number, the MAC address, the Lock ID and the firmware version. The Lock ID is the number you copy into our panel.
The same description in TTLock's own documentation: the lock information page. The rest of the app guides: ttlockdoc.ttlock.com.
Step 4: what you enter in the panel
| Field | What to enter |
|---|---|
| TTLock account | The login of the account the lock is registered on |
| TTLock password (MD5) | That account's password |
| Lock Type | A read-only field; the TTLock standard is currently the only one supported |
| Lock ID | The number read from the TTLock app, as described in step 3 |
| Time offset (min) | 0 to 15 minutes, 0 by default. The code starts working this much earlier and stops this much later |
The offset applies symmetrically, giving room to get in before the booking starts and out after it ends. A value of 0 limits the code to exactly the booked hours. Set it carefully: at 15 minutes, the previous customer's code remains valid for a quarter of an hour into the next booking.
You do not enter the TTLock API keys; we configure those on our side.
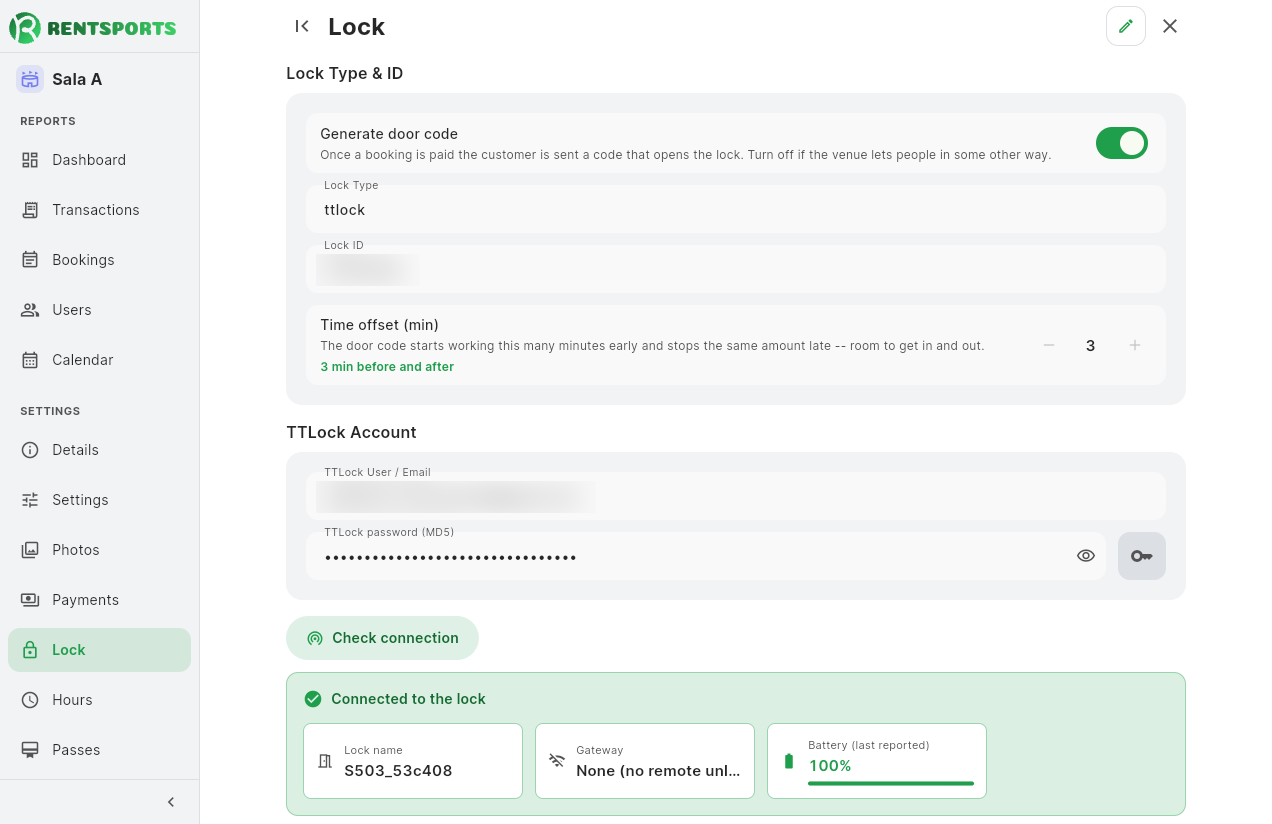
Step 5: checking the connection
The Check connection button signs in to TTLock and checks that the lock with the given ID answers. It becomes available once door codes are on.
After a successful test the panel shows the lock name, its battery level and the gateway status. The name confirms you reached the right lock, the gateway status tells you whether the lock can be reached remotely, and the battery is worth checking now and then, because a flat lock opens for no code at all.
When the test fails, the message names the cause:
- "TTLock rejected the credentials. Check the account, password and application keys.": check the TTLock account and password.
- "Authorisation worked, but no lock answers on that ID. Check the lock ID.": the sign-in is fine, but the Lock ID is wrong or the lock has no link through the gateway.
- "The TTLock application keys are not configured. This is a global setting, contact support.": write to contact@rentsports.app.
- "No answer from TTLock. Try again in a moment.": a passing problem.
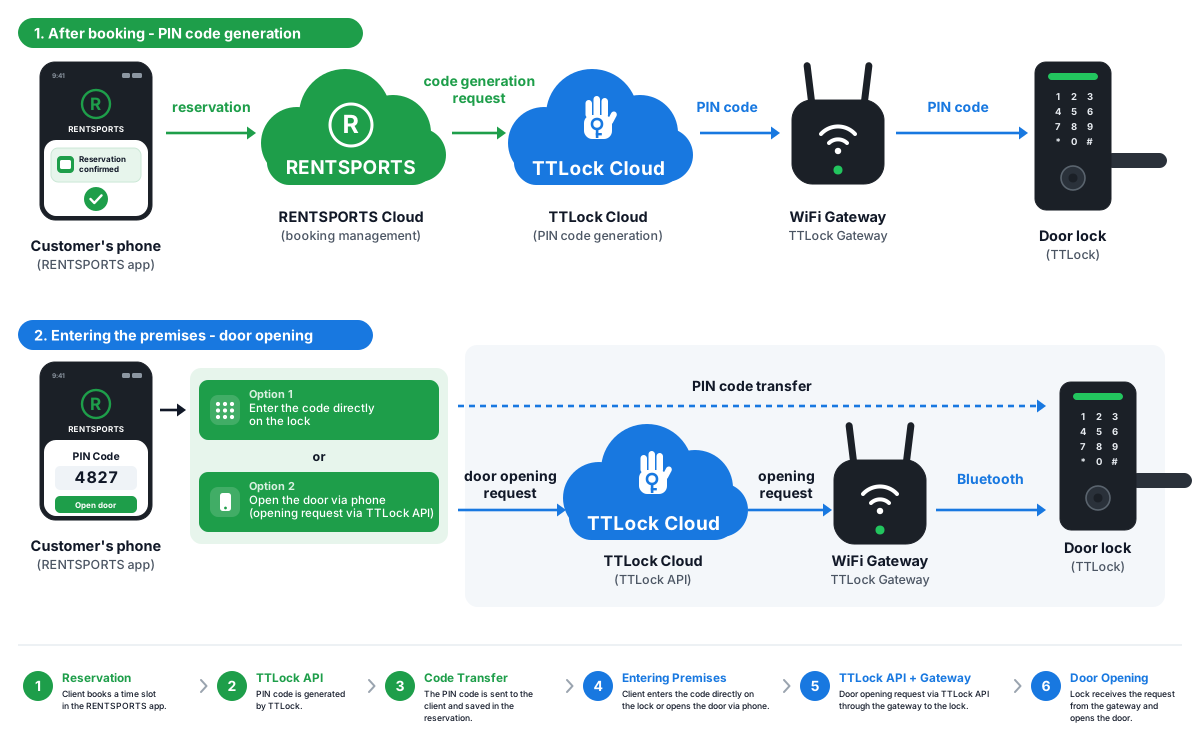
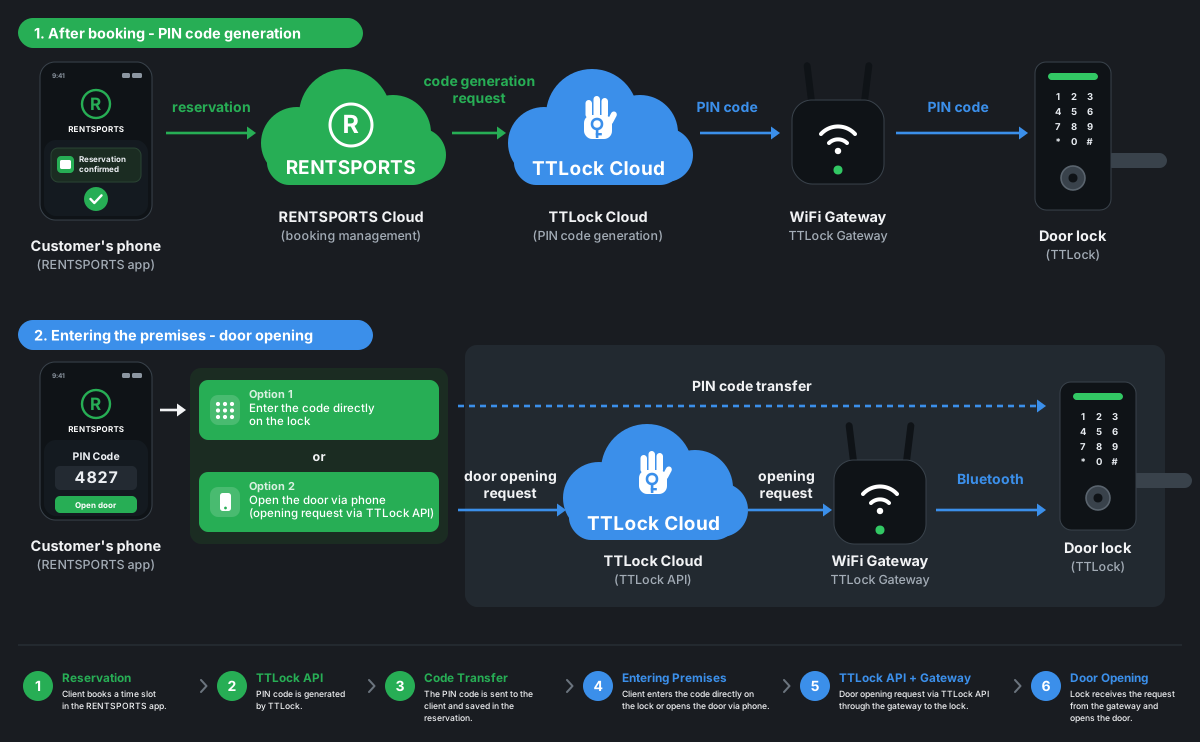
You can also generate a code by hand for a single booking, with the Generate key button in its detail view. The button appears on a paid booking that has no code issued yet, and it sends the code to the customer again. Useful when a customer lost the message.
8. Hours
The system lays out the grid of hours itself, from the opening hours you gave in Details. This is where you correct it: the week runs across seven columns, one per day, each holding that day's hours. There are three things you can do with them.
- Adding an hour. The button in the column header adds a new slot to the chosen day together with its price multiplier.
- Changing the price multiplier. Double-clicking a slot opens the multiplier that applies to that one hour on that one day, for instance 1.5 for a weekend evening or 0.8 for a cheaper morning hour. You set it from 0 to 3, in steps of 0.1. The base price comes from the venue configuration and the multiplier only recalculates it. Slots with a multiplier other than 1.0 are marked with the value beside the hour, for example ×1.5.
- Removing an hour. The icon on a slot deletes it from that day, after confirmation. This is how you permanently block a specific hour on a specific day of the week, for example when a court serves training every Thursday evening and is not to appear in the offer.
- Resetting a day. The second icon in the column header sets that day's hours afresh from the venue's opening hours. Changes made on that day are lost.
A removed slot does not return on its own. To restore it, add it again from the same screen.
Regenerating the calendar from venue configuration overwrites the whole week's grid, which removes the multipliers set here and restores the slots you deleted. The panel warns about this before the operation runs.
9. Passes
A pass entitles a customer to use the venue against a prepaid pool of entries or for a set period. Passes are defined separately for each venue, and the form covers the following fields.
- Pass name and Description, both shown to the customer in the app.
- Price and Currency. Leaving the currency blank defaults to PLN.
- Entries, at least 1. The panel will not save a pass with no entries.
- Period in days, counted from the day of purchase, at least 1 day.
- Accent colour, picked from a palette, which marks the pass in the list.
Both limits apply at once, so a ten-entry pass valid for 90 days expires either when the entries run out or when the period ends, whichever comes first. The pass list summarises these values in the form "Entries: 10 • Validity: 90 days" and offers edit and delete buttons on every row.
Selling passes requires online payments to be switched on. While payments are off, the button for adding a pass stays disabled and a notice above the existing list states that customers cannot buy them at present.
10. Reports
The four reports below, together with the Dashboard from the Statistics chapter, are seen by every administrator assigned to the venue. Configuration permissions change nothing here: anyone who runs the venue gets the reports.
Transactions
A report of payments with a date range and a status filter covering approved, pending and failed transactions as well as those originating from passes. The search box matches the transaction number and the customer name.
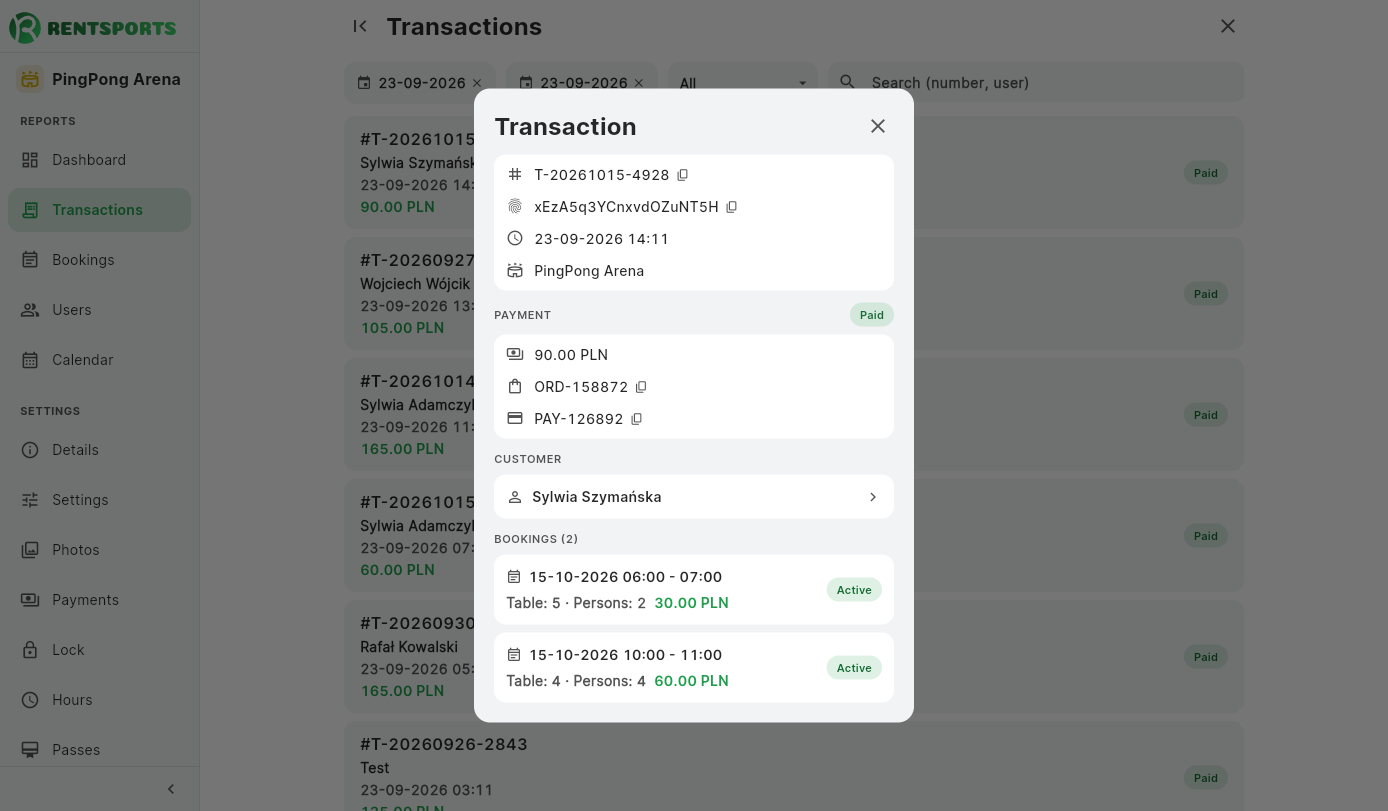
Bookings
The same bookings presented as a list. The date range narrows the list, while the status filter covers bookings that are active, cancelled, paid with a pass, added by an administrator, and those for which no lock code was issued. The search box matches the customer name and the court or table number. Manual bookings are added from here as well, and cancelling from the list triggers a refund on the terms set in the venue's settings.
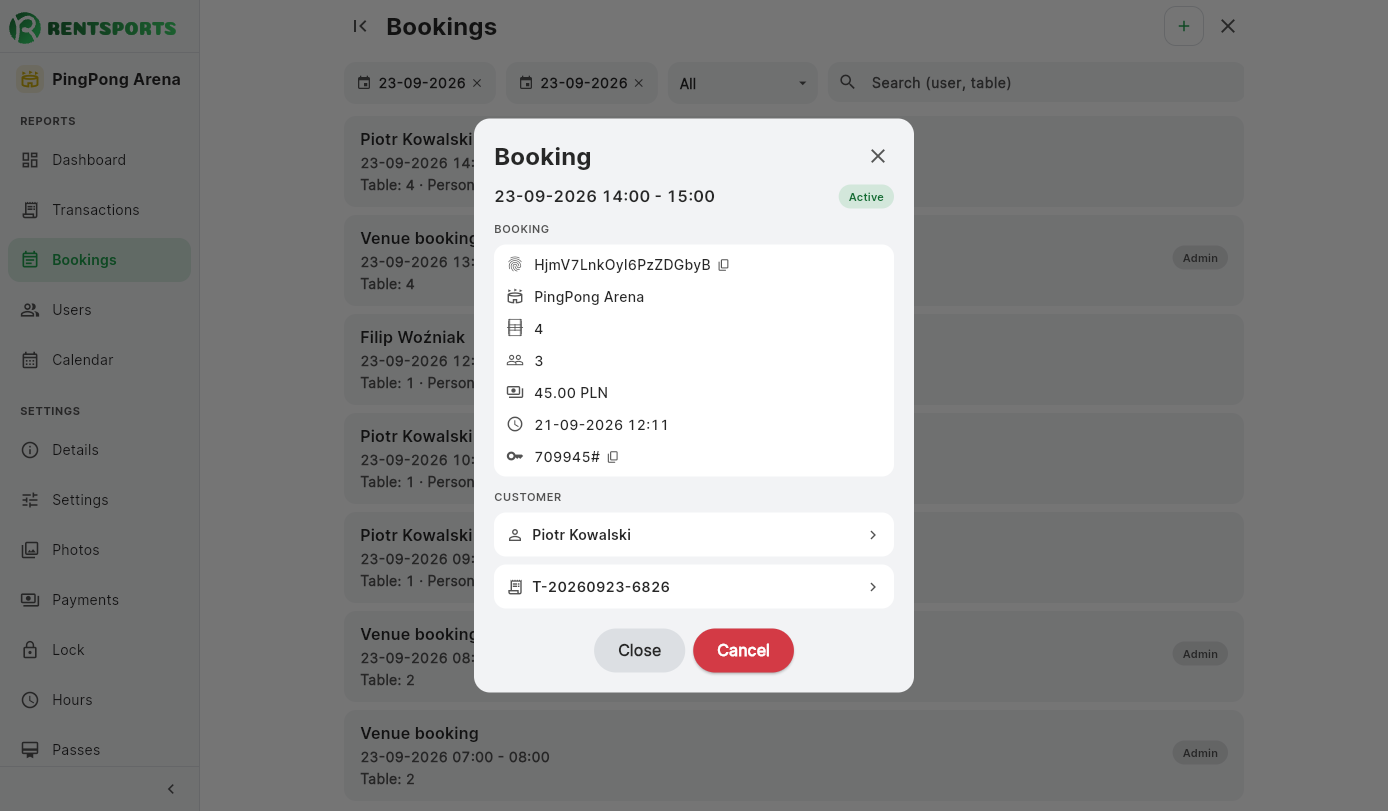
Users
A list of customers who have booked at this venue, searchable by name, email address and phone number. The Only incomplete toggle restricts the list to accounts with an incomplete profile, and the statistics toggle adds each customer's booking count and value to their row.
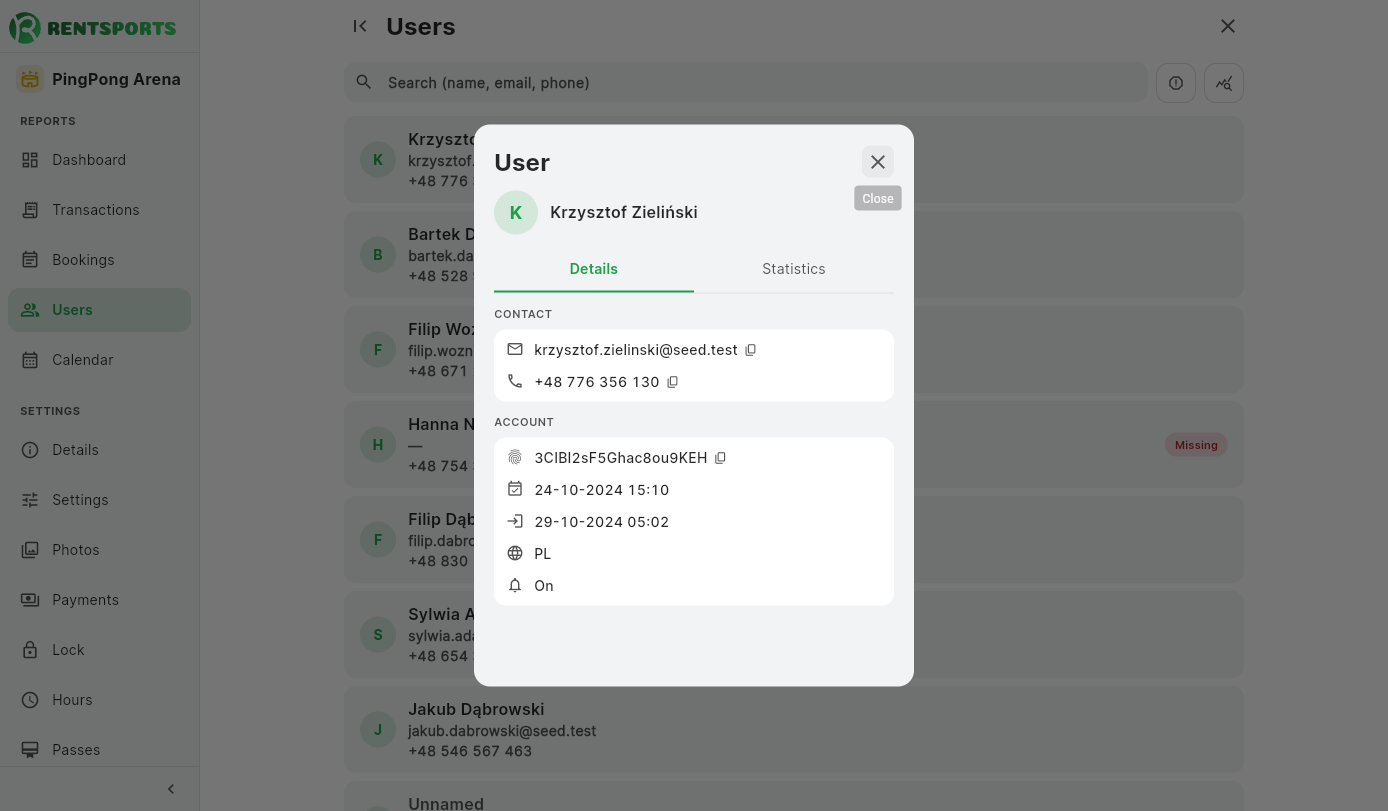
Calendar
A visual grid of bookings across seven days and hours. The day/week toggle changes the header and how far the arrows move: by one day or by a whole week. Bookings in the same hour sit side by side, ordered by court or table number. You also add a booking by hand here, the same way as from the Bookings section (see below).
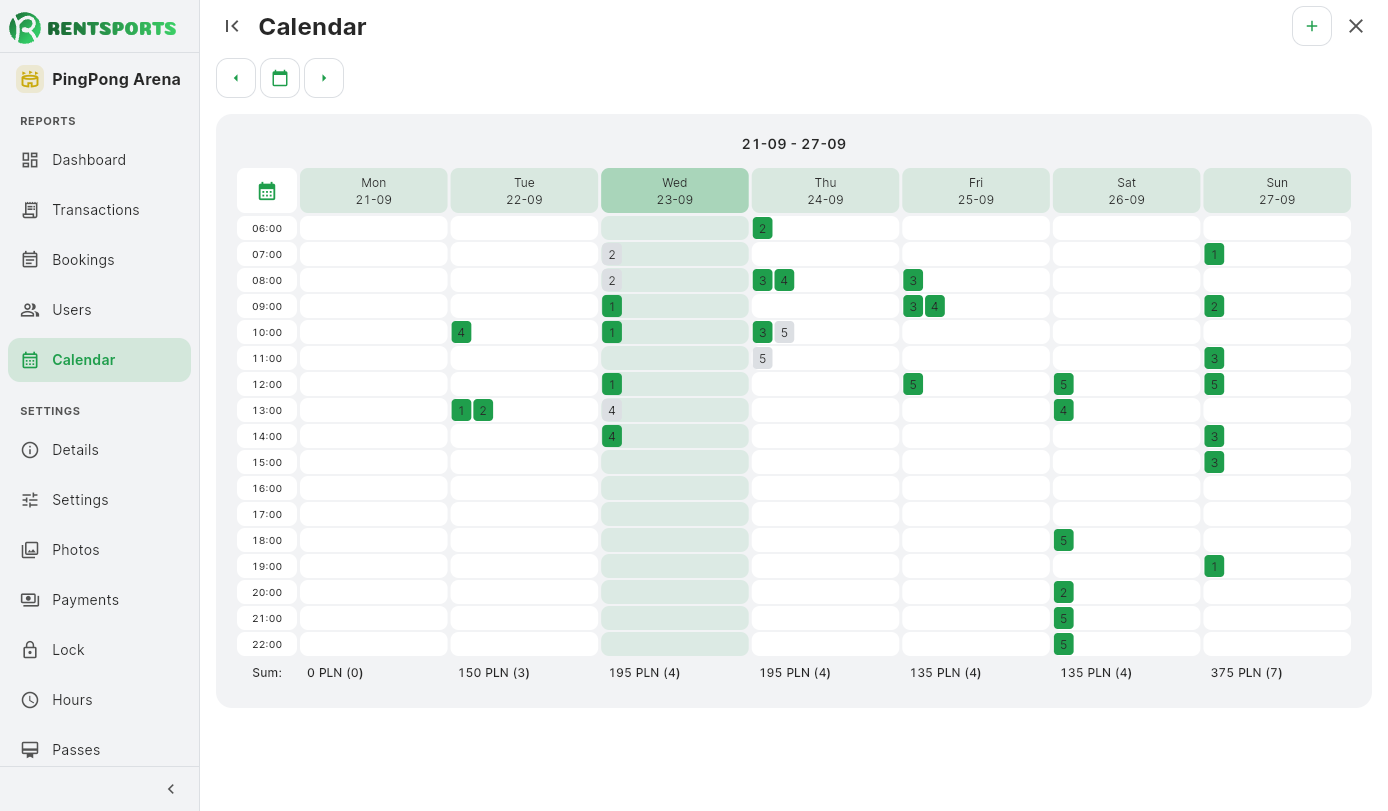
11. Adding a booking
You add a venue booking, meaning you block a table without a customer involved (for training or maintenance, say), by hand from the panel, through the same dialog no matter where you open it from.
Where to start it
The Add booking button appears in three places: the Bookings section header, the empty state of the bookings list (when nothing matches the current filters), and the Calendar section header. All three open the identical "Table reservation" dialog.
Picking a slot
In the dialog you first pick a day from the weekly calendar. Below it, a list of free slots appears: every opening hour of the venue that day gets its own row with numbered tables. A free table has a checkbox, a taken one shows only its number with no way to select it, so this screen cannot accidentally double-book a table. You can tick several slots at once, even across different tables and hours, and save them all with one click of Book (N), where N is the number of ticked slots. An optional description field (two lines at most) lets you add a note, for instance the reason for the block.
If no hours are left free that day, the panel shows "No hours left today."; if the venue is closed that day, it shows "The facility is closed on this day."
Price and customer data
A booking added this way is always free of charge and issues no door code. The dialog has no price field and no fields for the booking person's details; on the bookings list such an entry is marked as an administrator booking. If a customer is meant to pay and receive a door code, the booking has to come through the app instead of this form.
Protection against double-booking
A taken table has no checkbox, so this dialog cannot double-book a table. If somebody else takes the same slot at the same moment, the panel shows a "Slot taken" error listing the colliding slots and saves none of that batch; tick different hours and save again.
Visibility on the list
Bookings added this way show up on the Bookings list and in the Calendar the same as ordinary ones, marked as an administrator booking. The status filter on the Bookings list can show only these, which makes it easy to tell your own slot blocks apart from customer bookings.
Cancelling
You cancel them the same way as an ordinary booking, from the list or from the Calendar. Because they never went through checkout, cancelling one triggers no refund, since there is no transaction behind it: the full cancellation rules are covered in the next chapter.
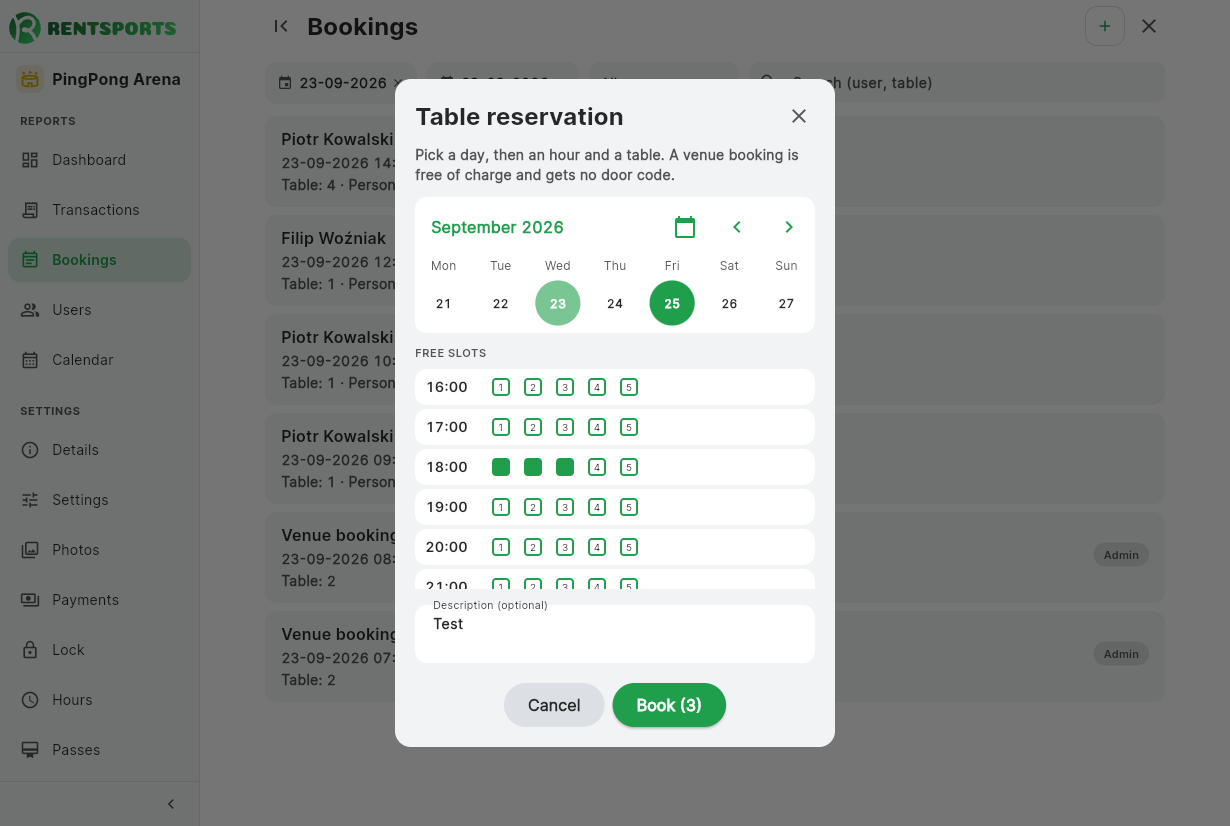
12. Cancelling a booking
A booking can be called off from two sides: by the customer in the app, or by you from the panel. Both free the slot and both can trigger a refund, but they follow different rules, and the difference matters in day-to-day work.
When the customer cancels
The customer is bound by the free cancellation deadline you set in the venue's Settings, in hours from 0 to 168, that is up to seven days. The default is 24 hours, and zero lets a booking be cancelled right up to its start. Once the deadline passes, the cancel button disappears from the app and the booking can no longer be called off from the customer's account.
Changing this setting does not act backwards. Bookings made earlier keep the deadline that applied when they were made, so shortening it does not take their right to cancel away. The new setting governs future bookings only.
When you cancel
Cancelling from the panel is not bound by the deadline. Staff may cancel at any time, including after it has passed, because you are the one answering for the venue and the one who settles the exceptional cases: a lighting failure, a flooded court, a mistake taking a booking by phone.
You cancel from the bookings list and from the schedule. Only an administrator assigned to that venue may do so; simply holding an administrator account in the system is not enough.
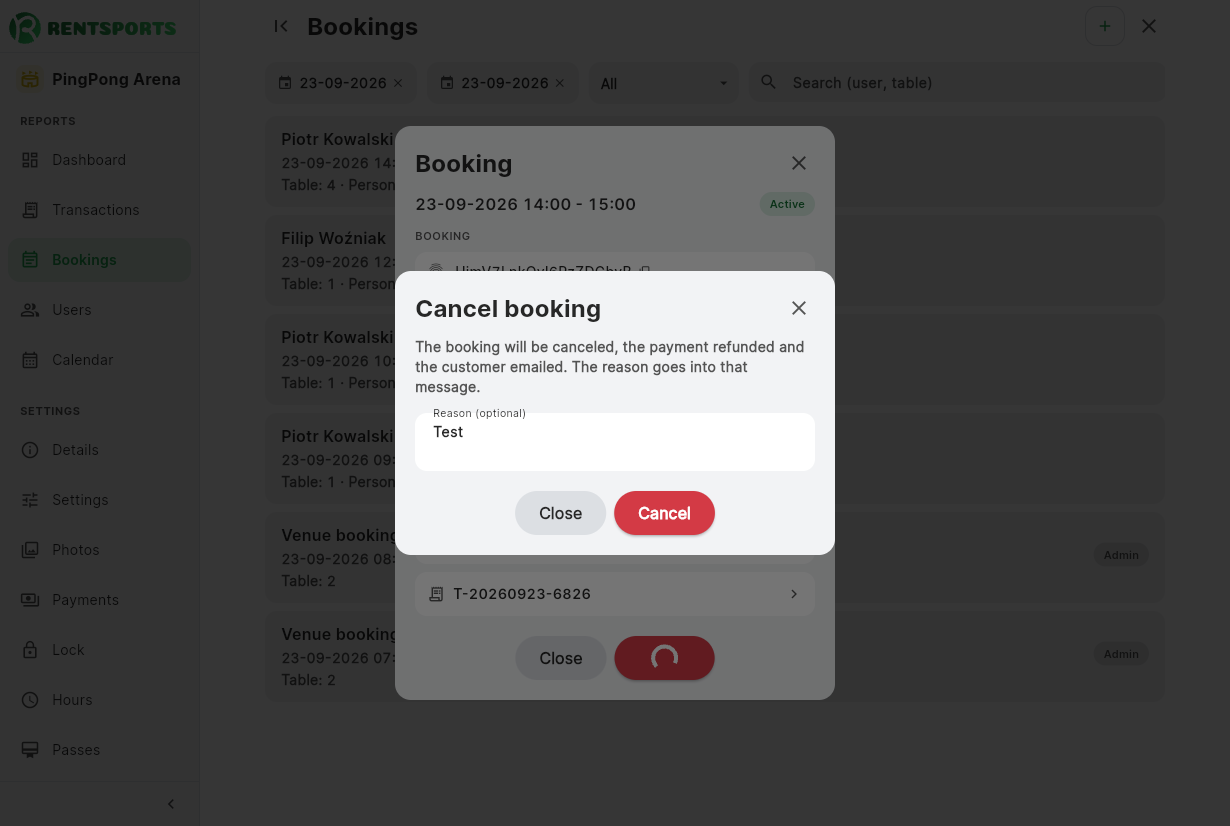
What happens to the money
The refund runs automatically, through PayU, back to the same source the payment came from. It needs nothing from you. Not every booking produces one, however:
- Paid online. A full refund through PayU. How long it takes to clear depends on the customer's bank, usually a few working days.
- Paid by pass. The entry returns to the pass's pool, whether the customer cancels from the app or you cancel from the panel. No money comes back, because none was paid separately for that booking.
- Settled on site. No PayU order was ever created, so there is nothing to refund. The slot simply returns to the pool.
- Unpaid. An expired hold that nothing was taken for. No refund. You can also remove such a booking from the panel with the Delete button on its detail; the customer then receives a cancellation message.
- Added by an administrator by hand. It never went through checkout, so it has neither a transaction nor a refund.
The door code
Cancelling a booking removes the code issued for it, so that it does not open the door during a slot that now belongs to nobody. This applies to both routes.
Removing the code needs the lock to be reachable through its gateway. With the gateway offline the code stays on the lock until the end of its validity window, that is until the end of the cancelled booking. This is not dangerous, since the window expires on its own, but it is worth knowing at a venue without a permanent connection.
Where it shows afterwards
A cancelled booking stays in the system and appears in the bookings list under the status filter. It no longer shows among the customer's own bookings, but they find it in the details of their transaction, clearly marked. That way it is always clear what the customer actually paid for and what was refunded.
13. Administrators
You add administrators from the owner panel. The form runs across three tabs: Details, Venues and Permissions. Each administrator is assigned the venues and the configuration sections they may reach.
- Enter the email address. First and last name are optional; the administrator fills them in when setting a password.
- Tick the venues the administrator is to manage.
- Tick the configuration sections they may open: Details, Settings, Photos, Payments, Lock, Hours and Passes. All of them start ticked.
Once saved, a new administrator receives a message with a link for setting a password. If an account already exists for the address given, the system assigns the selected venues to it and notifies that person, instead of creating a second account. Their existing permissions stay as they were.
An administrator sees and runs only the venues you assigned to them, reports included. Every venue of the account is visible to the owner alone.
These restrictions cover the configuration sections only. The reports, namely Dashboard, Calendar, Bookings, Transactions and Users, remain available to every administrator assigned to the venue.
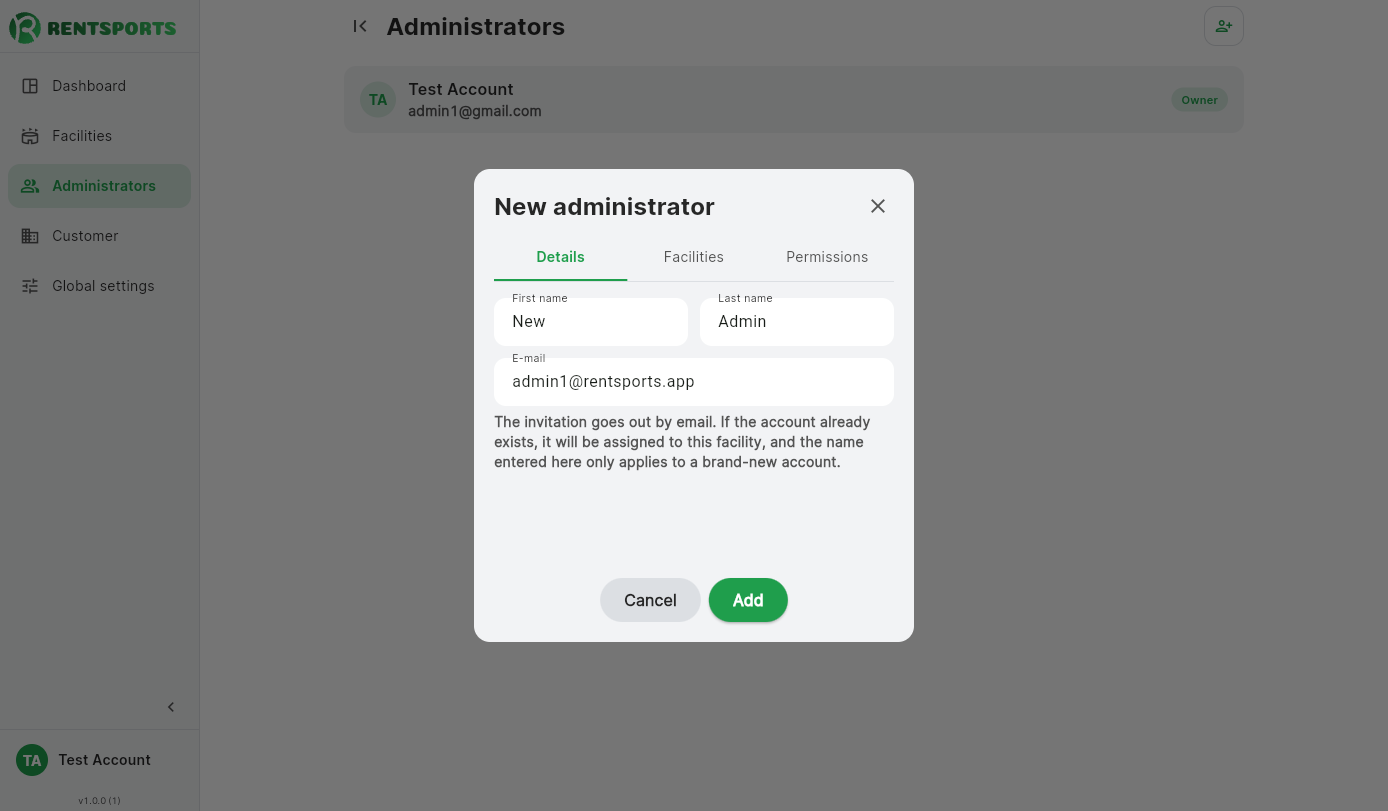
An administrator with access to a venue can see the personal data of customers who book there. Grant access only to people who actually run the venue.
An administrator from another club
You can add someone who already has a RENTSPORTS account, such as the owner of another club. At your venue only the permissions you grant them apply, whatever role they hold elsewhere. It works both ways: restrictions you set do not change their permissions at their own club, and at your venue they cannot go beyond the sections you granted, nor activate, deactivate or delete it.
The Payments and Lock sections protect the PayU keys and the lock password beyond the panel as well: someone without those sections cannot read them by any route. The venue's setup checklist shows an administrator only the steps from sections they have.
Removing an administrator
You remove an administrator with the Delete button in their edit window, after confirming. If their account is also used for something else, because they administer another club or use the customer app, only their access to your venues is taken away and the account stays. An account used only at your venues is deleted entirely. The owner's account cannot be removed this way.
14. Statistics
The system presents summaries in two places: separately for each venue, and collectively across all of a customer's venues.
Venue dashboard
The opening screen of every hall's panel. While the configuration remains incomplete, the checklist described in chapter two sits at the top. Below it are two cards. The Day card gives the booking count and the payment total together with a daily chart, and the Month card gives the same figures plus the average booking value and a revenue-by-month chart. The arrows on each card move the selected period, and under the cards sits a list of upcoming bookings.
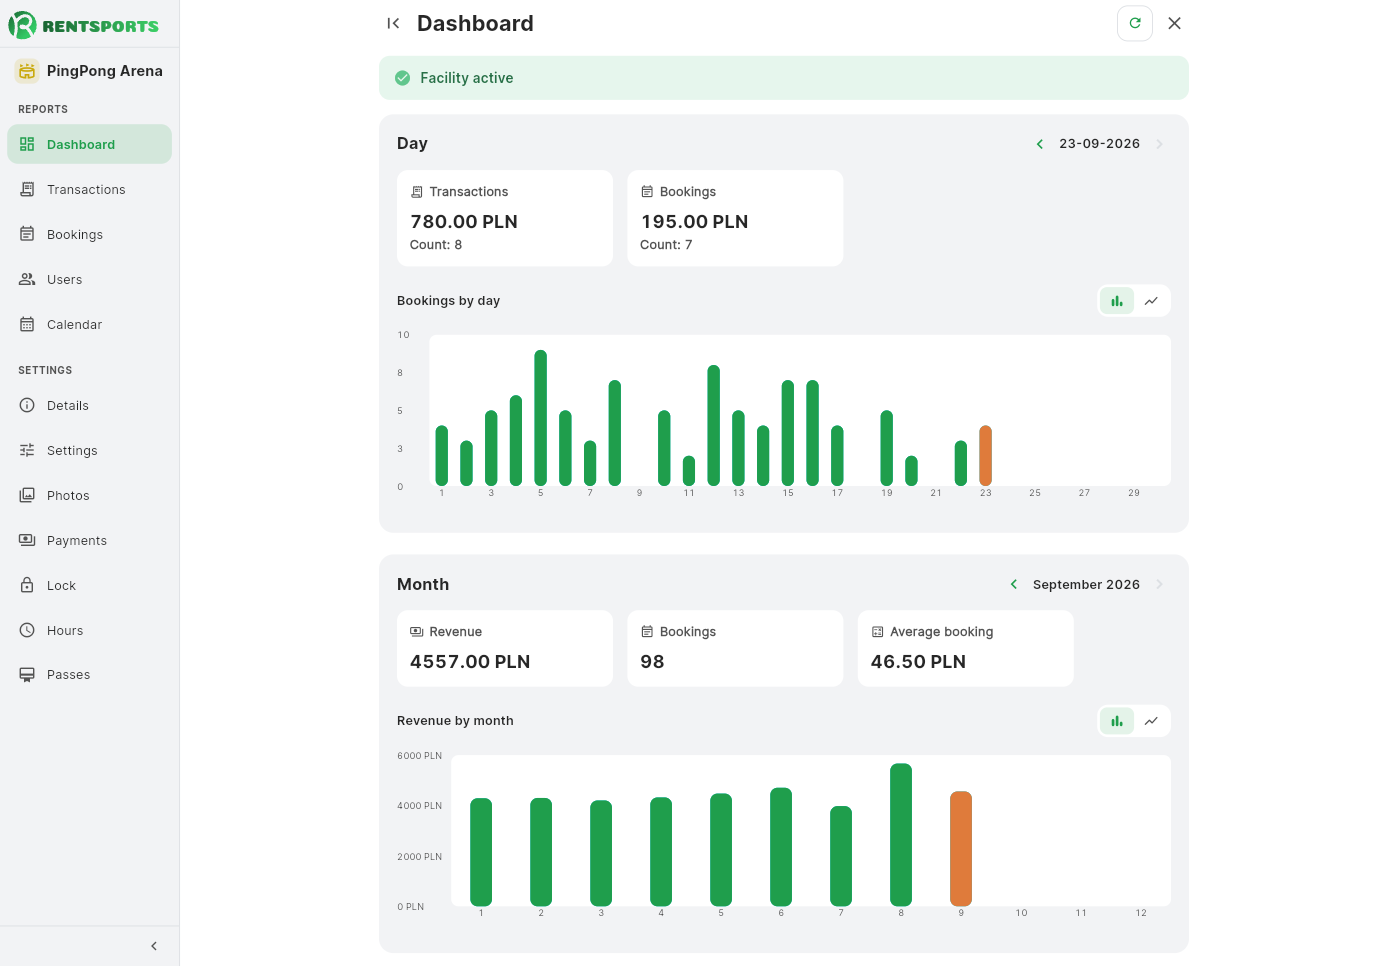
Customer dashboard
A separate Dashboard entry in the owner menu, beside the Venues entry. Rather than the figures for a single hall, it presents a comparison across every venue, each shown in its assigned colour. The legend above the charts ties the colours to the venue names.
A venue whose name has not been filled in does not appear in the combined charts.
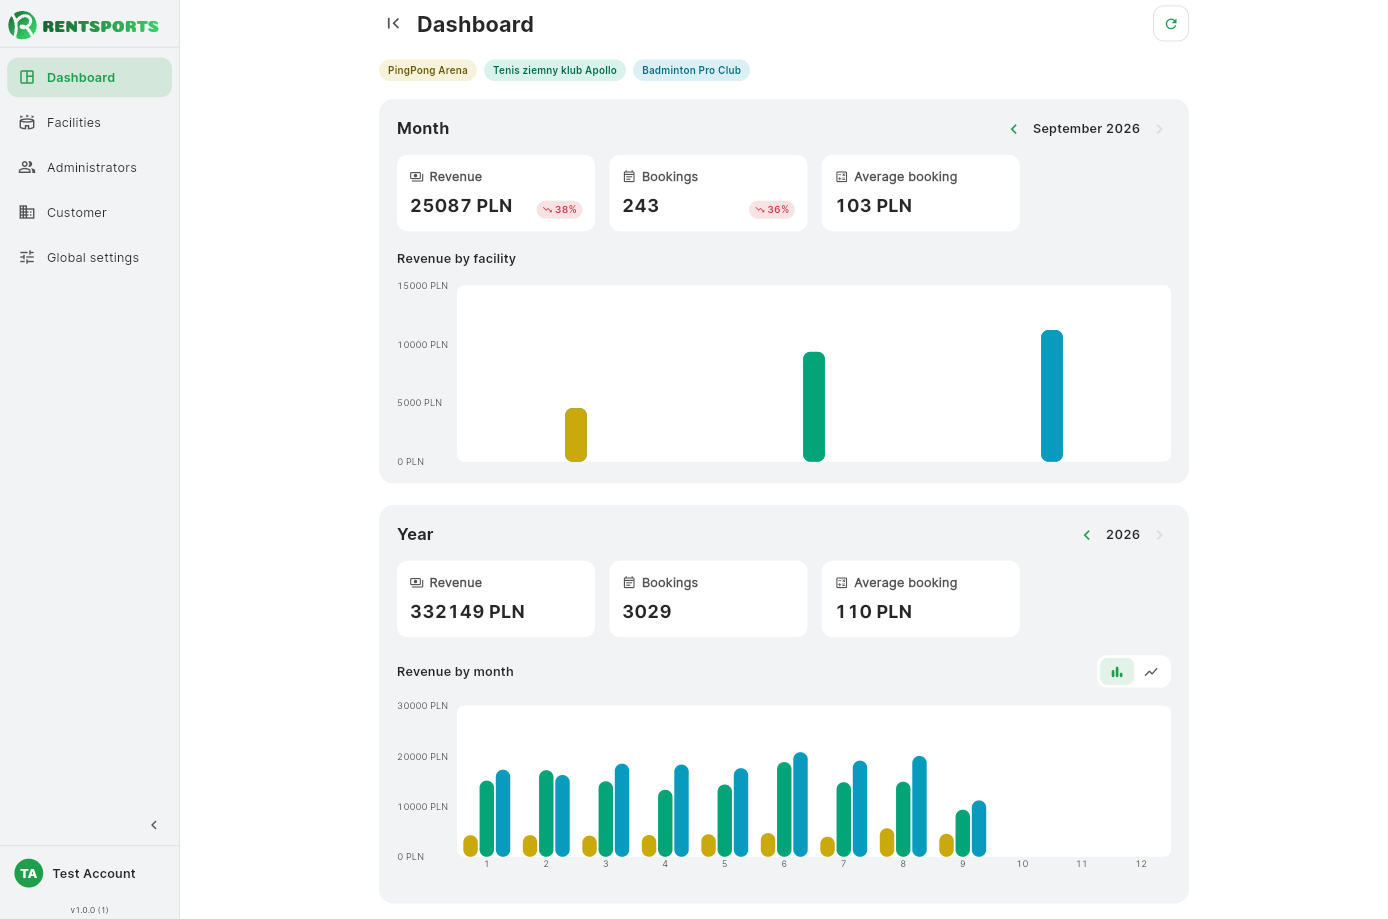
The day card draws on current data, so a booking or payment appears in it immediately. The monthly figures and the charts refresh once a day, overnight, so the current day reaches them the next day. If you need them sooner, use the button that recalculates the statistics from a chosen day.
15. Customer
Only the account owner reaches this section. It holds two tabs: the company details used on invoices, and the state of the subscription.
Customer details
The company's billing details, editable with an Edit/Save button: company name, tax ID or EU VAT number, billing address and time zone. The same details you entered at sign-up in step 2, editable here afterwards.
Deleting the account
At the foot of the Customer details tab, in the danger zone, the owner finds the Delete permanently button. It deletes the whole customer account: every venue with its bookings, transactions, passes, statistics, lock and payment settings and photos. Administrators lose access to the panel.
You confirm the deletion in two ways: by typing the customer's exact name and by entering your password. Until both are there, the button stays disabled.
- The subscription is canceled at once, with no refund for the current, already paid period. If canceling fails, nothing is deleted and you can try again later.
- Invoices for the subscription stay with the payment provider, as the law requires. After the deletion you can no longer sign in to the panel, so download them from Payment history beforehand.
- Customers of the app keep their accounts. Only their link to your venues goes.
- Administrators whose accounts are also used for something else, such as another club or the customer app, keep the account. Other administrator accounts are deleted.
- We send a confirmation of the deletion to the owner's address.
Deleting the account cannot be undone. If you only want to stop paying and keep access to the end of the paid period, choose Cancelling, described below, instead.
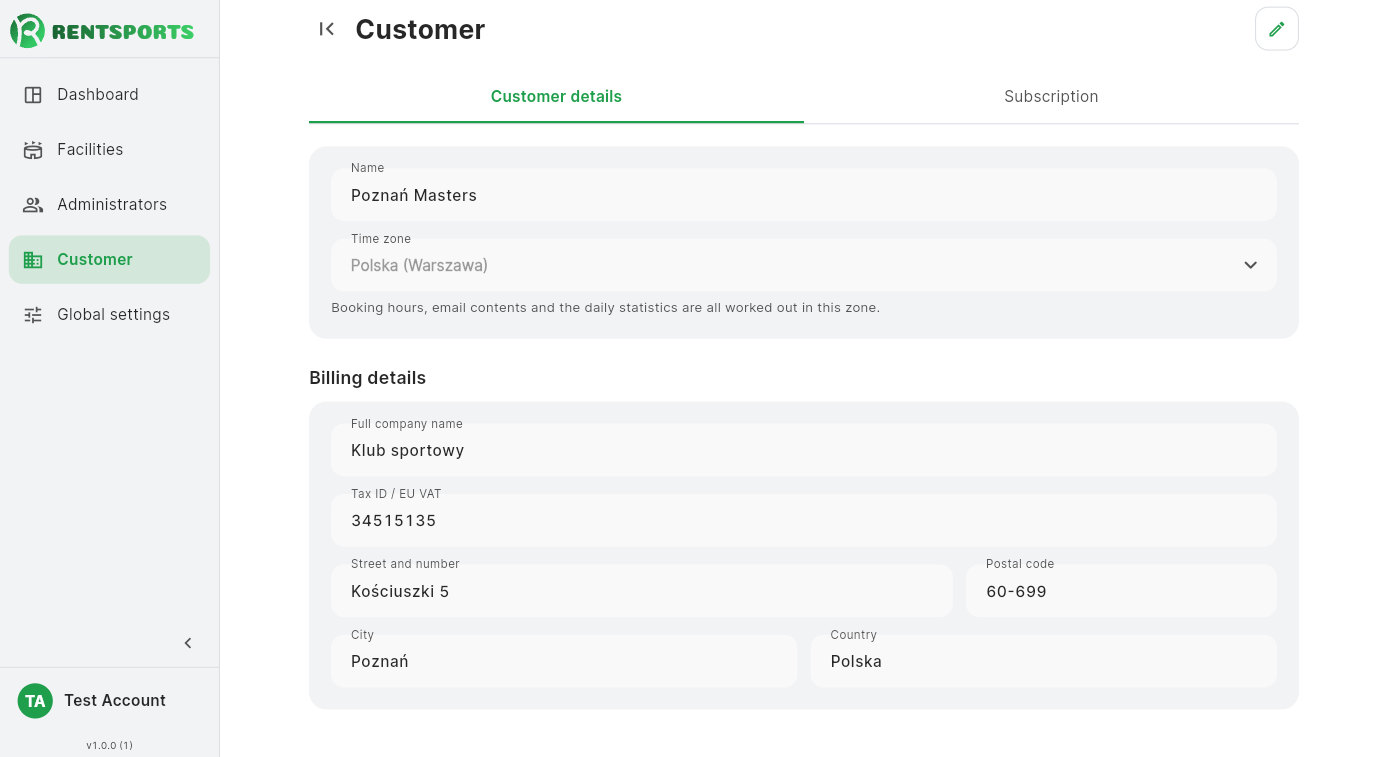
Subscription
This tab stays interactive without switching into edit mode. You change the plan, the number of venues, the number of courts or tables and the billing period directly, and the panel recalculates the amount after every change. The button for changing the plan stays disabled while the selection matches what is already stored.
Private Instance
A Private Instance is a separate version of the customer app, released under your own brand and styled the way you define it: name, logo and colours. It shows your facilities only, and a customer never sees another club in it. We publish it as a separate app in Google Play and the Apple App Store, along with its own subdomain for the browser version, and it carries a one-off implementation fee. SaaS uses the shared RENTSPORTS app, where your facilities sit alongside other clubs'.
Facility visibility
The Show facilities in the RENTSPORTS app switch appears on a Private Instance. Turned on, your facilities also appear in the shared RENTSPORTS app next to other clubs', so they reach its traffic. Turned off, they stay in your own app alone. The switch covers all your facilities at once, not a single one.
Changing the plan
If you already have an active subscription, the change takes effect immediately, the same day, and is prorated against the rest of the period. Moving from SaaS to a Private Instance adds the one-off implementation fee to it. If the subscription was previously canceled, or was never paid for, changing the plan redirects to a new payment and takes effect once it is paid.
You cannot switch from Private Instance back to the SaaS model yourself. That needs support's help.
Payment history
The Payment history button opens our payment provider's page, where you find every subscription charge, the invoices to download and the card the charges are taken from, with the option to change it. The button appears once the subscription has been paid at least once. When you are done you return to the panel.
Yearly billing
Choosing the yearly period takes 10% off the sum of twelve monthly fees.
Cancelling
You cancel in the panel. Access continues to the end of the period already paid for, after which the subscription does not renew.
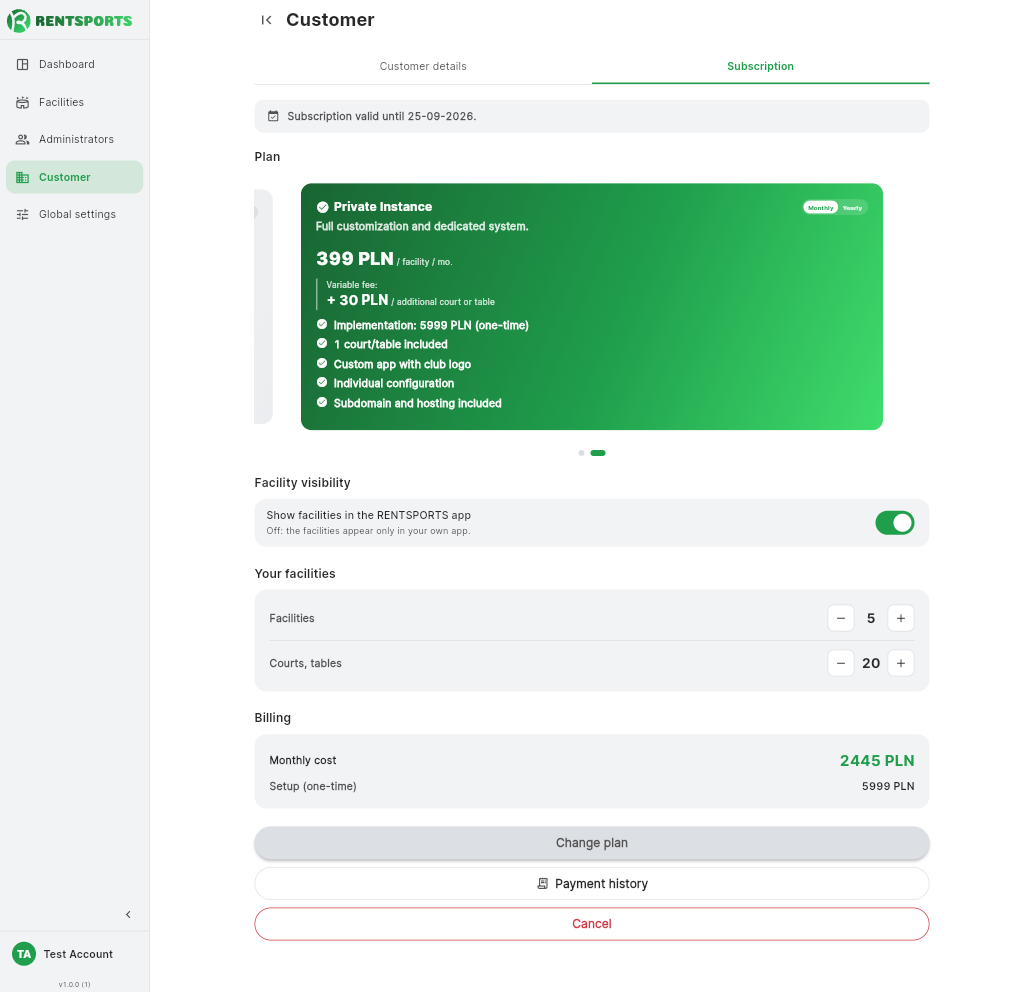
16. Common problems
The four situations you report most often. For each one we say what to check first, before writing to us.
The customer did not get a PIN
Check, in order: whether the payment is marked as paid, whether the WiFi gateway is online, whether the lock is assigned to the venue, and whether the connection test passes. The usual cause is a gateway out of Bluetooth range or no internet at the venue.
A booking disappeared before it was paid for
Once the time to pay expires, 30 minutes by default, the slot returns to the pool of free ones so that it does not stay blocked for other customers. If customers keep running out of time, extend that window on the Settings screen.
A refund never reached the customer
A refund only starts for a cancellation inside the deadline, and only for a booking that was actually paid for. How long it takes to appear depends on the customer's bank, usually a few business days.
I cannot find a section this guide mentions
You are most likely on a venue administrator account while the section belongs to the owner panel. Check with the account owner.
Still stuck? Write to contact@rentsports.app, ideally with the booking or transaction number.
17. Frequently asked questions
Here we answer the questions we are asked most often: about bookings, payments, venue access and billing.
What does the rollout look like: SaaS versus a Private Instance?
On SaaS there is no separate rollout. Your facilities appear in the existing RENTSPORTS app, already published in Google Play and the App Store, so it is hours from configuring a venue to the first booking rather than weeks. A Private Instance is a new app under your own brand, published as a separate listing in Google Play and the Apple App Store. It needs its own deployment and testing, and it has to pass review in both stores, so the whole thing usually takes about a month. Worth allowing for that if the launch has to line up with opening a venue or with a campaign.
How does a customer book a court or a hall?
The customer picks a venue from the list or the map, filters by discipline, chooses a court or table and the hours on an interactive calendar, then pays online. The whole thing happens in the Android, iOS or browser app, with nobody on your side involved.
How does a customer get in with no staff present?
Once payment clears, the system generates a PIN valid for exactly the booked hours and pushes it to the lock through the WiFi gateway. The code expires automatically when the booking ends. You can allow a few minutes' head start so the customer can get in just before it begins.
Which locks are supported?
Any TTLock-standard lock or controller: handle, cylinder or an electric strike controller. You also need a TTLock G2 or G3 WiFi gateway, placed within Bluetooth range of the lock, roughly 5 to 10 metres.
How do payments work and where does the money go?
The customer pays online through PayU, by card or Google Pay. The money lands directly in your own gateway account; we neither intermediate nor hold it. The system records the payment and sends the confirmation by itself.
What happens when a booking is cancelled?
A cancellation inside the deadline you set triggers an automatic PayU refund, with no involvement from you. The default deadline is 24 hours before the start, and you can set anything from zero, meaning cancellation right up to the start, to seven days ahead.
Does the system handle passes and subscriptions?
Yes. You sell passes by entry count or by period. You set the price, the scope and the validity separately for each venue, and the customer sees the state of their pass in the app.
Which disciplines does the system support?
The catalogue covers table tennis, tennis, badminton, squash, padel and pickleball. Any other discipline you add yourself, with your own name, icon and colour, so the system is not limited to racket sports.
Can I run several venues from one account?
Yes. One account runs many venues, and each administrator gets access only to selected halls and selected panel sections. The owner sees the statistics and billing for the whole company; a venue administrator works on their own schedule.
What does the system cost and how do I pay?
The SaaS Model is 299 PLN per hall per month; a dedicated instance is 399 PLN plus a one-time 5999 PLN setup. Add 30 PLN for each extra court or table, as one is included. You pay through Stripe, and paying yearly takes 10% off.
How long does launch take and what do I need to start?
You create the account yourself in the panel and configure the venue straight away. You need a TTLock lock, a WiFi gateway, an active PayU business account and a permanent connection at the venue. The connection test in the panel confirms the lock and payment setup.